
Water pooling on your kitchen floor or collecting under your crisper drawers is a frustrating hassle, but it rarely means you need to replace your entire appliance. Most refrigerator water leaks stem from simple maintenance issues like a clogged defrost drain or a loose water line connection. In this guide, you will learn how to identify where the water is coming from and fix the problem quickly before it damages your flooring or cabinetry.
Before performing any hands-on troubleshooting or removing panel covers, safety must come first. Always unplug your refrigerator from the wall outlet and shut off the dedicated water supply valve behind or under the unit. If you ever encounter electrical issues or cooling problems involving the sealed refrigeration system, stop immediately and consult an experienced technician.
| Leak Symptom | Likely Cause | Difficulty Level | Quick Solution |
|---|---|---|---|
| Water pooling under crisper drawers | Clogged defrost drain line | Easy DIY | Flush drain tube with warm water and baking soda |
| Water pooling under the front of fridge | Leveling issues or full drain pan | Easy DIY | Adjust front leveling legs or clean drain pan |
| Water dripping behind the refrigerator | Loose or cracked water line | Moderate DIY | Tighten fitting or replace plastic tubing |
| Water leaking inside near top shelf | Frozen water supply tube | Easy DIY | Thaw inlet line with warm air or defrost cycle |
| Puddles forming near door base | Damaged or dirty door gasket | Easy DIY | Clean rubber seal or adjust door alignment |
Clear a Clogged Defrost Drain Line
A clogged defrost drain is the single most common reason water pools under your crisper drawers or spills onto the floor. During normal operation, your refrigerator runs automatic defrost cycles to melt frost off the evaporator coils. That melted frost is supposed to drain down a small tube into a pan beneath the appliance where it safely evaporates. When food particles, ice build-up, or debris block that small opening, the defrost water has nowhere to go except into the bottom of the fresh food compartment.
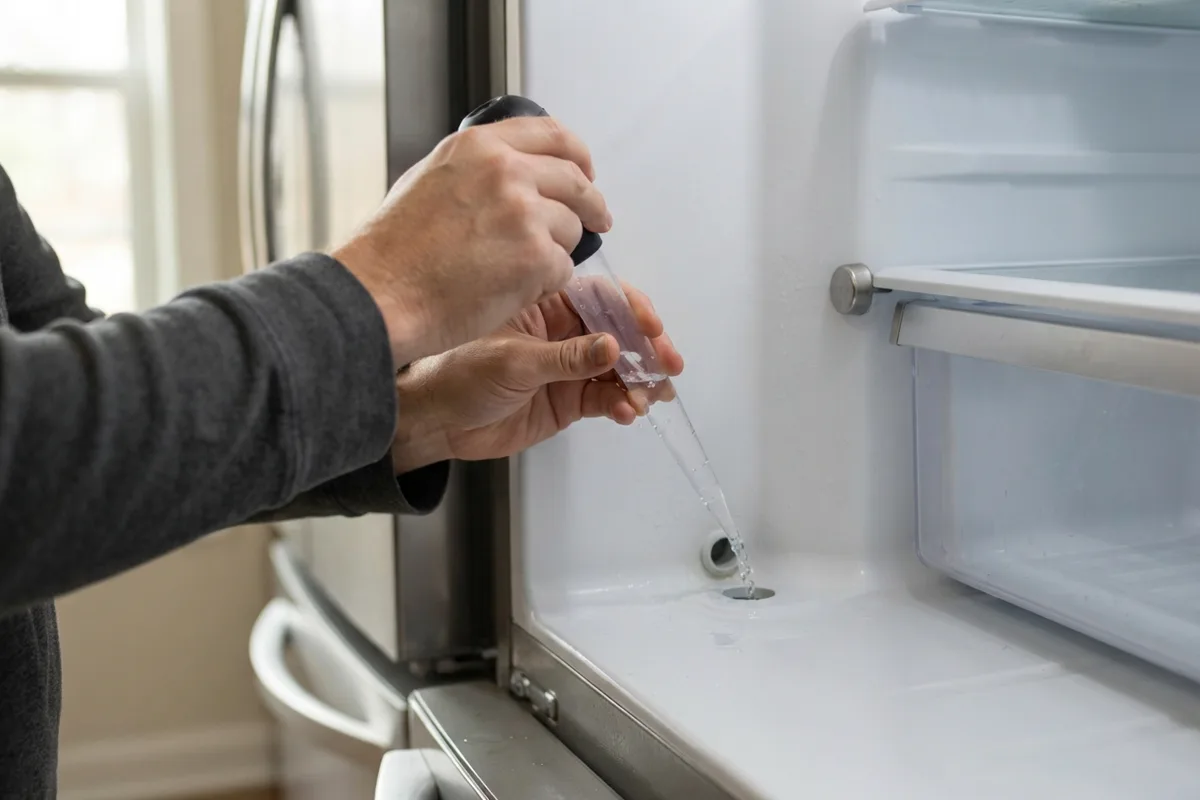
To fix a clogged defrost drain, start by disconnecting the power cord. Locate the drain hole, which is typically found along the back wall inside the freezer or behind the lower crisper drawers in the fresh food section. If ice is blocking the hole, use a turkey baster filled with warm water to melt the blockage gradually. You can also flush the tube with a solution of one teaspoon of baking soda mixed into two cups of warm water to clear mold and lingering organic matter. Avoid using sharp tools like knives or ice picks, which can puncture the plastic liner or damage internal cooling lines. For more tips on managing ice build-up, check out our guide on how to defrost a freezer fast.
Level Your Refrigerator Front to Back
Refrigerators are engineered to tilt slightly backward so that cooling condensation naturally flows toward the rear drain hole rather than pooling inside the cabinet. If your appliance is leaning forward or isn't level side-to-side, water from the defrost system can miss the drain channel entirely and leak out through the front doors or onto your kitchen floor.
 To check your alignment, place a small bubble level on top of the refrigerator cabinet (not the doors). Ideally, the front of the unit should sit approximately 1/4 inch to 1/2 inch higher than the back. To adjust the height, unplug the appliance and carefully pull off the lower front toe grille or kick plate. Locate the leveling legs or adjustable rollers on each corner. Using a flathead screwdriver or adjustable wrench, turn the legs clockwise to raise the front or counterclockwise to lower it. Once adjusted, open the refrigerator doors halfway; if the alignment is correct, the doors should gently swing shut on their own under their own weight.
Unclog or Replace the Water Inlet Valve
If you notice fresh water pooling behind the refrigerator or running down the back wall, the issue often involves the water supply system that feeds your ice maker and door dispenser. The water inlet valve, located near the bottom rear cover plate, controls the flow of household water into your appliance. Over time, plastic fittings can crack, internal seals can degrade, or sediment can clog the valve's inlet screen, causing slow drips that collect beneath the appliance.
Shut off the water supply valve connected to your home plumbing line and unplug the power cord before inspecting this area. Pull the refrigerator away from the wall to access the lower rear panel. Remove the retaining screws to expose the water inlet valve. Inspect the plastic lines connected to the valve for drips, hairline cracks, or loose compression nuts. If the tubing is secure but the valve housing itself shows mineral buildup or dampness, the valve assembly should be replaced. You can review general troubleshooting steps in our master article on how to fix a refrigerator to evaluate components before purchasing replacement parts.
Empty and Clean the Condensate Drain Pan
Underneath your refrigerator sits a plastic drain pan designed to catch the water that drains out during defrost cycles. Under normal home conditions, the heat generated by the compressor and condenser coils evaporates this water long before the pan overflows. However, high indoor humidity during summer months or a sudden surge of melted frost can overwhelm the pan, leading to unexpected puddles on your floor.
Disconnect the refrigerator from electrical power and remove the lower front grille or access panel at the back. Locate the plastic drip pan resting on or near the floor frame. Carefully slide or unclip the pan to inspect it. Look for hairline cracks or deep cracks in the plastic mold that might allow water to seep out before evaporating. Wash the pan thoroughly with dish soap and warm water to eliminate algae, bacteria, or dirt buildup that can create unpleasant odors. Allow the pan to dry completely before sliding it back into position.
Check Ice Maker Water Line Connections
A leaking ice maker line can cause hidden water accumulation that damages subflooring and cabinets long before you notice water spreading across the kitchen floor. Plastic and copper water lines that run from your wall valve to the back of the refrigerator can deteriorate, kink, or loosen due to vibration over several years of operation.
Turn off the water supply valve immediately if you suspect an ice maker line leak. Inspect the entire length of the tubing running from the wall shut-off valve to the back inlet connection on the refrigerator. Look for small pinhole leaks, crushed sections, or moisture around the compression fittings. If you find a damp connection, use two open-ended wrenches to gently tighten the compression nut—one wrench to hold the valve steady and the second to turn the nut. If the plastic tubing appears brittle, discolored, or cracked, cut away the damaged section or install a fresh braided stainless steel water line, which offers superior durability against bursts and kinks.
Inspect the Door Gasket Seal for Gaps
A damaged, dirty, or misaligned door gasket allows warm, moist room air to enter the cool interior of your refrigerator continuously. When that warm air hits the cold evaporator coils and cold shelving, it condenses rapidly into water droplets. This excessive condensation can run down the interior walls, saturate your crisper drawers, and eventually leak past the bottom door seal onto your floor.
Inspect the flexible rubber gasket around the entire perimeter of both the refrigerator and freezer doors. Check for tears, cracks, hardened sections, or trapped food crumbs that prevent a tight magnetic seal. Clean the gasket thoroughly using warm water, mild soap, and a microfiber cloth. To test the seal, insert a dollar bill between the door gasket and the cabinet frame, then close the door. Pull the bill gently; if it slides out easily without resistance, your gasket is not sealing properly. You can often restore flexibility to misshapen rubber by carefully warming the seal with a hair dryer on low heat while massaging it outward into place.
When to Call a Pro
While unclogging a drain tube or adjusting leveling legs are straightforward DIY projects, some refrigerator water leaks require professional expertise. If water continues to leak after you have cleared the drain and verified your water line connections, the problem may involve a damaged internal drain trough, a failed defrost heater, or an internal ice maker module failure. Furthermore, any work that involves electrical wiring, sealed refrigerant tubing, or complex plumbing should always be handled by a professional technician.
Typical professional repair costs for fixing a refrigerator leak generally range from $120 to $300, depending on your area, refrigerator model, and whether replacement parts like an inlet valve or internal drain assembly are needed. If you prefer not to handle messy line flushes or structural component replacements yourself, True Appliance Repair can quickly match you with a local appliance pro who can pinpoint and repair the leak safely.
FAQ
Is a leaking refrigerator dangerous?
Yes, a leaking refrigerator can pose immediate safety hazards. Water pooling around an electrical appliance creates a risk of electric shock or short circuits if it reaches internal wiring. Additionally, standing water can warp hardwood flooring, ruin subfloors, promote mold growth, and create a slipping hazard in your kitchen.
Why is water collecting under my crisper drawers?
Water collects beneath crisper drawers when the defrost drain tube at the back of the compartment becomes clogged with ice, dust, or food debris. During the defrost cycle, the melted frost cannot flow down the drain line to the evaporating pan, forcing the excess water to flow forward and pool at the lowest point inside the fresh food cabinet.
How much does it cost to fix a leaking refrigerator?
DIY fixes like flushing a clogged drain or leveling the unit cost almost nothing beyond basic household items. If a technician needs to replace a water inlet valve, drain pan, or internal tub line, professional repairs usually cost between $120 and $300, though exact pricing varies by area, appliance brand, and labor rates.
How often should I clean my refrigerator drain line?
It is a good idea to inspect and clean your refrigerator drain line at least once every six to twelve months. Regular maintenance prevents organic slime, dust, and ice from restricting water flow, keeping your appliance operating smoothly and leak-free year-round.