
When you turn a stove knob before dinner and hear endless clicking—or total silence—instead of a clean blue flame, a stalled gas stove burner can derail your whole evening. Fortunately, most ignition failures come down to simple surface issues like trapped moisture, misaligned caps, or cooked-on grease that you can safely fix in under twenty minutes. Follow these six step-by-step checks to restore reliable ignition without guessing or risking gas hazards.
1. Check for Gas Odor and Verify Power First
Before touching any burner parts, make sure you are dealing with an ignition problem rather than a gas leak or power loss. Most modern gas ranges still rely on standard 120-volt electricity to fire the spark igniters.
- Confirm all stove knobs are turned completely to the Off position.
- Sniff around the cooktop and behind the range; if you smell rotten eggs or hear hissing, do not touch switches or flames—open a door, step outside, and call your gas utility immediately.
- If there is no gas odor, check whether the range clock or display is lit.
- Inspect the wall outlet behind the stove and your home breaker panel for a tripped breaker or GFCI outlet, especially after storms or outages—our post-outage appliance safety checklist walks through safe reset steps.
- Verify the gas shutoff valve behind the stove is parallel to the pipe (open) rather than perpendicular (closed).
2. Realign the Burner Cap and Base
A burner cap that sits even a fraction of an inch off-center breaks the air-and-gas mixture path so the spark cannot reach incoming fuel. This happens often right after wiping down the stovetop or sliding heavy cookware across the grates.
- Turn all knobs off and wait until the grates and caps are completely cool to the touch.
- Lift off the cast iron grate over the stubborn burner and set it on a towel.
- Remove the flat black burner cap and inspect the underside for notches, pins, or ridges designed to lock onto the silver burner head.
- Check the burner head itself—some models lift straight off and can shift out of alignment during cleaning.
- Seat the burner head squarely, then set the cap flush on top so it does not wobble when you tap the edge with a fingertip.
- Replace the grate and test the knob briefly to see if a clean ring of blue flame catches.
3. Dry Out a Wet Spark Igniter
Boil-overs from pasta pots, soups, or heavy spray cleaners frequently soak the white ceramic spark electrode beside the burner head. Because water conducts electricity away from the tip, a damp igniter will either stop sparking or click weakly without lighting the gas.
- Switch off the range at the circuit breaker or unplug the power cord before cleaning around electrical igniter tips.
- Lift off the grate and burner cap to expose the small white ceramic post next to the burner head.
- Blot standing liquid out of the burner pan and around the base of the ceramic electrode with a dry paper towel.
- Let the area air-dry for at least 30 minutes, or aim a hair dryer on a cool or low setting at the igniter and burner base for two to three minutes.
- Reassemble the cap and grate, restore power, and test ignition again.
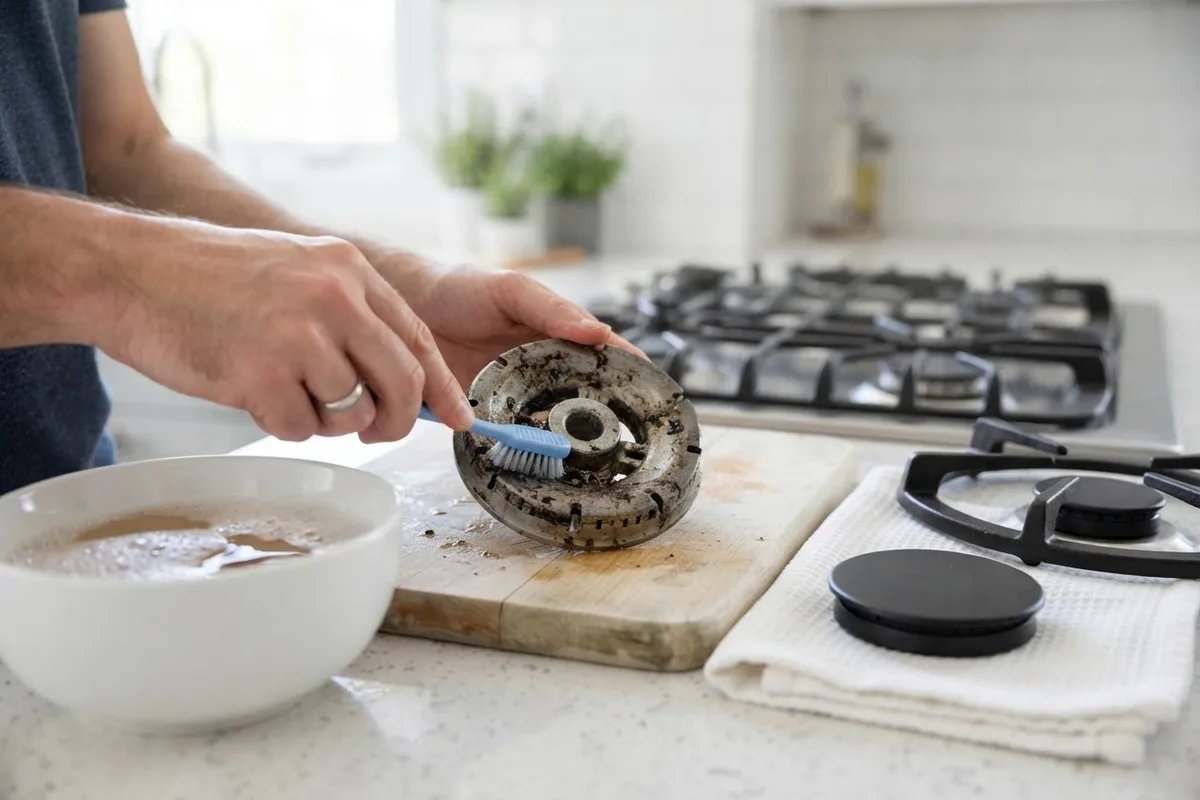
4. Unclog Blocked Burner Ports and Slots
Even a thin crust of boiled-over gravy or grease inside the tiny flame ports can starve the igniter of gas. Clearing these channels restores steady gas flow right where the spark jumps.
- Confirm the stove is cool, knobs are off, and power is unplugged or switched off at the breaker.
- Remove the grate, burner cap, and detachable burner head (skip removing the base if yours is screwed down).
- Soak the cap and removable burner head in warm water with mild dish soap for 15 to 20 minutes to soften baked-on residue.
- Gently scrub the notched flame ports around the rim using a soft nylon toothbrush.
- For stubborn clogs inside individual slots, carefully clear debris with a straightened metal paperclip—avoid wooden toothpicks that can snap off inside the ports, and never poke downward into the tiny brass gas orifice recessed in the center cavity.
- Rinse thoroughly, dry every piece completely with a clean towel, let them air-dry for 20 minutes, and reassemble.
5. Clean Grease Off the Igniter Electrode
Baked-on splatter coating the ceramic igniter post or its tiny metal tip acts like insulation, weakening or deflecting the spark before it can jump to the burner head. A quick targeted wipe often brings a sluggish burner right back to life.
- Keep the range unplugged or shut off at the breaker before touching the electrode.
- Remove the grate and burner cap so you have a clear view of the ceramic igniter post.
- Dampen a cotton swab with rubbing alcohol and gently wipe the metal tip and surrounding ceramic body to dissolve sticky cooking oil.
- Use a dry soft toothbrush to brush away any remaining charred flecks near the base where the spark arcs across to the burner head.
- Inspect the white ceramic body closely with a flashlight for hairline cracks or chips—a cracked ceramic sleeve lets the spark ground out below the cooktop instead of firing at the tip.
- Once the alcohol evaporates completely (about five minutes), reassemble the burner, restore power, and test.
6. Inspect the Spark Pattern and Switch Health
If the burner is clean, dry, and aligned yet still refuses to ignite, observing the spark behavior tells you whether the fault is local to one burner or shared across the cooktop. Always keep your hands clear of the metal tip whenever power is on.
- Turn off the kitchen lights briefly so you can clearly see the spark.
- Turn the problem burner knob to the Lite position for two seconds only, then immediately turn it back to Off.
- Watch the tip: a healthy igniter sends a bright blue-white spark to the burner head, while a weak orange spark signals a worn electrode or failing module.
- Compare the other burners—if they spark normally while the problem knob stays silent, that burner's rotary switch behind the control panel is likely worn out.
- If none of the burners click at all despite confirmed electrical power, the central spark module or wiring harness needs professional testing.
Quick Gas Burner Symptom Chart
Use this quick reference to match what you see and hear with the most likely cause and next step.
| What You Notice | Likely Cause | Safe Next Step |
|---|---|---|
| Clicks loudly, no flame on one burner | Misaligned cap, clogged ports, or dirty igniter | Clean ports, dry electrode, and reseat cap |
| Weak orange spark or spark jumps below cap | Cracked ceramic electrode or grease buildup | Wipe with alcohol; replace cracked igniter via pro |
| No clicking on one knob; other burners work | Faulty burner ignition switch or loose wire | Stop DIY; schedule an appliance technician |
| No clicking on any burner; clock is off | Tripped breaker, GFCI, or unplugged cord | Reset breaker or check power cord connection |
| No clicking on any burner; clock is on | Failed spark module or damaged wiring | Shut off power and call a repair pro |
When to Call a Pro
Stop DIY troubleshooting and shut off the gas supply valve behind the stove if you smell persistent gas, see a cracked ceramic igniter, find that none of the igniters spark with power confirmed, or suspect a failed ignition switch, spark module, or gas valve. Opening the cooktop chassis involves live 120-volt wiring and pressurized gas fittings that should only be serviced by an experienced technician.
In the US, having a pro replace a spark igniter electrode, burner switch, or spark module typically runs between $130 and $350 depending on parts and labor, though final pricing varies by area and range model. You can review typical oven and range repair costs before deciding how to budget for the visit. When you need hands-on help, True Appliance Repair can match you with local oven and stove repair specialists who work on residential gas ranges.
FAQ
Is it safe to light a gas stove burner with a match?
As a short-term workaround during a power outage, some manufacturers allow lighting top surface burners with a long fireplace match—light the match first, hold it beside the burner head, then slowly turn the knob to Lite. Never attempt to light a gas oven cavity with a match, and never keep relying on manual lighting if a burner smells strongly of gas or fails to stay lit cleanly.
Why does my gas stove click, but only one burner won't light?
When you hear normal clicking, the spark system is receiving power, which narrows the problem down to that single burner. The most common culprits are a slightly crooked burner cap, food debris blocking the small flame ports right next to the electrode, or moisture trapped after a spill.
How much does it cost to fix a gas stove igniter?
Professional replacement of a surface burner igniter or spark module typically costs $130 to $350 in the US, including diagnosis, parts, and labor. Exact prices vary by area, range brand, and whether sealed burner screws have seized from heat and need extra labor to remove.
Can a tripped breaker stop a gas stove burner from lighting?
Yes. Although your cooktop burns natural gas or propane for heat, the electronic spark ignition system runs on household electricity. If the range's dedicated circuit breaker or outlet trips, the knobs will stop clicking until power is safely restored.