
You turn the burner knob or press the touch panel, expecting the smooth ceramic surface to glow red, but your glass cooktop stays completely cold. When mealtime is approaching, a sudden cooktop failure can throw your entire routine off track. Fortunately, a cold surface doesn't always signal the end of your appliance.
Before you shop for an expensive replacement, several simple electrical and mechanical components can cause a smooth range to stop warming up. Follow this practical troubleshooting guide to pinpoint why your glass cooktop is not heating and get your kitchen running safely again.
1. Deactivate the Control Lockout Feature
Modern radiant and smooth-top stoves include a safety lockout feature—often labeled "Control Lock," "Child Lock," or a small padlock icon. This setting disables the heating elements and touch controls to prevent accidental activation. Many homeowners trigger this feature by accident when wiping spills off the glass surface or leaning against the front panel.
- Check the display panel: Look for an illuminated padlock icon or a small indicator light next to the lock button.
- Identify the unlock command: On most models, the lockout is cleared by pressing and holding the "Control Lock" button (or the "Cancel/Clear" pad) for a full three to five seconds.
- Listen for the chime: You should hear a distinct beep, and the lock light will turn off.
- Test the burner: Turn on a surface element to confirm the panel now sends power to the radiant coil.
If the touchpad beeps continuously or remains unresponsive even after holding the button, clear the electronic memory by turning off power at the circuit breaker for five minutes before turning it back on.
2. Reset the Dedicated 240V Circuit Breaker
Electric stoves and cooktops rely on a dedicated 240-volt electrical circuit powered by a double-pole breaker in your main electrical panel. This setup actually combines two separate 120-volt legs. If only one leg of the breaker trips, your stove's digital clock, display lights, and timer will remain brightly lit, giving the illusion of full power while the heavy-draw heating elements receive zero electricity.
- Locate your home breaker panel: Find the switch labeled "Range," "Stove," or "Cooktop," which consists of two joined breaker handles.
- Inspect the handle position: Look closely to see if the toggle switch is resting in a middle or "tripped" position rather than fully locked to "ON."
- Perform a firm mechanical reset: Push the double-pole switch firmly all the way to the "OFF" position until you feel and hear a sharp snap. Wait roughly 30 seconds, then push it firmly back to the "ON" position.
- Verify voltage delivery: Return to the kitchen and test the cooktop surface.
If the breaker immediately trips again the moment you activate a burner, stop immediately. Repeated tripping points to a direct short circuit in the internal wiring or radiant ribbon, which requires inspection from a professional technician.
3. Test the Radiant Burner Element for Continuity
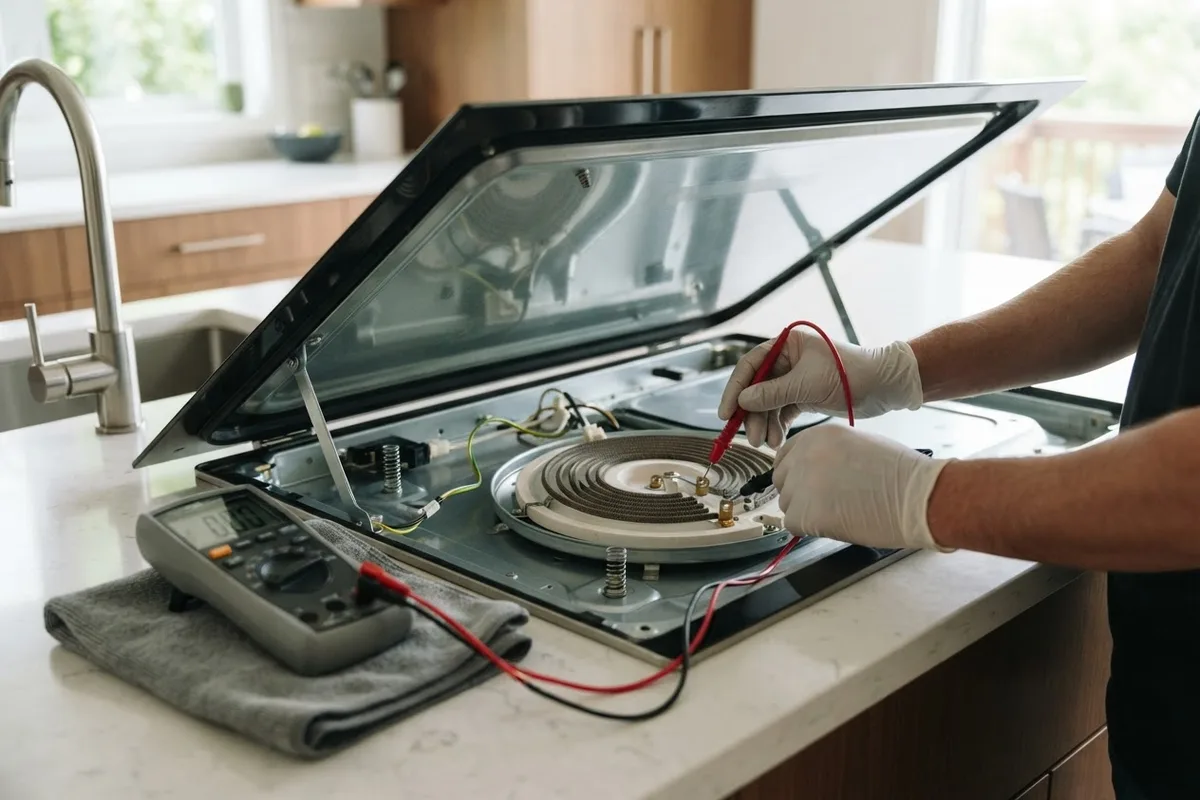
Underneath the smooth ceramic glass sits a series of radiant heating units made from coiled metal ribbon housed inside an insulated ceramic dish. Over thousands of heating cycles, these ribbons expand and contract. Eventually, the ribbon can burn through or snap, breaking the electrical path and leaving that specific burner completely dead while others work normally.
- Disconnect all electrical power: Flip the dedicated cooktop breaker to "OFF" before touching any tools or lifting the range.
- Access the internal assembly: For standalone cooktops, loosen the mounting brackets beneath the counter. For freestanding slide-in ranges, remove the front burner control knobs and release the mounting screws under the glass frame edge to tilt the glass surface upward.
- Perform a visual check: Inspect the failed element. A damaged radiant ribbon often reveals a distinct black scorch mark or an obvious physical break in the metal coil.
- Test with a digital multimeter: Set your multimeter to the lowest ohms (Ω) setting. Disconnect the wire leads from the element terminals and place a probe on each terminal.
- Evaluate the reading: A working radiant burner generally reads between 20 and 50 ohms of resistance, depending on size. If your meter reads "OL" (open loop) or infinite resistance, the ribbon is broken and the entire radiant element assembly must be replaced.
4. Check for a Burned Infinite Switch
If your stove uses rotary control knobs rather than a digital touch glass display, each burner is controlled by an individual infinite switch mounted behind the front console. This switch functions like an internal thermostat, rapidly cycling power on and off to maintain your chosen heat setting. Over time, electrical arcing can burn out the switch contacts or melt internal plastic gears.
- Check the symptoms: A bad infinite switch frequently causes a burner to produce no heat at all, or causes the element to get stuck on scorching maximum heat regardless of dial setting.
- Cut the power: Switch off the range breaker at your main panel before disassembling the console.
- Inspect the switch body: Remove the rear access panel or front knob housing to view the back of the switch. Look for burned plastic, melted wire insulation, or loose spade terminals.
- Check for continuity across contacts: Using your multimeter, test the "L1 to H1" and "L2 to H2" terminal sets with the switch turned on. If the switch fails to show continuity when rotated past the "OFF" position, replace the infinite switch.
Replacement switches are model-specific and generally cost between $35 and $85 for the part alone, making this a cost-effective DIY repair compared to buying a new appliance.
5. Inspect the Thermal Limiter and Terminal Wiring
Ceramic glass can shatter if exposed to extreme, uncontrolled temperatures. To prevent this, every radiant burner assembly includes an integrated thermal limiter—a long metal probe extending across the coil. The limiter acts as a safety thermostat: if the burner exceeds safe temperatures, it temporarily cuts electrical current until the glass cools down.
If this limiter fails in an open state, power can never reach the heating element ribbon. Additionally, high heat inside the cooktop housing can cause terminal spade connectors to loosen and oxidize, causing voltage drops.
- Verify power is disconnected: Ensure the cooktop breaker remains off.
- Examine the limiter terminals: Locate the two small sensor terminals at the edge of the circular burner housing.
- Test limiter continuity: Touch your multimeter leads to the thermal limiter contacts. At room temperature, the limiter switch should read near zero ohms (closed circuit). If it reads open loop ("OL"), the safety switch is broken.
- Inspect wire harnesses: Look for blackened, brittle wire ends. If you smell burned insulation or notice compromised wiring, read our troubleshooting tips on what to do when an oven smells like burning plastic to evaluate internal wire damage.
Because the limiter is calibrated directly to the heating coil, manufacturers usually supply it as a single complete radiant element assembly rather than a standalone piece.
| Failure Symptom | Most Likely Cause | Primary DIY Check | Difficulty Level |
|---|---|---|---|
| All burners cold; lights off | Tripped 240V breaker | Inspect and reset double-pole breaker | Easy |
| All burners cold; lights on | Control lock active / relay board | Hold lock button 3–5 seconds | Easy |
| One burner cold; others work | Broken radiant element ribbon | Multimeter continuity test across coil | Moderate |
| Burner stays cold or sticks on high | Faulty infinite switch | Inspect switch contacts for scorching | Moderate |
| Burner shuts off after seconds | Bad thermal limiter sensor | Multimeter resistance check on limiter | Moderate |
When to Call a Pro
While swapping an individual radiant burner or resetting a tripped breaker is well within reach for most DIY homeowners, certain electrical faults require specialized tools and training. If you notice signs of melted main wiring harnesses, damaged terminal blocks where your home's 240-volt conduit connects, or a fractured glass top, do not attempt to operate the appliance.
Working with high-voltage household circuits carries serious shock hazards. Always stop and call a pro whenever you encounter scorched electrical junction boxes, intermittent power across the entire unit, or complex electronic relay board failures. If hands-on electrical testing feels outside your comfort zone, True Appliance Repair can match you with an independent local technician who specializes in oven and cooktop repairs.
Professional repairs for radiant cooktops typically range from $150 to $375, including parts and labor, though costs vary by area and model. If your glass top is cracked alongside the heating failure, replacement costs can climb higher, making an evaluation by an experienced technician the smartest first step.
Frequently Asked Questions
Can one burner burn out on a glass cooktop while the others still work?
Yes, this is the most common failure on glass cooktops. Each radiant burner operates on an independent circuit with its own heating ribbon, thermal limiter, and control switch. If one element burns out or its switch fails, the remaining burners will continue to heat and cycle normally.
Why does my glass cooktop burner turn on and off while I am cooking?
This cycling is normal operation for radiant electric cooktops. The internal infinite switch and thermal limiter pulse power to the element in intervals to maintain your desired cooking temperature and protect the glass ceramic surface from overheating. However, if the element cycles off after only a few seconds and never gets hot enough to boil water, the thermal limiter or infinite switch is likely failing.
How do I know if the problem is my switch or the burner element?
A multimeter test will quickly give you the answer. With power disconnected, test the burner element terminals for continuity. If the element shows between 20 and 50 ohms of resistance, the ribbon is intact and the problem almost certainly lies with the infinite switch or electronic relay board failing to send voltage.
Can you replace just the heating element under a glass stove top?
Yes, radiant surface elements are designed to be replaced individually. You do not need to replace the entire glass cooktop assembly if only a single burner stops heating. As long as the ceramic glass itself is smooth and crack-free, you can unmount the individual burner housing from underneath and install an identical replacement part.