
Opening the fridge only to find a puddle under your crisper drawers is frustrating—especially right before holiday grocery shopping fills every shelf. When a refrigerator is leaking water inside, the culprit is usually a simple maintenance issue like a blocked drain, tilted cabinet, or worn door seal rather than a broken compressor. Follow these six safe DIY checks to pinpoint the drip, clear the blockage, and keep your food fresh.
| Where Water Appears | Most Likely Cause | First DIY Check |
|---|---|---|
| Under crisper drawers | Clogged defrost drain tube | Flush drain hole with warm water |
| Dripping from top shelf | Loose water filter or fill tube | Inspect filter O-rings and ice chute |
| Beads along inner walls | Dirty gasket or humid air | Wipe door seal and run dollar-bill test |
| Pooling near front doors | Fridge tilted slightly forward | Level front legs higher than rear |
1. Clear a Clogged Defrost Drain Tube
During normal defrost cycles, frost melts off the freezer's evaporator coils and flows down a small drain hole into a pan underneath the appliance. When food crumbs, sticky spills, or solid ice clog that tube, meltwater backs up and pools right under your bottom crisper drawers.
- Unplug the refrigerator from the wall outlet before removing panels or working near interior components.
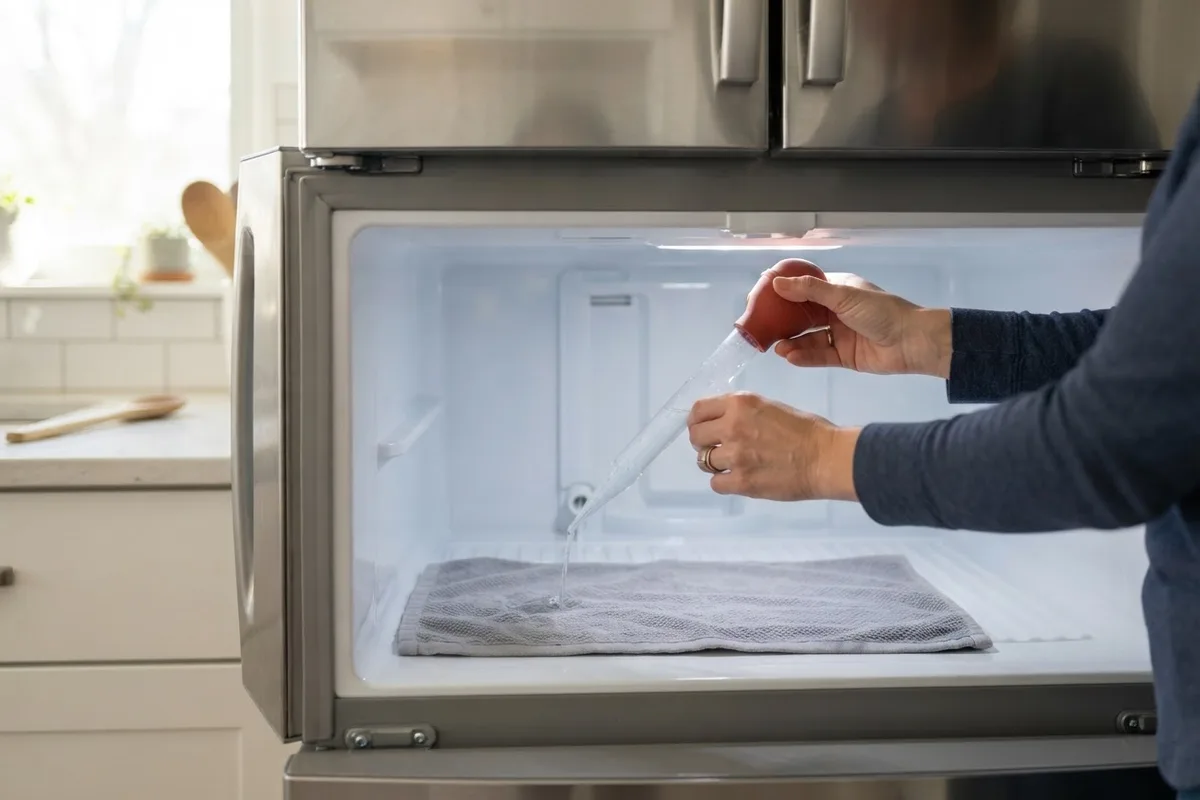
- Pull out the bottom crisper drawers and place a towel along the floor of the fridge compartment.
- Locate the small drain opening along the back wall or beneath the lower rear panel, and melt any visible ice plug using warm water in a turkey baster.
- Gently push a flexible pipe cleaner or zip tie a few inches down the tube—never use sharp metal tools that could puncture the lining.
- Flush with a cup of warm water mixed with one teaspoon of baking soda until it drains freely into the pan below.
2. Level the Refrigerator Front to Back
Even a clean defrost drain cannot work properly if your appliance leans forward. A refrigerator needs a slight backward tilt so condensation naturally flows toward the rear drain trough and heavy doors swing shut on their own every time. If someone bumped the cabinet while sweeping or moving groceries, the front leveling feet may have shifted.
- Clear the top shelf and set a small bubble level across it, pointing from front to back.
- Look behind the bottom front grille (or kickplate) to locate the two adjustable leveling legs or roller screws.
- Use a wrench or flathead screwdriver to raise the front slightly until the front sits roughly a quarter-inch higher than the rear.
- Open each door halfway and let go; it should glide closed smoothly without bouncing back open.
- Wipe up existing puddles and check the crisper bay again after 24 hours.
3. Clean and Test the Door Gaskets
Every time warm, humid kitchen air sneaks past a sticky or warped door seal, moisture condenses on cold shelves and runs down into your drawers. During busy cooking weeks when doors open repeatedly, a weak gasket turns minor humidity into steady interior puddles.
- Mix warm water with a few drops of mild dish soap and scrub the accordion folds of both fridge and freezer gaskets using a soft cloth.
- Rinse with a damp rag and dry the rubber completely so food residue does not glue the seal shut.
- Run the dollar-bill test: close the door on a crisp bill and pull gently; if it slides out without resistance, the seal has a gap.
- Warm slightly flattened rubber gently with a hair dryer on low while shaping it back toward the frame.
- For cracked seals, follow our guide on cleaning and inspecting appliance seals and gaskets.
4. Inspect the Water Filter and Housing
If water drips down from the upper shelf or along the ceiling of your refrigerator, the internal water filter or its plastic housing is often to blame. A filter that was twisted in crookedly, a pinched rubber O-ring, or mineral scale inside the receptacle can release a slow trickle whenever the dispenser or ice maker draws water.
- Turn off the cold-water shutoff valve behind the fridge or under the sink, and unplug the power cord for safety.
- Lay a folded towel underneath the filter compartment to catch residual drops.
- Twist or unlatch the filter cartridge and inspect the two small black O-rings at the tip for nicks, flattening, or hard-water crust.
- Wipe the inside of the housing dry with a lint-free cloth and reinstall the filter firmly until it locks cleanly into place.
- Restore water and power, dispense a few glasses of water, and shine a flashlight inside to confirm zero drips.
5. Check the Ice Maker Fill Tube and Tray
An ice maker sitting above the fresh-food section—common in French-door models—can leak meltwater straight onto your upper shelves if its water fill tube freezes over or shifts out of alignment. Instead of filling the ice mold cleanly, incoming water splashes onto the housing and trickles down behind the crispers.
- Unplug the refrigerator and shut off the water supply valve before touching the ice compartment.
- Empty the ice bin and look closely at the rubber fill cup and plastic chute above the mold for clear icicles or slush.
- Press a warm, damp washcloth against frozen buildup until it melts; avoid chiseling ice with knives or screwdrivers.
- Check that the flexible fill tube sits squarely centered over the fill cup rather than resting against the side wall.
- If water still overflows into the bin after restarting, the water inlet valve may be sticking open and allowing too much flow.
6. Fix Overpacked Shelves and Air Vents
Stuffing leftovers, large roasting pans, or produce bags tightly against the back interior wall blocks cold air vents. Without steady airflow, pockets of frost form on the rear panel and repeatedly melt whenever the compressor cycles off, leaving water droplets on shelves and inside drawers.
- Pull items forward to leave one to two inches of breathing room in front of every rear and side air vent.
- Place a standalone fridge thermometer in a glass of water on the middle shelf and verify temperatures hold near 37°F in the fridge and 0°F in the freezer.
- Store damp leafy greens and washed fruit inside covered crisper bins rather than uncovered bowls, which add extra moisture to the air.
- Avoid putting piping-hot pots straight into the fridge; let cooked food cool safely on the counter first so steam does not condense inside.
- Give the cabinet 24 hours with clear vents before checking whether condensation stops.
When to Call a Pro
If you have cleared the defrost drain, leveled the cabinet, and checked the gaskets and filter, yet puddles keep returning, stop DIY troubleshooting and schedule a professional inspection. Call an appliance technician right away if you notice thick frost blanketing the back freezer wall, water dripping from an electrical housing or control board, or a hairline crack in the plastic interior liner. Never open sealed refrigerant lines or attempt electrical panel repairs yourself.
For most US homeowners, clearing a stubborn internal drain line or swapping a faulty water inlet valve typically runs around $150 to $350, while defrost heater or control board repairs range from $250 to $550 depending on your area and appliance model. If your unit is over 10 years old, review these refrigerator repair or replace rules before investing in major parts. Otherwise, True Appliance Repair can match you with a local refrigerator repair pro to pinpoint the leak safely.
FAQ
Is water leaking inside my fridge dangerous?
Standing water inside the fridge rarely poses a direct shock hazard since most wiring is sealed behind panels, though it can spoil groceries and grow mold in drawer tracks. However, if water drips near interior light sockets or onto the kitchen floor near the outlet, unplug the unit right away and dry the area thoroughly.
Why does water only pool under the crisper drawers?
Gravity pulls meltwater and condensation down the back interior wall to the lowest flat surface—the trough beneath your crisper bins. A blocked defrost drain hole is the number-one reason puddles collect there, followed closely by a fridge leaning slightly forward.
Can a full refrigerator cause water to leak inside?
Yes, packing groceries tightly against rear air vents blocks circulation and traps humidity against cold walls. That trapped moisture freezes and thaws repeatedly, causing droplets to run down onto shelves and pool beneath drawers.
How often should I clean my refrigerator defrost drain?
Inspecting and flushing the defrost drain once a year is plenty for most households. If you have a large family or frequently store uncovered produce and marinades, a quick warm-water flush every six months helps prevent sticky blockages.