
Opening the kitchen cabinet to find a puddle under the sink is frustrating, especially when water is actively dripping down the body of your disposal. If you are asking, "Why is my garbage disposal leaking from the side?" the good news is that side leaks almost never require replacing the entire unit. Unlike a bottom leak that signals failed internal seals, a side leak usually comes from a loose clamp, a worn-out rubber gasket, or a cracked plastic elbow that you can easily fix yourself.
Safety First: Before touching any wires, clamps, or plumbing under the sink, unplug the garbage disposal from the under-sink outlet or turn off its dedicated circuit breaker at your electrical panel. Never put your hands inside the grinding chamber. If water has dripped onto the electrical cord, outlet, or the bottom electrical cover plate, do not touch the unit until the power is off at the main breaker box.
1. Pinpoint the Exact Side Leak Source
Water can be tricky. A slow drip from the top sink flange can run down the outer casing and hang on the side inlets, making a top leak look like a side leak. Before you start taking pipes apart, run a dry paper towel test to find the true origin.
- Unplug the disposal and clear everything out of the cabinet so you have room to work.
- Thoroughly dry the entire outside of the garbage disposal, the top mounting collar, and both side hoses with a clean towel.
- Wrap a dry paper towel around the top sink neck, securing it with a rubber band.
- Put the stopper in the sink, fill the basin halfway with cold water, and add a few drops of blue or red food coloring.
- Pull the stopper and watch the side ports with a flashlight as the colored water drains.
- Check the paper towel at the top first. If it stays bone dry while colored water beads at the upper dishwasher inlet or the lower drain pipe, you have confirmed a true side leak.
2. Tighten a Loose Dishwasher Inlet Clamp
The smaller nipple near the top side of your disposal is the dishwasher drain inlet. Every time your dishwasher empties, warm, soapy water surges through a ribbed rubber hose attached to this port. Over time, the vibrations from the disposal can loosen the metal clamp holding that hose in place.
- Locate the flexible black or gray rubber hose connected to the upper side port of the disposal.
- Inspect the metal clamp securing the hose. It will be either a worm-gear clamp (with a small screw) or a pinch-style spring clamp.
- Place a shallow bowl or towel directly underneath the connection to catch any trapped water.
- If it is a screw-style clamp, use a screwdriver or a 5/16-inch nut driver to turn the screw clockwise until it is snug against the rubber.
- Avoid over-tightening, which can slice into the soft rubber hose or crack the plastic inlet port.
- If it is a spring clamp that has lost its tension, squeeze the tabs with pliers, slide it back, and replace it with a standard stainless steel worm-gear clamp.
3. Replace a Cracked Dishwasher Hose or Adapter
If tightening the clamp does not stop the drip at the upper port, the rubber dishwasher hose itself or its stepped rubber adapter boot has likely dry-rotted or split. Exposure to hot water and dish detergent eventually makes rubber brittle, leading to pinhole leaks right where the hose bends.
- Keep your catch bowl under the inlet port and loosen the hose clamp completely with a screwdriver or pliers.
- Gently twist and pull the dishwasher hose off the disposal nipple. Have a towel ready for the cup of water that will spill out.
- Inspect the آخر 2 inches of the rubber adapter. Flex it with your fingers to look for hairline cracks, splits, or mushy spots.
- If the rubber boot is cracked, take it to a hardware store to buy a matching universal garbage disposal dishwasher connector kit (typically $6 to $12, though prices vary by area).
- Slide the new rubber adapter onto the disposal inlet and secure it tightly with the new clamps included in the kit.
- Run a quick rinse-and-hold cycle on your dishwasher to verify the new connection stays dry.
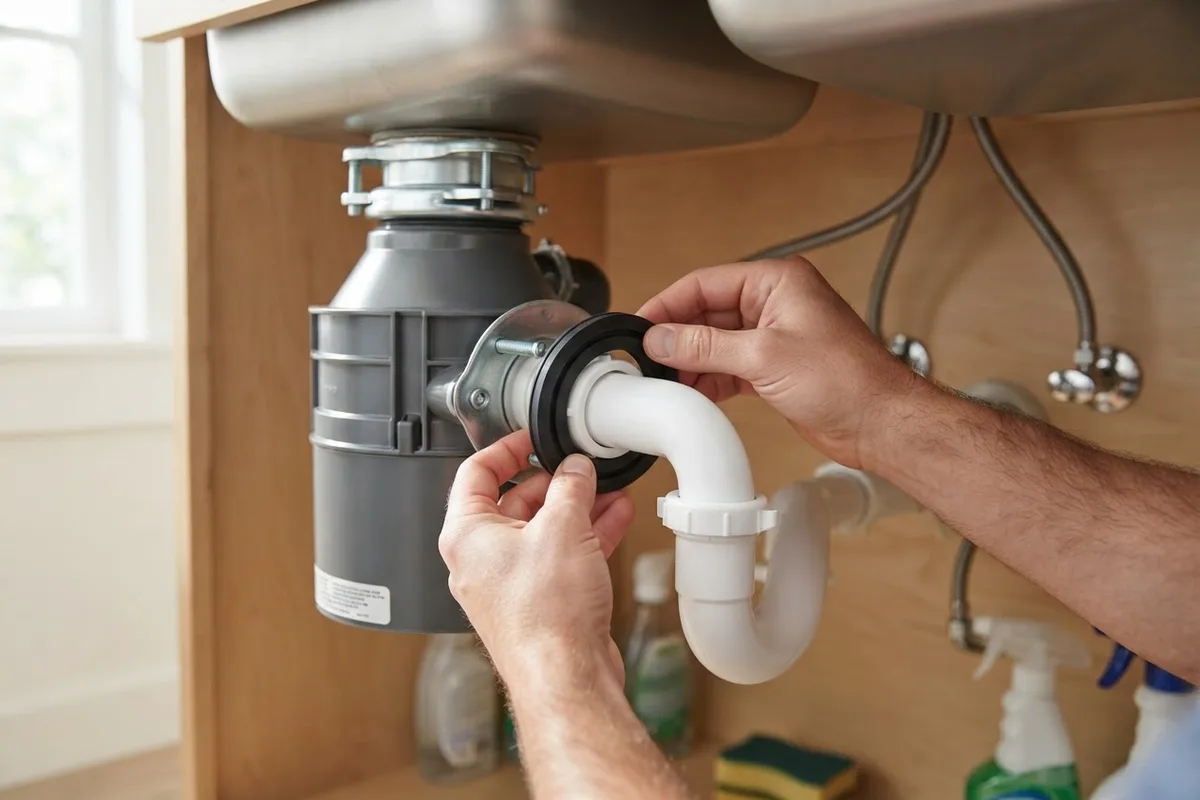
4. Replace the Discharge Tube Rubber Gasket
The larger pipe coming out of the middle side of the disposal is the main discharge drain elbow. This curved pipe carries ground food waste into your home's plumbing trap. Between this pipe and the disposal body sits a thick rubber gasket that flattens and hardens after years of vibration.
- Place a bucket under the sink P-trap to catch standing water.
- Loosen the large plastic slip-nut connecting the lower end of the disposal's curved elbow to the sink drain pipe.
- Use a screwdriver or socket wrench to remove the one or two metal bolts holding the metal flange plate against the side of the disposal.
- Pull the curved elbow slightly away from the disposal and peel out the old black rubber gasket seated inside the port.
- Wipe away any crusty food buildup or mineral scale around the rim of the side port using an old toothbrush and white vinegar.
- Press a new disposal discharge gasket (usually $3 to $7 at local hardware stores) onto the lip of the elbow, making sure the beveled side faces the direction specified on the package.
- Reattach the metal mounting plate and tighten the bolts evenly.
5. Fix an Uneven Flange or Cracked Drain Elbow
Sometimes the rubber gasket is still in good shape, but water still weeps from the main side drain port. This happens when the two mounting bolts on the metal flange plate are tightened unevenly, or when the plastic 90-degree discharge elbow has developed a hairline crack along its seam.
- With the discharge elbow unbolted from the side of the unit, clean it thoroughly with warm soapy water.
- Hold the plastic elbow up to a bright light and inspect the lip where the metal flange presses against it. If the lip is warped or cracked, the gasket will never seal properly.
- Purchase a universal 1.5-inch garbage disposal discharge tube kit if the elbow is damaged.
- When reinstalling the elbow, thread both metal flange bolts in by hand first so they catch evenly.
- Alternate tightening the top and bottom bolts a quarter-turn at a time with your screwdriver. This keeps the metal plate completely flat against the rubber gasket.
- Hand-tighten the lower slip-nut back onto the P-trap, then give it an extra quarter-turn with slip-joint pliers.
6. Clear a Knock-Out Plug or Clogged P-Trap
If you just installed a brand-new disposal or recently connected a dishwasher and water is spraying from the side, check for a blocked drain path. When water cannot flow freely down the pipes, pressure builds up inside the chamber and forces water out through the side seals. If your unit wasn't even running before the leak started, check our guide on why a garbage disposal is not turning on after you dry up the cabinet.
- If a dishwasher was just hooked up: Pull off the upper dishwasher hose and stick a finger or screwdriver tip inside the small inlet nipple. If you hit a solid plastic wall, the factory knock-out plug was left in place, causing dishwasher water to back up and leak around the hose clamp.
- If the drain is backing up: Unscrew the two slip-nuts holding the U-shaped P-trap pipe under the sink and drop the trap into your bucket.
- Dump out any packed food sludge, eggshells, or grease blocking the curved pipe, and rinse it clean in another sink.
- Reinstall the P-trap and tighten the slip-nuts firmly by hand.
- Run cold water for two minutes to ensure the side ports hold under normal flow.
Quick Reference: Side Leak Symptoms and Fixes
| Where Water Appears | When It Leaks | Most Likely Cause | Typical DIY Part Cost* |
|---|---|---|---|
| Upper side nipple | Only when dishwasher drains | Loose hose clamp or cracked rubber boot | $5 – $12 |
| Upper side nipple | First time running dishwasher on new disposal | Knock-out plug was not removed | $0 |
| Middle side drain pipe | Whenever sink faucet runs | Worn rubber discharge gasket | $3 – $7 |
| Bolt heads on side flange | When draining a full basin of water | Uneven flange bolts or cracked plastic elbow | $8 – $15 |
| Side seam of metal casing | Constantly or during grinding | Rusted-through internal grinding shell | Unit replacement needed |
Note: Part prices are broad typical US ranges and vary by area and model.
When to Call a Pro
Most side leaks come down to a $5 rubber part and twenty minutes with a screwdriver. However, you should stop DIY work and call a professional if you discover that the outer metal or plastic shell of the disposal itself is cracked or rusted through at the side seam. Once the housing corrodes from the inside out, patching it with plumbers putty or epoxy will not hold back the vibration and water pressure—the entire disposal must be replaced. You should also call a pro if water has leaked into the electrical splice box or if your under-sink shutoff valves are leaking and won't turn off.
If your disposal is making a terrible racket along with the leak, you can read about fixing a garbage disposal squealing noise to see if the motor bearings are failing. When a leak turns out to be a cracked housing, a stubborn under-sink plumbing issue, or a dishwasher drain problem, True Appliance Repair can match you with a local pro for dependable home appliance repair or dishwasher repair. Typical professional garbage disposal repair or replacement labor generally ranges from $120 to $275 plus parts, depending on your region and plumbing setup.
FAQ
Can I use plumber's putty or silicone caulk on a garbage disposal side leak?
No, you should never use plumber's putty, thread tape, or silicone caulk on the side discharge elbow or the dishwasher inlet port. Plumber's putty is only meant for the stationary metal sink flange at the very top of the sink basin. The side ports experience heavy vibration and water pressure, so they rely entirely on flexible rubber gaskets and tight clamps to stay watertight.
Why is water leaking from the side of my disposal when the dishwasher runs?
When your dishwasher pumps out dirty water, it pushes a high-pressure stream directly into the upper side inlet of your garbage disposal. If that hose clamp is slightly loose, or if the black rubber adapter boot is cracked, pressurized water will squirt out around the fitting. Tightening the clamp or replacing the rubber connector boot solves this issue.
How tight should the two bolts on the side of the garbage disposal be?
The metal flange bolts holding the discharge drain elbow should be tightened until the metal bracket sits snug and flat against the pipe flange, compressing the rubber gasket inside. Tighten both bolts evenly by alternating between them a few turns at a time. Stop tightening once the bracket feels firm; cranking down too hard with a wrench can bend the metal ears or crack the plastic drain elbow.
Does a side leak mean my garbage disposal is ruined?
Almost never. When a garbage disposal leaks from the bottom reset button or air vents, it means the internal motor seal has failed and the unit needs to be replaced. A leak from the side, however, is almost always an external hose, clamp, or gasket issue that costs under $15 to fix yourself.