
Few kitchen frustrations ruin dinner prep faster than a gas oven taking forever to preheat when you have a casserole or sheet of cookies ready to go. A healthy residential gas oven typically reaches 350°F in 10 to 15 minutes; if yours drags past 20 or 30 minutes, it is losing heat or struggling to open the gas safety valve on time. Below are the six most common causes and step-by-step DIY checks you can perform to get your oven heating quickly again before peak holiday baking arrives.
Safety First: Before inspecting internal oven components, removing bottom panels, or touching wiring, always unplug the range from the wall outlet (or flip the circuit breaker off) and turn off the gas shut-off valve behind the stove. Allow the oven cavity to cool completely.
1. Check a Weak Gas Oven Igniter
A weakening glow bar igniter is the number-one reason a gas oven takes too long to preheat. In a gas range, the igniter does two jobs: it gets hot enough to light the gas, and it draws a specific amount of electrical current to tell the gas safety valve to open. As the igniter ages, it still glows bright orange, which tricks homeowners into thinking it works fine—but it takes several minutes longer to draw enough amperage to open the valve.
- Open the oven door or broiler drawer so you can see the bottom bake burner flame port.
- With power and gas on for this visual observation only, start a 350°F bake cycle and time the igniter.
- Watch the igniter glow from yellow-orange to bright white-hot.
- Note how long it takes for the gas to whoosh on and ignite.
- If the igniter glows for more than 60 to 90 seconds before the burner lights, the igniter is weak and needs to be replaced.
2. Inspect and Reseat the Door Gasket
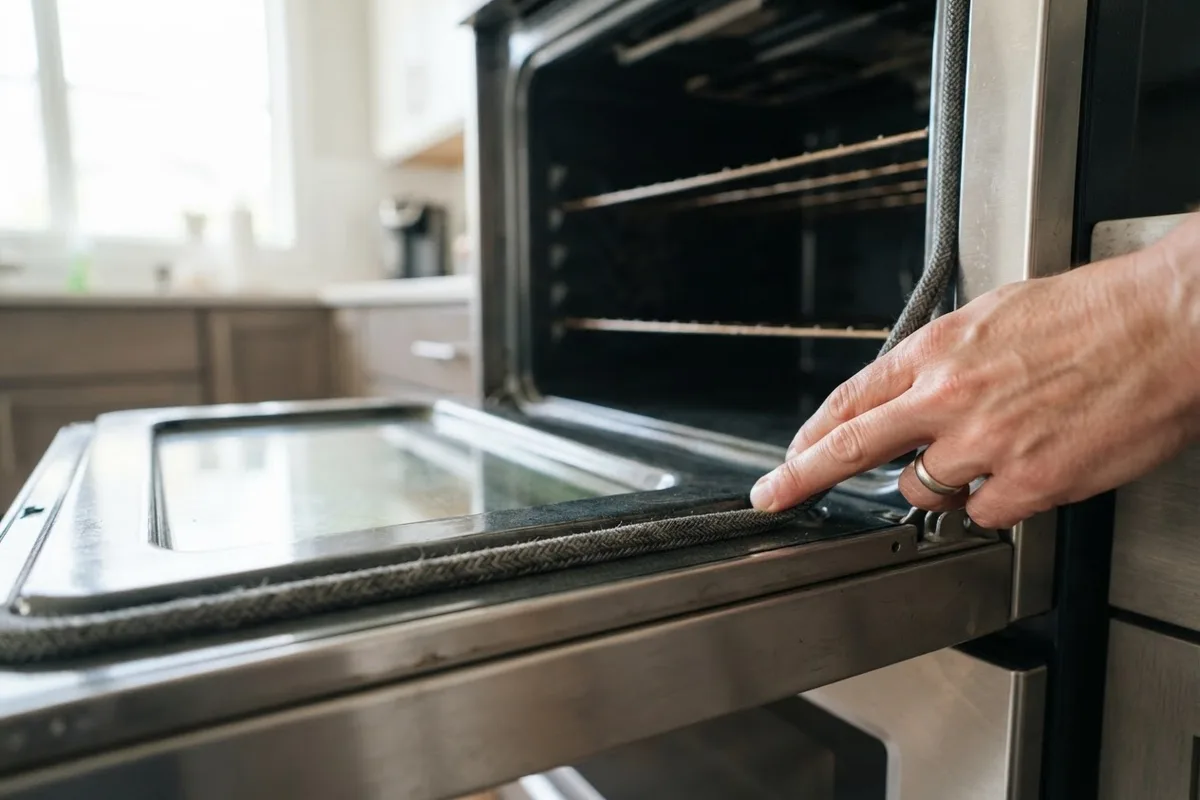
If the burner lights promptly within a minute but the oven still crawls up to temperature, heat may be pouring out around the door. The braided fiberglass or silicone rubber gasket sealing the perimeter of the oven door flattens, frays, or pulls out of its mounting clips over years of use.
- With the oven completely cool, open the door and run your fingers along the entire gasket perimeter.
- Look for crusty baked-on food, frayed fiberglass, hard brittle spots, or gaps where the seal has popped loose.
- Wipe away grease buildup with a damp microfiber cloth and mild dish soap so the seal can compress evenly.
- Push any loose mounting pins firmly back into the keyhole slots along the door frame.
- Perform the paper test: close the oven door on a crisp dollar bill or strip of printer paper at several points around the frame. If the paper slides out with zero resistance, replace the door gasket.
While you are inspecting the door assembly, it is also a great time to check out our guide on how to clean oven door glass between the panes so you can watch your food bake without opening the door and letting heat escape.
3. Remove Aluminum Foil from the Oven Floor
Lining the bottom of a gas oven with aluminum foil to catch drips is a widespread habit that severely slows down preheating. Gas ovens rely on airflow openings along the bottom panel to feed oxygen to the burner and circulate hot air up into the main cavity. Foil blocks those vents, reflects heat back down toward the temperature rules, and can even melt onto the porcelain enamel.
- Unplug the oven or ensure it is completely cool before reaching inside.
- Remove all sheets of aluminum foil from the oven floor and from the oven racks.
- Remove any heavy cast-iron Dutch ovens, pizza stones, or roasting pans that you store inside the oven when not in use, as they absorb massive amounts of heat during preheating.
- Check that the slots along the bottom panel are completely clear of burnt food debris.
- If you want drip protection, place a small cookie sheet on a rack directly below your dish rather than covering an entire rack or the oven floor.
4. Clean Clogged Bake Burner Ports
Even when the igniter triggers the gas valve on time, clogged burner ports along the metal burner tube can restrict the flame. Grease drips, boil-overs, and rust scale can plug the tiny holes along the side of the bake burner, resulting in a weak, patchy flame that struggles to heat the cavity.
- Turn off the circuit breaker and shut off the gas supply valve behind the range.
- Pull out the oven racks and remove the two screws or clips holding the bottom oven floor panel in place, then lift the panel out.
- Locate the long metal bake burner tube in the center of the base.
- Brush away loose ash and rust scale around the burner holes using a stiff nylon brush.
- Gently clear clogged port holes with a wooden toothpick or a sewing needle—never use a wooden match or metal wire that could break off inside the port.
- Wipe the tube clean, reinstall the bottom panel, and restore gas and power.
If your stovetop needs similar attention while you have your cleaning tools out, follow our steps on how to clean cast iron stove grates to keep the top of your range working just as efficiently.
5. Test and Clean the Oven Temperature Sensor
The oven temperature sensor is a thin metal rod—usually three to four inches long—sticking out of the upper back wall of the oven cavity. As the oven heats up, electrical resistance inside this sensor changes, telling the electronic control board the exact internal temperature. If the rod is coated in baked-on grease or touching the oven wall, it reads the temperature inaccurately and may cycle the burner off prematurely.
- Make sure the oven is cool and unplugged from power.
- Locate the thin cylindrical sensor probe in the upper left or upper right corner of the back oven wall.
- Inspect the probe to make sure it is not bent or touching the metal wall of the oven; it should sit parallel to the floor with air space all around it.
- Gently scrub away any dark, baked-on grease coating the probe using a damp sponge and a pinch of baking soda, then wipe dry.
- Hang an inexpensive standalone oven thermometer on the center rack, preheat to 350°F, and compare the thermometer reading to the display once the preheat chime sounds.
6. Check the Door Hinges for a Gap
Sometimes the door gasket is brand-new, yet hot air still pours out the top of the oven door because the door hinges have sprung or worn out. Dropping a heavy turkey pan onto an open oven door or leaning on it while scrubbing can bend the hinge arms just enough to leave a quarter-inch gap at the top edge.
- Close the oven door and look closely at the side seam where the door meets the front frame of the range.
- Check whether the door sits flush from bottom to top or tilts slightly outward at the top corners.
- Press gently against the top of the closed door; if it moves inward a quarter-inch or more before stopping, the hinge springs have weakened.
- Inspect the hinge receivers along the lower front frame for food buildup or bent metal tabs preventing the door from seating fully.
- If the hinges are bent or no longer hold tension, replace both left and right door hinges as a matched pair so the door seals evenly.
Quick Reference: Slow Gas Oven Preheating Causes
| Symptom You Notice | Most Likely Cause | Typical Part or Repair Cost* |
|---|---|---|
| Igniter glows 90+ seconds before gas lights | Weak bake igniter | $150 – $300 (pro) / $35 – $85 (DIY part) |
| Hot air escaping around top of closed door | Torn door gasket or sprung hinges | $120 – $280 (pro) / $30 – $90 (DIY part) |
| Oven chimes at 350°F but thermometer reads 275°F | Dirty or faulty temperature sensor | $130 – $250 (pro) / $25 – $60 (DIY part) |
| Burner lights fast but flame is tiny or uneven | Clogged burner ports or gas pressure issue | $0 (DIY cleaning) / $150 – $320 (pro) |
| Oven takes 25+ minutes with pizza stone inside | Blocked bottom vents or excess thermal mass | $0 (remove foil and heavy cookware) |
Note: Prices reflect broad US averages and vary by area, range brand, and model.
When to Call a Pro
Cleaning burner ports, removing aluminum foil, and swapping a worn door gasket are safe, straightforward weekend projects for most homeowners. However, if you smell raw gas that does not ignite, notice corroded gas supply lines, suspect a faulty gas safety valve, or find scorched wiring behind the control panel, stop immediately and leave the repair to an experienced technician. Working with gas valves and high-voltage control boards carries serious safety risks if handled improperly.
If your oven still takes forever to preheat after these checks—or you would rather not crawl into the bottom of your range to replace a bake igniter—True Appliance Repair can match you with a local pro for dependable oven and stove repair. You can also reach out through our contact page to get connected with a technician in your area before your next big family meal.
FAQ
How long should a gas oven take to preheat to 350°F?
Most residential gas ovens take between 10 and 15 minutes to preheat to 350°F, though models with extra-large cavities or hidden bake elements underneath the oven floor can take up to 18 minutes. If your oven consistently takes 20 to 30 minutes or never reaches the set temperature, a weak igniter or heat leak is almost always to blame.
Why does my gas oven igniter glow orange if it is bad?
A gas oven igniter does not just light the flame with heat; it also acts as an electrical resistor wired in series with the gas safety valve. As silicon carbide igniters age, their electrical resistance increases, meaning they still glow bright orange at 1,800°F+ but cannot draw the 3.0 to 3.6 amps of current needed to open the gas valve promptly.
Can I still use my gas oven if it preheats slowly?
If the slow preheating is caused by a weak igniter, the oven may work temporarily, but the igniter will eventually fail to open the gas valve altogether—often right in the middle of baking a meal. Worse, a weak igniter can sometimes cause delayed ignition, where a small pocket of gas builds up before lighting with a loud mini-boom, so it is best to address the issue right away.
Does opening the oven door really slow down preheating?
Yes, opening the oven door for just five to ten seconds can drop the internal cavity temperature by 25°F to 50°F, forcing the bake burner to run several extra minutes to recover. Use the interior oven light and clean window glass to check on food until the oven is fully preheated and your dish is nearly done.