
Finding a puddle of water around the base of your appliance is a stressful sight for any homeowner. While many people immediately assume the water supply line is leaking, the actual culprit is frequently a humble plastic tray hidden beneath the cabinet: the drain pan. When this component overflows, water trickles onto your kitchen flooring, risking water damage, warped subfloors, and mold growth.
Under normal operation, your refrigerator automatically channels frost meltwater into this pan during its defrost cycle. The heat generated by the compressor and airflow from the condenser fan then evaporate the water harmlessly into the air. However, when something disrupts this balance, the pan fills faster than it can evaporate—or spills over entirely. Before pulling out your hair or spending hundreds of dollars on an unnecessary appliance replacement, follow this practical guide to identify why your drain pan is overflowing and how to fix it yourself.
Safety Warning: Always unplug your refrigerator from the wall outlet and turn off the shutoff valve on your water supply line before inspecting lower cabinets, electrical components, or rear access panels.
Clear a Clogged Defrost Drain Tube
The most frequent reason a refrigerator drain pan overflows in sudden, large amounts involves a blockage in the defrost drain system. During regular cooling cycles, frost naturally builds up on the evaporator coils inside the freezer. Several times a day, a heating element turns on to melt this frost. The resulting water flows down a tiny drain channel, through a rubber tube, and directly into the drain pan beneath the unit.
Over time, food crumbs, dust, mineral deposits, or mold can wash down the channel and clog the narrow exit tube. When the drain line becomes blocked, water backtracks. It can freeze into an ice sheet on the freezer floor, leak into the refrigerator compartment, or suddenly burst through a partial clog, flooding the drain pan faster than the ambient room air can evaporate it.
To fix a clogged defrost drain line:
- Unplug the refrigerator and move food items away from the back wall of the freezer.
- Locate the drain opening (usually at the bottom center of the back freezer panel or behind a plastic cover grill).
- Clear visible ice or food debris using a plastic putty knife or a warm cloth.
- Flush the drain hole with a mixture of warm water and a tablespoon of baking soda using a turkey baster or syringe.
- Inspect the rubber duckbill valve at the bottom rear of the appliance (where the tube empties above the drain pan). Squeeze the rubber tip to dislodge built-up sludge or mineral crust.
Inspect and Level Your Refrigerator
Refrigerators are engineered to sit at a slight backward tilt. Appliance manufacturers generally recommend that the front of the refrigerator sit approximately 1/4 to 1/2 inch higher than the rear. This slight slope ensures that cabinet doors swing shut automatically and allows condensate water inside the liner to flow backward into the drainage trough rather than sloshing forward.
If your refrigerator is tilted forward or severely unlevel from side to side, water flowing during the defrost cycle may miss the drain spout entirely. Alternatively, water already sitting in the shallow drain pan can spill over the front edge whenever the compressor kicks in or someone shuts the refrigerator door firmly.
To correct refrigerator leveling problems:
- Place a bubble level flat across the top cabinet of the refrigerator (front-to-back and side-to-side).
- Pry off the plastic kick plate grill located at the front base of the appliance near the floor.
- Locate the adjustable leveling legs or rollers behind the grill.
- Use a flathead screwdriver, socket wrench, or adjustable pliers to turn the leveling legs clockwise to raise the front of the unit.
- Check the level again; the bubble should show a subtle backward tilt so that doors seal easily when released from a 45-degree angle.
Replace a Damaged or Cracked Drain Pan
Drain pans are manufactured from durable plastic, but years of exposure to compressor heat, vibrations, and household cleaning chemicals can cause the plastic to turn brittle over time. A pan that appears overflowing may actually be leaking through fine hairline cracks or stress fractures along its base or seams.
Because the pan sits in a dark, warm space under the cabinet, a hairline crack lets water trickle out onto the floor continuously every time defrost water empties into the tray. Homeowners often mistake this steady leak for an overflowing pan because the floor beneath stays perpetually wet.
To inspect and replace a broken drain pan:
- Disconnect power to the refrigerator.
- Remove the front bottom kick plate or the rear lower access panel depending on your refrigerator model.
- Carefully slide out the plastic drain pan. On some models, the pan is secured with a retention clip or hex head screw.
- Clean the pan with mild dish soap and warm water, then hold it up to a bright light source to check for fractures, chips, or pinholes.
- If you spot any damage, order an exact replacement pan matching your model number. Replacement drain pans typically cost between $25 and $50 and take less than ten minutes to swap out.
Check and Seal Worn Refrigerator Door Gaskets
Your refrigerator works constantly to extract heat and moisture from inside the fresh food and freezer compartments. The flexible rubber door gaskets create an airtight seal that keeps warm, humid room air outside. When a door seal becomes cracked, dirty, or warped, warm ambient air streams into the cold cabinet continuously.
This continuous inflow of warm air causes extreme condensation inside the unit. The evaporator coils freeze over rapidly, forcing the defrost heater to work overtime. The resulting surge of defrost water fills the drain pan with double or triple its normal volume. Because the ambient moisture in the kitchen is also high, the air cannot evaporate the excess water from the pan, causing it to overflow onto your floor.
If you notice your refrigerator temperature fluctuating alongside standing water in the drain pan, test your door gaskets:
- Open the refrigerator door and inspect the rubber seal around the entire perimeter for rips, hardened rubber, or mold.
- Perform the dollar bill test: place a dollar bill between the gasket and cabinet frame, close the door, and pull. If the bill slides out easily without resistance, the seal is too loose.
- Clean dirty gaskets thoroughly using warm soapy water and a soft micro-fiber cloth to remove sticky residue or food particles.
- If the gasket is warped, warm it gently with a hairdryer on low heat and reshape it with your fingers.
- Replace torn or flattened gaskets promptly to reduce excess humidity and frost buildup.
Clean Dusty Condenser Coils Below the Cabinet
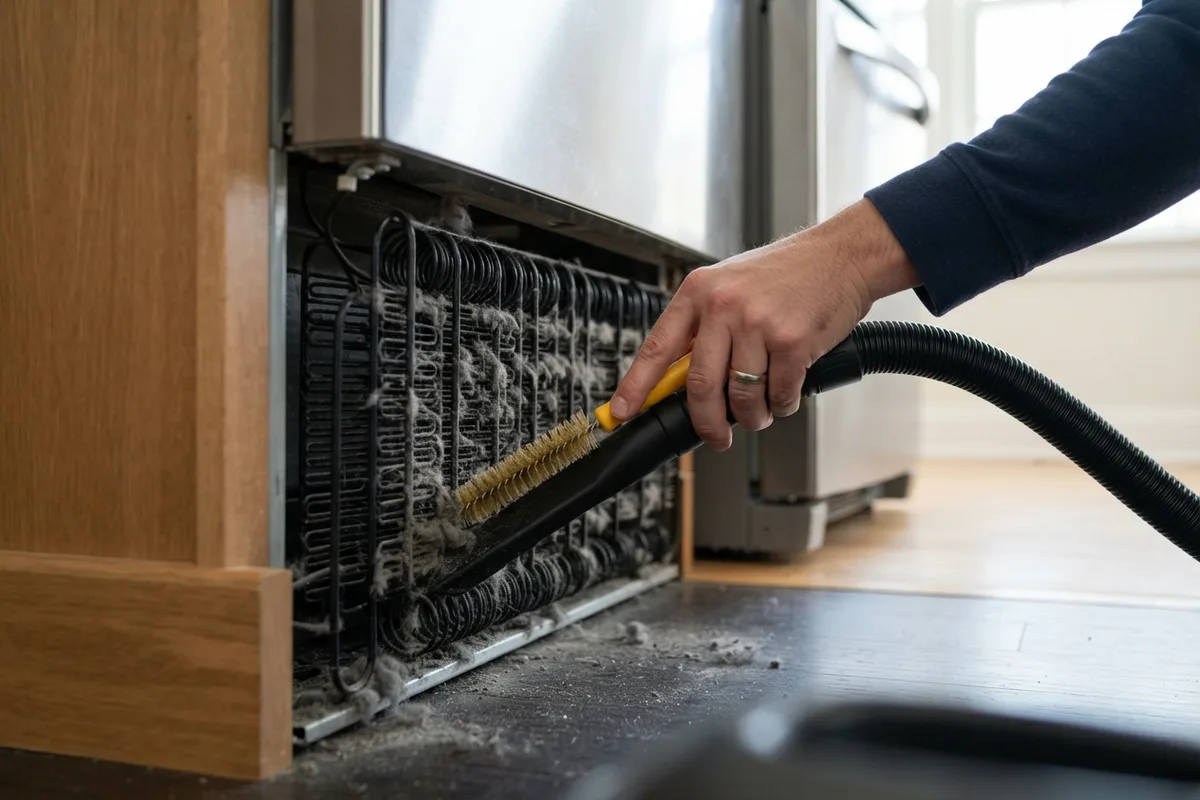
The evaporation process in a refrigerator's drain pan relies heavily on heat generated by the condenser coils and airflow from the condenser fan. On modern refrigerators, these coils are located underneath the cabinet right next to the drain pan. When coils become coated in thick dust, pet hair, and lint, heat transfer is severely restricted.
Without adequate ambient heat radiating near the tray, defrost water sits stagnant in the pan rather than evaporating between defrost cycles. Over a few days, incoming defrost water accumulates until the tray overflows onto your kitchen floor.
To clean your condenser coils:
- Unplug the unit and pull it away from the wall to access the rear lower panel (or remove the front toe kick grill).
- Use a long, flexible condenser coil brush to loosen trapped dust and pet dander from the wire coils.
- Vacuum the surrounding space and the top of the drain pan using a narrow hose attachment.
- Verify that the nearby condenser fan blade spins freely by hand; if lint is jamming the fan motor, heat will not circulate across the water tray.
Refrigerator Drain Pan Troubleshooting Guide
Use this handy reference table to quickly match your symptoms with the most likely cause, estimated DIY repair difficulty, and typical component costs.
| Problem Symptom | Primary Cause | DIY Fix | Time Required | Typical Part Cost |
|---|---|---|---|---|
| Ice under freezer drawers & overflow | Clogged defrost drain tube | Flush drain tube with warm baking soda water | 30–45 mins | $0 – $15 |
| Water pooling under front of fridge | Forward cabinet tilt | Adjust front leveling legs clockwise | 15 mins | $0 |
| Continuous floor leak beneath tray | Cracked or brittle drain pan | Inspect under light & replace plastic pan | 15–20 mins | $25 – $50 |
| Excess frost & pan constantly full | Damaged rubber door gasket | Clean or replace door seal | 20–30 mins | $35 – $80 |
| Water sitting stagnant without evaporating | Heavy dust on condenser coils | Brush and vacuum coils & check fan | 20–30 mins | $0 – $12 |
When to Call a Pro
While most drain pan issues stem from simple maintenance neglect or minor leveling adjustments, certain underlying causes require professional diagnostic equipment. If you have cleared the drain tube, leveled the cabinet, and cleaned the coils, but the pan continues to overflow or fill rapidly with ice-cold water, you may be dealing with a complex electronic control failure or defrost timer glitch.
In addition, if you discover water leaking from internal sealed refrigerant lines, notice electrical burning smells near the compressor motor, or suspect an internal water valve leak, stop troubleshooting immediately. Sealed-system leaks and high-voltage wiring repairs should always be handled by an experienced professional.
When basic DIY steps do not resolve the issue, True Appliance Repair can match you with a local appliance pro to diagnose complex cooling and electrical faults. Alternatively, if you need broader assistance with household equipment, True Appliance Repair can quickly connect you with verified local repair experts in your area.
FAQ
Where is my refrigerator drain pan located?
On most modern refrigerators, the drain pan is located at the very bottom of the unit behind the front lower kick plate or accessible from the back behind a metal access panel near the compressor. On older top-freezer units, it may sit directly on top of the compressor housing to maximize heat transfer.
How often should a refrigerator drain pan be cleaned?
It is good practice to inspect and clean your refrigerator drain pan once every six months during routine home maintenance. Wash the tray with warm water, mild dish soap, and a splash of white vinegar to prevent algae growth, mold spores, and sour odors from developing.
Can an overflowing drain pan cause damage to my kitchen?
Yes, water overflowing from a drain pan can seep underneath vinyl plank flooring, hardwood, or tile. Over time, trapped moisture rots subfloors, ruins baseboards, encourages toxic mold growth, and can even leak through ceilings into living spaces directly below the kitchen.
Why does the water in my refrigerator drain pan smell bad?
Defrost water carries tiny organic particles, food oils, and dust down from the food compartment. When this water sits stagnant in a warm pan beneath the appliance, bacteria and mold thrive rapidly, causing sour or dirty sock odors throughout your kitchen.