
Pulling a favorite shirt or delicate sweater out of the laundry only to discover mystery pinholes, frayed seams, or jagged tears is deeply frustrating. When a washing machine starts damaging garments, the problem usually stems from hidden sharp edges inside the tub, damaged agitator parts, or incorrect laundry loading habits.
Before you toss out snagged clothing or assume you need a brand-new appliance, several quick checks can isolate the problem. In this guide, we break down the five most common reasons a washer tears clothes and how you can fix them yourself.
Safety First: Always unplug your washing machine from the electrical outlet and shut off the hot and cold water supply valves before reaching inside internal components or attempting any hands-on inspection or repair.
Inspect the Drum for Sharp Edges or Burrs
Over time, small metal items like coins, paperclips, stray bra underwires, or loose screws can scratch the inside of your washing machine drum. On stainless steel tubs, these scratches create microscopic razor-sharp metal burrs. On porcelain-coated steel drums, chipped enamel exposes rough, rusty edges that snag delicate fibers during high-speed spin cycles.
How to test the drum interior:
- Unplug the washing machine to ensure the drum will not rotate unexpectedly.
- Perform the nylon stocking test: Slip an old pair of pantyhose or a fine nylon stocking over your hand like a glove.
- Feel the entire surface: Rub your covered hand slowly along every inch of the inner drum walls, including around the small drain perforations, plastic drum baffles, and back wall.
- Identify snags: If the nylon catches or threads pull anywhere along the metal, you have identified the sharp edge tearing your clothes.
How to fix it:
- For Stainless Steel Drums: Smooth away tiny burrs by gently sanding the spot with fine-grit emery cloth or wet/dry sandpaper (400-grit or higher). Wipe the area clean with a damp cloth afterward.
- For Porcelain Tubs: Clean away any flaking rust or dirt with rubbing alcohol, let it dry, and apply a drop of waterproof appliance touch-up enamel to seal the exposed metal edge.
Check the Agitator or Impeller Vanes
Top-loading washers use either a tall central post (an agitator) or a flat bottom disc (an impeller) to move clothes through water. If these plastic components become cracked, chipped, or loose, clothing items can easily get pinched underneath them during wash cycles.
+-------------------------------------------------------------------------+
|                         TOP-LOAD WASHER CHECK                           |
+-----------------------------------+-------------------------------------+|
| AGITATOR PROBLEMS                 | IMPELLER PROBLEMS                   |
+-----------------------------------+-------------------------------------+|
| Cracked plastic directional fins  | Loose center mounting bolt          |
| Worn internal directional dogs    | Damaged edge fins catching fabric   |
| Gap at bottom plate pinching trim | Gap beneath plate trapping clothes  |
+-----------------------------------+-------------------------------------+|
Troubleshooting steps:
- Inspect for physical cracks: Examine the plastic fins on the agitator or impeller plate. Look for sharp hairline cracks or missing plastic fragments caused by heavy belt buckles.
- Test for looseness: Grab the base of the agitator column or impeller disc and gently wiggle it. It should fit snugly against the tub floor without excessive vertical play.
- Check the directional dogs: If a top-load agitator turns freely in both directions by hand (instead of locking in one direction), worn agitator dogs inside the column can cause jerky movements that stress fabrics.
- Tighten or replace: Tighten loose mounting bolts using a socket wrench. Damaged plastic agitators or impellers should be replaced promptly to prevent ongoing fabric damage.
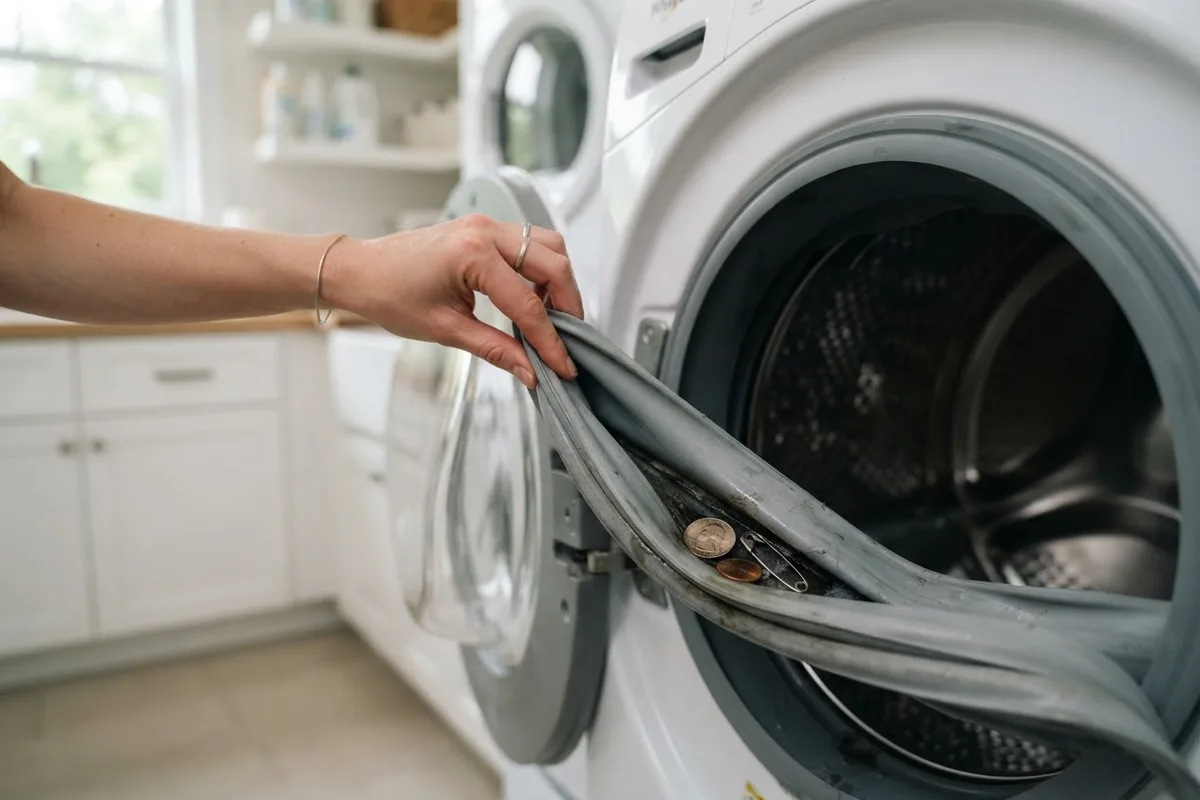
Remove Trapped Debris from the Door Seal
Front-loading washing machines rely on a flexible rubber door boot gasket to keep water sealed inside the tub. Over months of use, small hard items like coins, safety pins, keys, and gravel wash out of pockets and settle into the deep folds of this rubber seal.
When the washer spins at speeds up to 1,200 RPM, clothes pressed against the rubber gasket can rub directly against trapped metal objects, causing friction burns, dark grease stains, or severe tears. Keeping this area clean is also an important part of overall maintenance; for more leak prevention tips, check our guide on 9 Appliance Maintenance Steps to Prevent Water Leaks.
Step-by-step seal cleaning guide:
- Pull back the rubber folds: Using your fingers, carefully spread open the flexible rubber folds around the front lip of the gasket.
- Remove foreign debris: Use a flashlight to inspect the bottom groove and clear out coins, buttons, or metal debris caught near the drain holes.
- Wipe down residue: Clean the gasket thoroughly with a warm, soapy microfiber cloth to clear away build-up, detergent scum, or mold.
- Inspect for rubber damage: Check if the inner rubber edge itself is torn or rough. A damaged door boot can catch clothing as it tumbles.
Examine Zip Fasteners and Pocket Contents
Sometimes the washing machine itself is completely fine—the damage is caused by items inside the wash load. Unzipped metal zippers, open bra hooks, sharp metal studs, and loose items in pockets act like claws when mixed with soft cotton knits or silk.
+-------------------------------------------------------------------------+
|                  LAUNDRY PREPARATION CHECKLIST                          |
+-----------------------+------------------------------------------------+|
| ITEM                  | PREPARATION ACTION                              |
+-----------------------+------------------------------------------------+|
| Metal Zippers         | Zip fully to top before washing                 |
| Bras & Underwire      | Fasten hooks or place in mesh laundry bag       |
| Pocket Contents       | Empty all keys, coins, clips, and screws        |
| Velcro Straps         | Fasten all hook-and-loop closures securely      |
| Delicate Fabrics      | Turn garments inside out to minimize friction   |
+-----------------------+------------------------------------------------+|
Prevention best practices:
- Zip every zipper: Always pull metal zippers all the way up so the teeth are hidden and locked.
- Use zippered mesh laundry bags: Place delicate items, lace, activewear, and underwire bras inside fine mesh wash bags to keep them separated from heavy garments.
- Sort by fabric weight: Avoid washing heavy denim jeans with thin cotton T-shirts. The heavy friction from thick fabrics can pull fibers and split lightweight garments.
Avoid Overloading and Select Gentle Cycles
Stuffing a washing machine past its recommended capacity forces clothes tightly against the drum walls, door boot, or agitator base. Without room to circulate freely, clothing gets twisted, caught in tight crevices, and subjected to high friction.
Furthermore, using an aggressive wash cycle (such as Heavy Duty) with high spin speeds on lightweight clothing puts tremendous tension on fabric seams.
Loading and cycle tips:
- Maintain proper tub capacity: Never pack clothes down into the drum. For a standard top-loader, leave at least 4–5 inches of space below the top edge of the basket. For front-loaders, clothes should fill no more than three-quarters of the drum volume loosely.
- Match cycles to fabric types: Select the Delicate or Gentle cycle for thin knits, lace, and synthetic blends to lower agitator speeds and spin RPMs.
- Check balance: Overloading can also unbalance the wash drum, leading to severe shaking during spin cycles. If your machine vibrates erratically while spinning, read our guide on Why Is My Washing Machine Shaking Violently? 5 DIY Fixes.
Common Causes of Fabric Damage Comparison
| Issue | Primary Symptom | Quick DIY Fix |
|---|---|---|
| Metal Burr in Drum | Fine pulls, snags, or thread loops | Buff with 400-grit emery cloth |
| Chipped Porcelain | Mystery rust stains and fabric tears | Apply appliance touch-up enamel |
| Damaged Agitator | Clothing wedged under bottom plate | Tighten base bolt or replace agitator |
| Trap Debris in Gasket | Pinholes and dark friction marks | Clear rubber folds and wipe boot clean |
| Open Zippers & Hooks | Jagged tears across knit shirts | Zip closure items & use mesh bags |
| Overloaded Tub | Stretched seams and torn hems | Reduce load size to 3/4 drum capacity |
When to Call a Pro
If you have performed the stocking test, cleared the gasket, sorted your laundry correctly, and your washer continues to tear clothes, an internal mechanical failure may be occurring. Worn tub bearings, broken tub suspension springs, or a bent drive shaft can cause the inner drum to spin out of alignment, creating narrow gaps where fabric gets caught and sheared during spin cycles.
Replacing internal drive belts, tub bearings, or tub assemblies requires disassembling cabinet panels and handling heavy mechanical components. Never attempt hands-on work inside electrical panels or drive assemblies yourself.
When DIY steps do not solve the issue, True Appliance Repair can match you with a local appliance pro to diagnose and repair your washing machine safely.
FAQ
Why are small tiny holes appearing on the front of my shirts after washing?
Small mystery holes near the front waistband of shirts are usually caused by friction between the fabric and belt buckles, jeans buttons, or granite countertops. The washer cycle amplifies these weakened thread spots until they tear open into visible holes. Washing shirts inside out and using gentle spin cycles prevents this fabric breakdown.
Can a damaged washing machine agitator be repaired, or does it need replacement?
If an agitator has small plastic burrs, they can sometimes be sanded smooth with fine emery paper. However, if the directional fins are cracked, or the internal agitator directional dogs are broken, replacing the entire agitator assembly is usually the safest and most effective solution.
How can I tell if my front-load washer door gasket needs replacement?
If your door gasket has deep tears, missing rubber chunks, or mold build-up that does not clean off, it should be replaced. Damaged gaskets can tear clothing during high-speed rotation and may eventually cause water leaks on your floor.