
Pouring a cold drink only to watch thin, fragile ice crush instantly is frustrating. When your refrigerator produces hollow ice cubes, your ice maker is either not getting enough water during its fill cycle or freezing the water too rapidly before the mold fills. Fortunately, you can troubleshoot and fix the most common water supply and temperature issues with simple tools you already have at home.
Safety always comes first when working with kitchen appliances. Before pulling your refrigerator away from the wall, inspecting water lines, or handling electrical harnesses, unplug the refrigerator power cord and shut off the dedicated cold water shutoff valve.
Replace a Clogged Refrigerator Water Filter
A restricted water filter is the single most common reason refrigerator ice turns out hollow or undersized. Refrigerator ice makers fill on a timed cycle, usually between 5 and 7 seconds, rather than by weight or water level. If a filter is clogged with sediment, mineral deposits, or carbon debris, the flow rate drops significantly. As a result, only a fraction of the necessary water enters the ice mold before the valve shuts off.
- Locate your filter housing, typically inside the upper interior cabinet or behind the bottom toe kick grille.
- Turn the filter counterclockwise a quarter-turn or press the release push-button to eject the old cartridge.
- Wipe out the filter housing port with a clean, dry microfiber cloth to remove any stray grit.
- Insert a fresh replacement filter, pushing firmly until it locks into place.
- Flush 2 to 3 gallons of water through your front-door dispenser to purge trapped air and loose carbon powder from the new cartridge.
If your dispenser water stream was weak before replacing the cartridge, you should see immediate improvement in flow. Discard the first three batches of ice to allow the system to calibrate.
Straighten Kinked Water Supply Lines
Your refrigerator connects to your household plumbing via a flexible copper, braided stainless steel, or plastic supply line. Over time, sliding the heavy appliance back against the wall after vacuuming or seasonal maintenance can crimp or pinch that flexible tube. A pinched line chokes off water pressure, leading to shallow fills in the ice maker mold.
- Carefully pull the refrigerator forward 12 to 18 inches, keeping it level so you do not damage your kitchen flooring.
- Shine a flashlight behind the lower rear access panel to trace the supply line from the wall valve to the refrigerator cabinet inlet.
- Check for sharp 90-degree bends, flattening, or tight loops along the entire line.
- If you have plastic PEX tubing that has creased, consider upgrading to a braided stainless steel supply line, which resists kinking and provides higher durability.
- Realign the tubing in wide, gentle loops before gently sliding the refrigerator back into position, ensuring at least 2 inches of clearance from the back wall.
Restoring unrestricted line diameter ensures the water pressure reaches the manufacturer-recommended 20 to 120 PSI required for full-sized cubes.
Thaw a Frozen Ice Maker Fill Tube
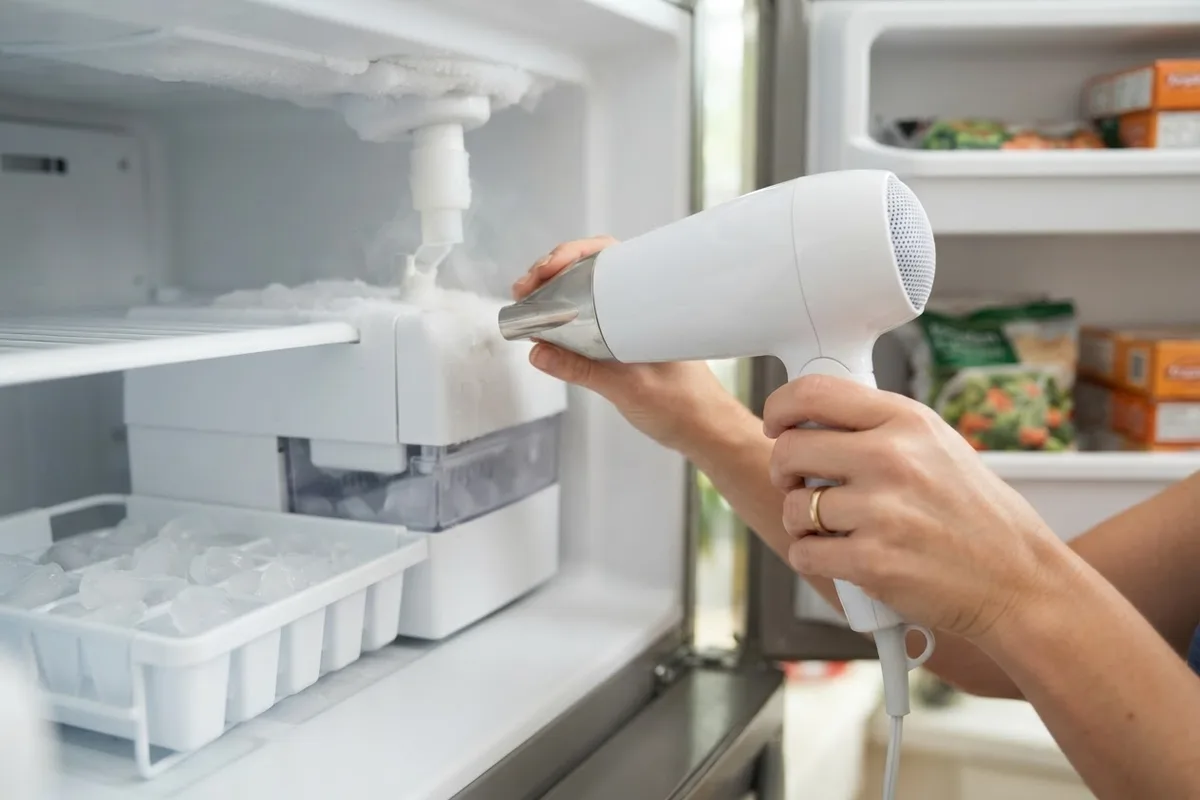
The small plastic or silicone spout that directs water into the ice maker mold can freeze shut. When low household water pressure or a slight valve weep allows a trickle of water to sit inside the spout, freezing air circulating across the top of the freezer turns that water to solid ice. Eventually, only a pencil-thin stream or occasional droplet makes it through to the mold, producing paper-thin, hollow shells.
- Turn off power to the refrigerator at the outlet or main electrical panel.
- Remove the ice storage bucket to gain clear visibility of the ice maker assembly.
- Inspect the fill tube extending from the back freezer wall directly over the ice tray.
- If you see white frost or a solid plug of ice inside the spout, warm the area using a handheld hair dryer set to medium heat. Keep the nozzle at least 6 inches away to prevent warping plastic components.
- Place an absorbent kitchen towel beneath the spout to catch melting water.
- Once completely dry, restore power and watch the next fill cycle to ensure smooth, centered water delivery.
 If you find frost spreading to other areas of the compartment, check out our guide on why your freezer door is hard to open to see if external air leaks are accelerating ice accumulation.
Clean the Water Inlet Valve Filter Screen
The dual-solenoid water inlet valve mounted at the bottom rear of your refrigerator features a fine mesh screen inside its inlet port. This screen prevents municipal sediment, sand, and pipe rust from lodging inside the valve seals. When this screen clogs, incoming water pressure drops drastically, producing hollow cubes even if your main household water pressure is excellent.
- Unplug the refrigerator and turn the water supply shutoff valve clockwise until completely closed.
- Disconnect the water supply line from the brass or plastic threaded fitting on the back of the refrigerator using an adjustable wrench. Keep a small bucket nearby to catch drainage.
- Look inside the threaded inlet fitting to locate the small wire or plastic mesh sediment screen.
- Carefully pull the screen out using needle-nose pliers, taking care not to puncture the mesh.
- Rinse the screen under warm running tap water and scrub away mineral deposits using an old soft-bristle toothbrush dipped in white vinegar.
- Reinstall the clean screen firmly, reconnect the supply line, tighten the compression nut snugly, and turn the water back on to verify there are no leaks before restoring power.
Dial In the Correct Freezer Temperature
Your freezer internal temperature directly impacts ice density and harvesting cycles. Most modern automatic ice makers rely on an internal thermostat or electronic thermistor attached to the bottom of the mold. Once the sensor detects a temperature around 15°F (-9°C), it triggers the harvest fingers to eject the cubes. If your freezer is set too warm—or fluctuating dramatically—the ice maker may harvest the cubes before the centers have frozen solid, resulting in hollow shells filled with slush.
- Verify your freezer is set between 0°F and 5°F (-18°C to -15°C). The fresh food compartment should stay around 37°F (3°C).
- Place a freestanding appliance thermometer directly in the ice bin for 12 hours to measure actual air temperature.
- Make sure bulky frozen packages are not stacked tightly against the evaporator fan grille on the rear interior wall, which chokes air circulation.
- Clean dust, pet hair, and lint from the condenser coils under or behind the unit so the compressor can run efficiently.
If temperature swings continue to affect your food preservation, review common reasons why your freezer is burning food to prevent costly grocery losses.
Hollow Ice Troubleshooting Guide
Use this quick reference table to match the specific symptoms in your ice bucket with the most probable root cause and corrective action.
| Symptom | Most Likely Cause | Corrective DIY Fix |
|---|---|---|
| Very thin, cup-shaped ice cubes | Timed fill cycle underfilling mold | Replace the water filter or clean the inlet screen |
| Hollow cubes with liquid centers | Freezer temperature above 10°F | Lower freezer setting to 0°F and clear air vents |
| Sudden drop in cube size after moving fridge | Pinched or crushed supply tubing | Pull fridge out, inspect line, and unkink tubing |
| Uneven cube size (small on one side) | Refrigerator not level front-to-back | Adjust front leveling legs so unit leans slightly back |
| Intermittent hollow cubes & whistling noise | Low home water pressure (<20 PSI) | Inspect saddle valve or main supply plumbing valve |
When to Call a Pro
Most causes of hollow refrigerator ice can be resolved in under an hour with basic maintenance tasks like replacing a filter, clearing a fill tube, or leveling the appliance. However, if your water pressure is strong, the filter is new, and the lines are clear, the issue may involve a failing dual-solenoid water valve, an internal electronic control board defect, or an inefficient refrigeration sealed system.
Testing electrical solenoids with a multimeter or repairing complex wiring requires specific technical experience. Furthermore, any troubleshooting involving refrigerant, compressors, or interior electrical terminals must be handled by trained technicians. In typical US markets, a professional ice maker or valve repair generally runs between $150 and $350, though costs vary by area and appliance model. When you need dependable diagnostic assistance, True Appliance Repair can match you with a local appliance pro to get your ice maker running smoothly again. You can also explore our dedicated refrigerator repair services for comprehensive kitchen cooling help.
FAQ
Can low water pressure cause hollow ice cubes?
Yes. Automatic ice makers use an electric timer rather than a float to control the water volume during each fill cycle. If your household water pressure drops below 20 PSI, less water passes into the mold during that fixed window, creating small, thin, or hollow ice cubes.
How often should I change my refrigerator water filter?
Most manufacturers recommend replacing your refrigerator water filter every six months, or sooner if you notice a slower dispenser flow or odd water taste. In homes with hard water or high sediment levels, changing the cartridge every four months helps maintain proper fill volume.
Why does my ice maker make hollow cubes after installing a new filter?
Air bubbles frequently become trapped inside brand-new dry filter media, impeding water velocity. After installing a replacement cartridge, always purge the system by dispensing at least two to three gallons of water continuously through the front-door water spout before evaluating ice cube size.
Will an unlevel refrigerator cause hollow ice?
Yes. If your refrigerator tilts sideways, water pools unevenly inside the multi-cavity ice tray. The high side of the tray receives very little water, creating tiny or hollow cubes, while the low side may overflow, forming a thick block of joined ice.