
Opening your freezer door on a warm afternoon only to find a nearly empty ice bin is beyond frustrating. A standard residential ice maker should produce a fresh batch of 8 to 10 crescent cubes every 90 to 120 minutes, yielding around 3 to 4 pounds of ice daily. When production drops to a crawl, or yields tiny, hollow cubes, you do not necessarily need a brand-new appliance.
Most ice production slowdowns trace back to minor water line restrictions, temperature imbalances, or simple mechanical snags. Before inspecting any components, always practice safety: unplug the refrigerator from the wall outlet and turn off the dedicated water shut-off valve behind or beneath the unit. Here is how to diagnose and fix a sluggish ice maker step-by-step.
1. Replace the Clogged Water Filter
The water filter handles all incoming liquid destined for both your door dispenser and the ice mold. Over several months of filtering minerals, sediment, and chlorine, the microscopic pores inside the carbon block filter cartridge gradually clog. When water flow restricts, the ice maker fill cycle—which operates on a strict timer of roughly 5 to 7 seconds—cannot deliver enough water to fill the mold cavities.
To correct this issue, begin by checking the installation date of your current filter. Most manufacturers recommend replacement every six months. If your water dispenser flow has also slowed down to a trickle, the filter is almost certainly the culprit.
- Locate the filter housing, typically inside the upper right corner of the fresh food compartment or hidden in the bottom grille.
- Turn or press the release button to eject the old cartridge.
- Insert a fresh OEM-compatible filter, twisting until it locks firmly into place.
- Run 2 to 3 gallons of water through the door dispenser to purge trapped air bubbles from the line.
- Wait 12 to 24 hours to monitor ice production speeds.
2. Inspect the Water Line and Saddle Valve for Restrictions
If the filter is fresh but ice batches remain undersized or slow, inspect the flexible water supply line feeding the back of the refrigerator. Kinks in braided stainless steel or plastic tubing severely choke water pressure, starving the ice maker during its brief fill window.
Pull the refrigerator away from the wall carefully, ensuring you do not strain the tubing. Check for sharp bends or tight pinches where the line tucks behind cabinetry. Next, locate your shutoff valve—frequently a small needle or saddle valve tapped into the cold water pipe under the kitchen sink or in the basement ceiling.
- Confirm the shutoff valve handle is turned fully counterclockwise to the open position.
- If your system uses a self-piercing saddle valve, the tiny puncture hole can accumulate scale and mineral deposits over time. Carefully turn the valve clockwise to clear debris, then back open completely.
- Disconnect the water line from the rear valve inlet into a small bucket, turn the supply on briefly, and confirm a steady, strong stream. Low household pressure below 20 PSI will stall standard ice makers.
3. Adjust Freezer Temperature and Improve Airflow
An ice maker operates on a built-in thermostat located on the mold body. The mechanism will not initiate a harvest cycle until the internal mold temperature drops below approximately 15°F (-9°C). If your freezer compartment runs too warm, the harvest thermostat delays the ejector blades, stretching cycle times from 90 minutes to several hours.
For optimal ice production, your freezer temperature must stay between 0°F and 5°F (-18°C to -15°C). Use an independent appliance thermometer placed directly beside the ice bin to confirm the actual temperature.
- Adjust the freezer dial or digital thermostat down if the reading exceeds 5°F.
- Check the air vents inside the freezer. Stacking frozen food boxes tightly against the evaporator vents blocks cold air circulation over the ice maker module.
- Keep at least 2 inches of clearance around the ice maker assembly.
- Clean your refrigerator condenser coils underneath or behind the unit; dirty coils force the compressor to struggle, raising internal box temperatures. If you notice thick frost spreading along the back wall, learn why ice is building up in your freezer to clear airflow blockages.
4. Clear Frost Buildup Around the Ejector Arm and Fill Tube
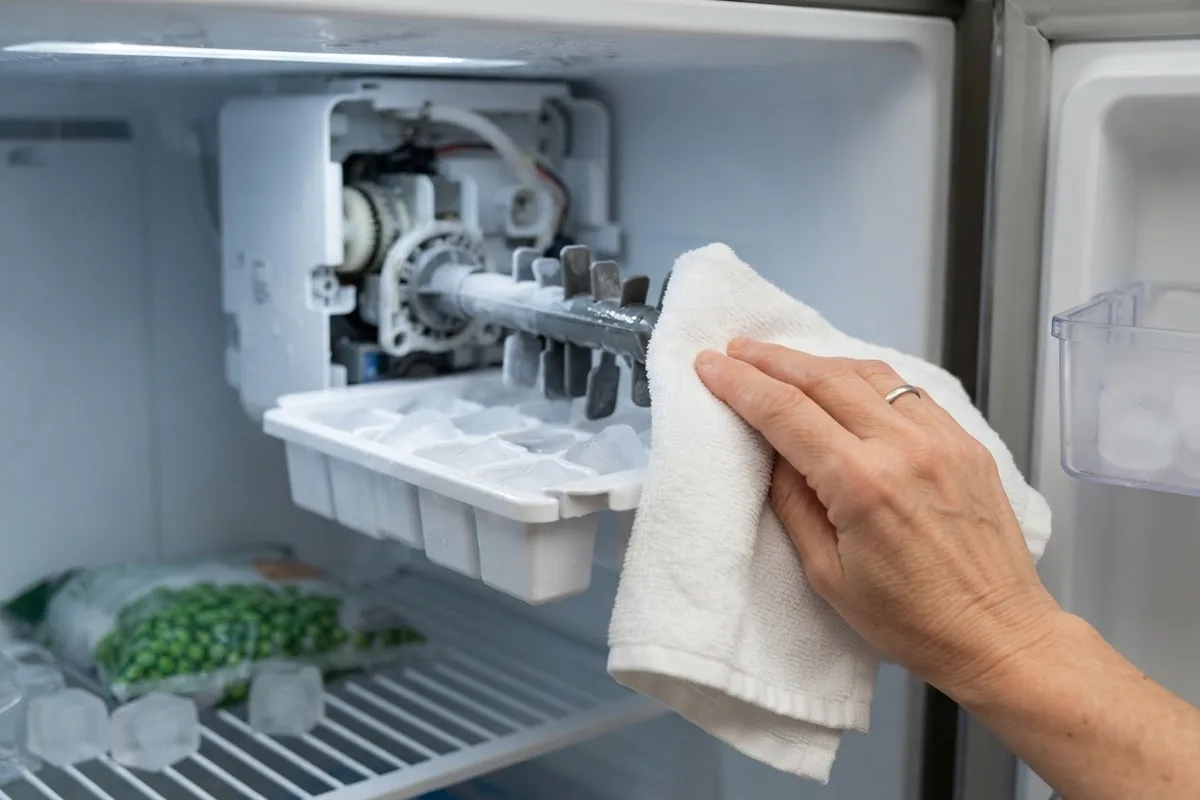
Frost accumulation around moving parts creates physical resistance that stalls the mechanical drive motor. When moisture enters the freezer from frequent door openings or a torn perimeter gasket, humidity settles directly onto the cold metal ice ejector tines and the plastic water fill funnel.
Inspect the top of the ice maker assembly with a flashlight. Look for ice bridges connecting individual mold slots or frost coating the sweeper blades.
- Lift the shutoff bail arm (or toggle the electronic switch) to the OFF position.
- Dip a clean microfiber cloth in warm water and gently press it against any frozen buildups around the ejector blades and stripper teeth.
- Examine the silicone fill tube extending from the freezer ceiling into the ice tray. If ice has backed up inside the tube mouth, use a warm hair dryer on low heat or a bulb syringe with warm water to melt the blockage.
- Dry the entire assembly with a towel before turning the ice maker back on to prevent instant refreezing.
5. Test the Dual Water Inlet Valve for Mechanical Failure
The dual water inlet valve mounted at the lower rear of your refrigerator houses electrical solenoids that open on command to send water to the dispenser and ice tray. Over time, internal mineral scale, sediment, or a weakened electrical solenoid coil can prevent the valve from opening fully during the timed fill signal.
Testing this component requires checking both mechanical flow and electrical continuity:
- Unplug the refrigerator and shut off the cold water supply line.
- Remove the lower rear cardboard or metal access panel to expose the valve.
- Inspect the fine mesh sediment screen inside the valve inlet collar; pry it out gently and rinse away trapped silt or lime scale with white vinegar.
- Use a digital multimeter set to ohms (resistance) to check the solenoid terminals for the ice maker side. A functional coil typically reads between 200 and 500 ohms, depending on the model. An open loop reading (OL or infinite resistance) indicates a dead coil requiring valve replacement.
- If the valve buzzes loudly during a cycle without releasing water, the internal diaphragm is mechanically jammed.
Ice Maker Output Troubleshooting Guide
Use this quick-reference table to match ice maker symptoms directly with the most common underlying cause and practical fix:
| Symptom | Likely Cause | Recommended DIY Solution |
|---|---|---|
| Tiny, hollow ice cubes | Low water pressure or clogged filter | Replace water filter; inspect supply line for kinks |
| Cycles taking over 4 hours | Freezer compartment too warm | Lower freezer to 0°F; rearrange food to clear vents |
| Ejector arms stopped mid-cycle | Frost jam or failing drive gear | Thaw frost with warm cloth; check shut-off arm |
| No water entering mold | Frozen fill tube or dead inlet valve | Thaw fill funnel; test inlet valve solenoid with meter |
| Ice cubes clumped into a solid block | Intermittent defrosting or stuck bail arm | Lower temp fluctuation; empty bin and reset bail arm |
When to Call a Pro
While water filter swaps, vent clearing, and fill tube defrosting are straightforward DIY tasks, some underlying problems require specialized equipment. If you notice signs of a sealed system leak, an evaporator fan motor failure, erratic main control board relays, or persistent low water pressure despite a new valve, troubleshooting electrical circuits and refrigerant flow requires professional expertise.
Typical refrigerator repair costs range broadly from $150 to $400 for component replacements like inlet valves, fan motors, or complete modular ice maker assemblies, depending on your region and appliance model. When complex electrical or cooling issues leave you without ice, True Appliance Repair can match you with an independent local technician to diagnose the problem quickly and safely. You can also explore our general appliance repair services or reach out via our contact page for help with kitchen breakdowns.
Frequently Asked Questions
How many pounds of ice should a standard refrigerator make per day?
A standard residential refrigerator ice maker typically produces between 3 and 4 pounds of ice per 24 hours, which translates to roughly 8 to 10 batches. Larger french door models with dual ice makers can produce up to 6 to 8 pounds daily under optimal temperature conditions.
Why are my new ice cubes cloudy and hollow?
Hollow ice cubes occur when the water inlet valve does not deliver enough water during the timed fill cycle, leaving the mold half-empty. Cloudy ice is usually harmless and caused by dissolved minerals, hard water, or microscopic air bubbles trapped in the water as it freezes rapidly from the outside inward.
How do I manually reset my refrigerator ice maker?
Most modern ice makers have a small reset button located on the bottom or front of the motor housing. Press and hold this button for 3 to 5 seconds until you hear a chime or motor engagement. On mechanical models, gently cycling the metal bail arm down and up or power-cycling the refrigerator at the breaker for 5 minutes will reset the control board.