
Rising utility bills often have less to do with how often you use your machines and more to do with hidden dirt, worn seals, and clogged vents forcing motors and heaters to work overtime. When airflow is restricted or heat escapes, your household appliances run longer cycles and draw far more electricity and gas than necessary. By completing these seven practical appliance energy saving tips, you can restore peak efficiency, cut monthly energy waste, and prevent premature wear on expensive parts.
1. Vacuum Dust From Refrigerator Condenser Coils
Your refrigerator runs around the clock, making it one of the largest steady energy users in your kitchen. It cools food by releasing absorbed heat through condenser coils located either at the bottom behind the toe-kick grille or on the back of the cabinet. When pet hair, dust, and kitchen grease blanket those coils, heat gets trapped inside the system. The compressor has to run significantly longer and hotter to maintain safe food temperatures, spiking your electric bill and wearing out the motor.
- Unplug the refrigerator from the wall outlet before removing any access panels.
- Pop off the bottom front toe-kick grille, or gently roll the unit out from the wall if your coils are rear-mounted.
- Use a long, flexible condenser coil brush to gently loosen compacted dust from between the metal loops.
- Vacuum away all loosened debris using a narrow crevice attachment.
- Restore power and push the unit back into place, leaving at least two inches of breathing room behind the cabinet for proper heat dissipation.
2. Clear Lint Buildup From the Dryer Exhaust Duct
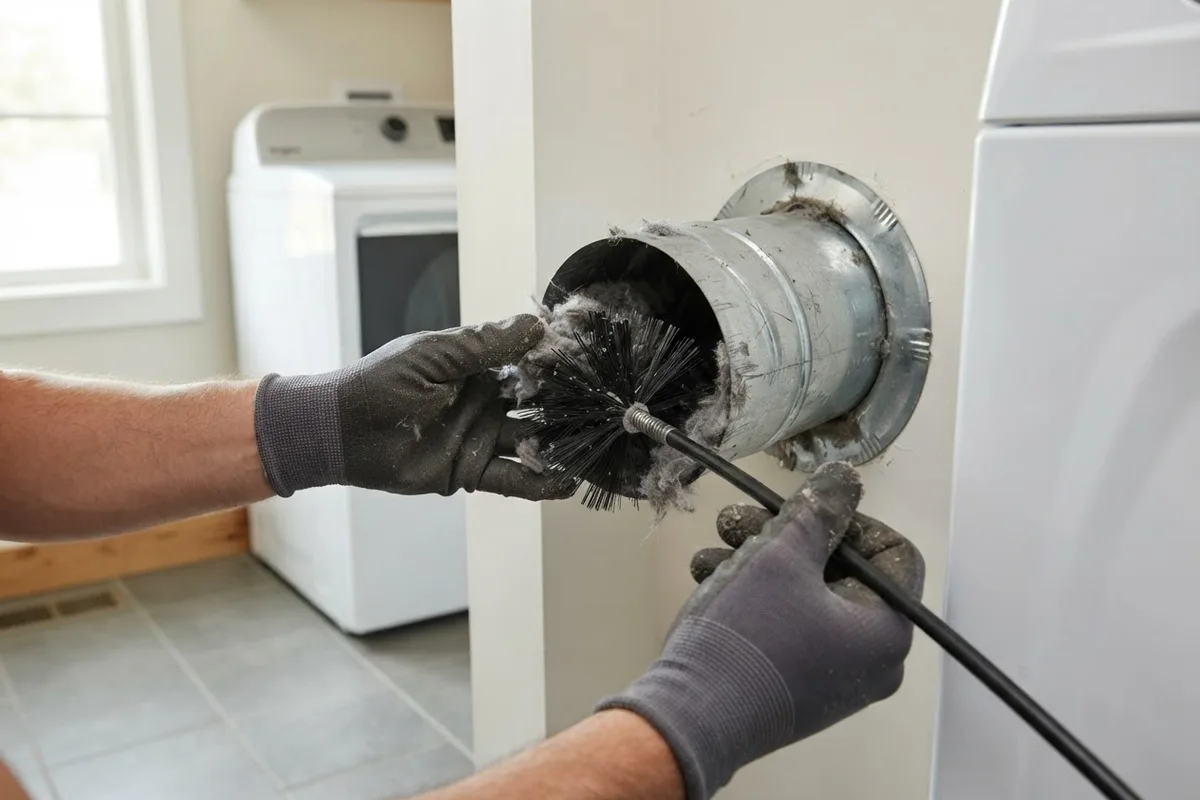
A clothes dryer that takes two cycles to dry a single load of towels is doubling its energy consumption every laundry day. Even if you wipe the removable lint screen before every load, fine fibers bypass the mesh and accumulate inside the blower housing and the rigid metal exhaust duct inside your wall. Restricted airflow traps moist, hot air inside the drum, causing the heating element or gas burner to cycle on and off repeatedly without actually drying your laundry.
- Unplug your electric dryer or shut off the gas supply valve and unplug the power cord on a gas model.
- Pull the dryer away from the wall and loosen the metal clamp connecting the 4-inch transition duct to the back exhaust port.
- Feed a flexible rotary dryer vent brush through the wall duct all the way to the exterior hood, vacuuming out the clumps of damp lint as you pull the brush back.
- Vacuum inside the dryer lint trap slot and inspect the exterior vent flap outside your home to verify it opens freely.
- Reattach the duct using rigid or semi-rigid metal venting rather than thin foil accordion tubing, ensuring there are no sharp kinks before plugging the machine back in.
3. Test and Clean Refrigerator and Oven Door Seals
Your refrigerator and oven sit at opposite ends of the temperature spectrum, yet both rely on flexible perimeter gaskets to keep conditioned air inside the cabinet. If a refrigerator gasket is sticky or warped, warm room air seeps in continuously. If an oven gasket is frayed or flattened, intense heat radiates out into your kitchen, forcing the bake element to stay on longer. If you notice heat escaping around the frame, reviewing how to fix an oven door leaking heat can save both energy and baking headaches.
- Make sure the oven is completely cool and switched off before touching the door perimeter.
- Close a crisp dollar bill in the refrigerator door at several points around the frame and pull it out; if it slides out with zero resistance, the gasket is not sealing tightly.
- Wash rubber refrigerator gaskets with warm water, a drop of mild dish soap, and a soft cloth to remove sticky food spills that pull the rubber out of shape, then dry thoroughly.
- Inspect the woven fiberglass or silicone gasket around your oven door for tears, crusty baked-on grease, or missing mounting clips.
- Replace any torn or permanently flattened door seals, which typically cost $25 to $90 for the part (varies by area/model) and press into channel tracks without special tools.
4. Descale the Dishwasher Heating Element and Spray Arms
When hard water minerals like calcium and lime coat the circular heating element at the bottom of your dishwasher tub, that chalky layer acts like an insulator. The heater has to draw electricity longer to bring water up to sanitizing temperatures and to dry your dishes at the end of the cycle. Mineral deposits also clog the tiny jets in the rotating spray arms, reducing water pressure and forcing you to rewash dirty plates.
- Turn off power to the dishwasher at the circuit breaker before reaching around the lower heating ring.
- Pull out the bottom dish rack and twist out the cylindrical mesh filter in the sump basin.
- Rinse the filter under warm running water with a soft dish brush to clear trapped grease and food particles.
- Unclip the lower and upper spray arms and use a wooden toothpick to poke hard water scale out of the spray nozzles.
- Reinstall the parts, restore power, place a dishwasher-safe glass measuring cup filled with two cups of white vinegar on the top rack, and run a normal hot cycle with no detergent to dissolve mineral scale off the heating element.
5. Wash Cold Loads and Maximize Washer Spin Speed
Roughly three-quarters of the energy used by a washing machine goes toward heating the water rather than turning the drum. Switching your routine settings and keeping the drain path clear yields immediate savings on both water-heating fuel and dryer run time. If your machine leaves laundry sopping wet at the end of a cycle, troubleshooting a washing machine not spinning properly will prevent your dryer from working twice as hard.
- Switch your everyday laundry default to the cold water setting and use high-efficiency detergent formulated to dissolve in cool temperatures.
- Select the highest safe spin speed for heavy fabrics like denim, cotton towels, and bedding so centrifugal force extracts maximum moisture before the clothes ever enter the dryer.
- Unplug the washing machine and locate the small drain pump access door on the lower front corner (common on front-load models).
- Place a shallow baking pan and towel under the access door, slowly unthread the pump filter cap to drain residual water, and remove coins, hairpins, and lint that slow down water extraction.
- Wipe the rubber door boot seal and run a monthly hot cleaning cycle with a washing machine cleaner tablet to keep internal sensors clean and accurate.
6. Clean Range Hood Grease Filters and Oven Glass
Small cooking habits and clean surfaces make a noticeable difference in kitchen energy consumption. Every time you crack the oven door open to check on a roast, the internal temperature drops by 25 degrees or more, forcing the bake element or gas burner to fire back up to recover. Similarly, a range hood choked with sticky cooking grease draws full electrical power at the fan motor while failing to vent steam and heat out of your kitchen.
- Make sure the stove, oven, and range hood are switched off and completely cool.
- Pop the metal mesh or baffle filters out of the underside of your range hood and soak them in a sink filled with hot water, a squirt of degreasing dish soap, and a quarter-cup of baking soda for 20 minutes.
- Scrub the filters gently with a non-abrasive brush, rinse thoroughly, let them dry completely, and snap them back into place.
- Apply a paste of baking soda and water to the inside of your oven door window, let it sit for 15 minutes, and wipe it clean with a damp microfiber cloth so you can check food using the oven light instead of opening the door.
- Match your pots and pans to the exact size of your electric or gas surface burners; a 6-inch pot on an 8-inch burner wastes substantial heat into the room.
7. Set Optimal Refrigerator and Freezer Temperatures
Many homeowners set their refrigerator and freezer dials to the coldest possible numbers after loading warm groceries and forget to dial them back. Setting a refrigerator below 35°F or a freezer below -5°F does not preserve food any better—it simply forces the compressor to run much longer and risks freezing fresh produce in your crisper drawers.
- Place an inexpensive freestanding appliance thermometer in a glass of water in the center of your refrigerator, and tuck another thermometer between frozen packages in the center of the freezer.
- Check the readings after eight hours without opening the doors repeatedly.
- Adjust your digital control panel or manual dial so the refrigerator stays between 37°F and 40°F and the freezer stays right at 0°F.
- Keep the freezer roughly two-thirds full; frozen items act as thermal mass that helps hold cold temperatures steady when the door opens (use jugs of water to fill empty space if needed).
- Avoid overpacking refrigerator shelves tightly against the back wall, as blocked air vents force the evaporator fan to run longer to circulate cold air.
Quick-Reference Appliance Efficiency Checklist
| Appliance | Key Maintenance Task | Ideal Frequency | Primary Energy Benefit |
|---|---|---|---|
| Refrigerator | Vacuum condenser coils & check temps (37°F / 0°F) | Every 6 months | Reduces compressor run time and prevents overheating |
| Clothes Dryer | Brush out main exhaust duct & exterior hood | Every 6–12 months | Cuts drying cycles in half and prevents heater cycling |
| Washing Machine | Clean drain pump filter & wash in cold water | Monthly / Every load | Eliminates water heating cost and removes more water on spin |
| Dishwasher | Clean sump filter & descale heating ring with vinegar | Monthly | Speeds up water heating and improves heated dry efficiency |
| Oven & Range | Degrease hood filters, clean door glass, check gasket | Every 3 months | Retains cabinet heat and clears kitchen steam faster |
When to Call a Pro
Routine cleaning and seal checks are safe, rewarding DIY tasks, but some efficiency problems point to failing internal components. If your refrigerator compressor runs nonstop even after you clean the coils, if your dryer still takes multiple cycles to dry with a clear vent, or if your oven struggles to hold a steady temperature, an underlying sensor, thermostat, heating element, or sealed-system component may be failing. Never attempt to open a refrigerator sealed refrigerant system, test high-voltage 240-volt dryer circuits, or adjust internal gas valves yourself.
Professional diagnostic visits and targeted part replacements—such as swapping a faulty oven temperature sensor, a weak washer drain pump, or a worn dryer drum seal—typically range from $120 to $350 depending on the machine (varies by area/model). When a machine needs hands-on troubleshooting beyond basic maintenance, True Appliance Repair can match you with an independent local specialist for home appliance repair to get your household running efficiently again.
FAQ
Which household appliances use the most energy?
After your central heating, cooling, and water heater, your clothes dryer and refrigerator are typically the largest energy consumers among household appliances. Electric ovens, dishwashers, and washing machines follow closely behind, especially when washing machines and dishwashers are run frequently on hot water cycles.
Does unplugging appliances really save electricity?
Major appliances like refrigerators, ovens, and dishwashers either need continuous power or are hardwired and plugged into heavy-duty outlets that should not be unplugged daily. However, unplugging countertop kitchen appliances with digital clocks or standby modes—like coffee makers, toaster ovens, and microwaves—can trim small phantom power draws over the course of a year.
How much does a dirty dryer vent increase energy bills?
A partially clogged dryer vent can force a clothes dryer to run two to three times longer per load to evaporate moisture. Beyond adding unnecessary dollars to your monthly electric or gas bill, that trapped heat puts intense strain on the heating element, thermal fuse, and drive motor.
Is it cheaper to repair an older appliance or replace it for energy savings?
If an appliance is within the first half of its typical 10-to-15-year lifespan and the repair costs less than half the price of a comparable new unit, repairing it and keeping up with cleaning is almost always the most cost-effective choice. If a machine is over 12 years old and requires a major compressor or motor repair, upgrading to a modern high-efficiency model often makes better financial sense.