
You open your oven door, turn on the bake cycle, and wait. You see a warm orange glow from the bottom of the cavity, but no flame appears and the temperature gauge never rises. This frustrating problem is one of the most common issues homeowners face with gas ranges, especially as baking season approaches.
While a glowing igniter looks like it is working, heat output alone does not mean it is drawing enough electrical current to open the gas safety valve. In this guide, you will learn why this happens, how to troubleshoot the components safely, and five practical steps to get your oven heating evenly again.
Safety First: Disconnect Power and Gas Supply
Before performing any hands-on inspection or maintenance on your gas range, safety is your top priority. Gas appliances combine electrical current and combustible gas, requiring careful preparation.
- Pull the oven away from the wall carefully to avoid damaging your kitchen flooring.
- Unplug the power cord from the wall outlet, or switch off the dedicated circuit breaker in your home's breaker panel.
- Shut off the manual gas supply valve, usually located on the wall pipe behind the appliance.
- Allow the oven to cool completely if you attempted to run a bake cycle recently.
Taking these preliminary precautions protects you from electrical shock and prevents gas leaks while you examine internal components. If you ever smell strong gas odor (similar to sulfur or rotten eggs), stop immediately, open your windows, evacuate the area, and contact your local gas utility company.
Check Igniter Resistance with a Multimeter
A gas oven igniter (a silicon carbide or silicon nitride element) serves two roles: it gets hot enough to ignite natural gas or propane, and it draws enough electrical current (amperage) to heat a bimetal strip inside the safety valve. As igniters age, their internal resistance increases, causing them to glow orange while failing to reach the amperage necessary to open the valve.
To check your igniter using a digital multimeter:
- Remove the lower oven racks, bottom floor panel, and metal flame spreader shield.
- Locate the igniter mounted next to the burner tube.
- Unclip the wire harness connector attaching the igniter to the main wiring harness.
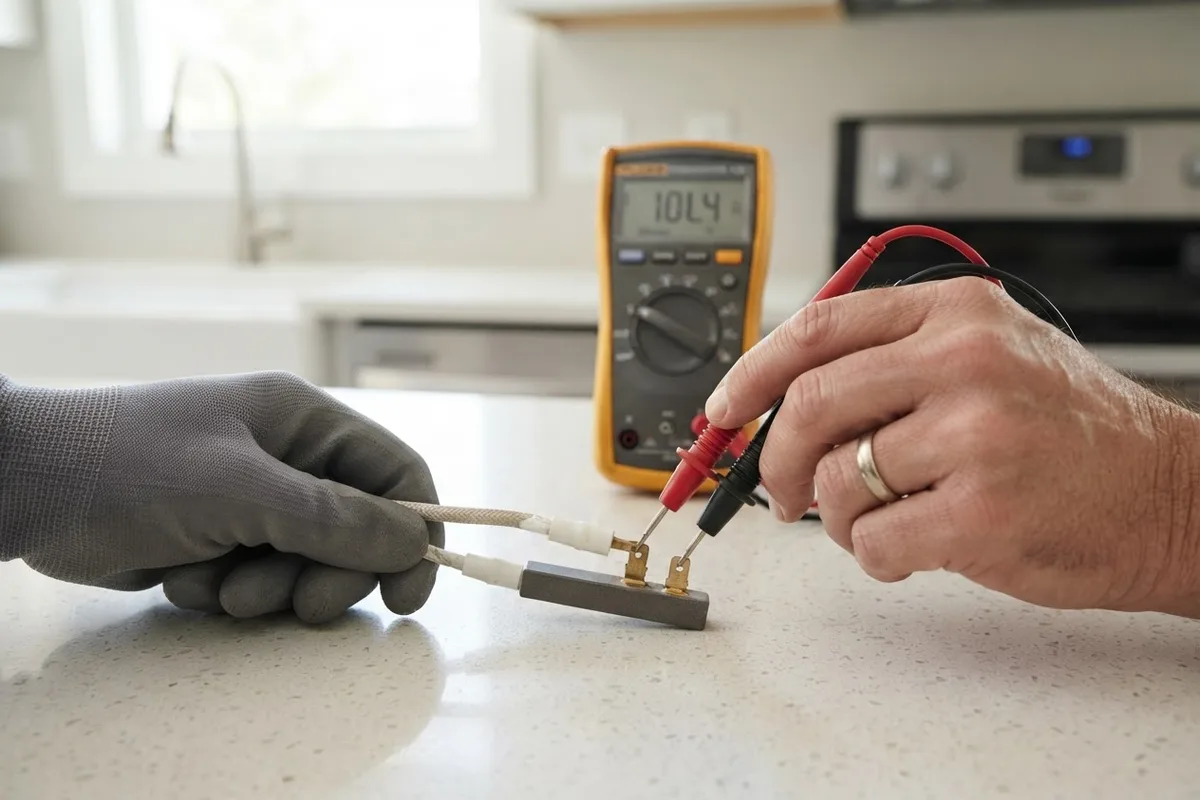
- Set your multimeter to the resistance setting (ohms, Ω).
- Place one meter probe on each terminal pin in the igniter plug.
A functional flat silicon carbide igniter generally reads between 40 and 400 ohms depending on the model manufacturer specifications. If your multimeter displays an open circuit (infinite resistance) or an extremely high resistance value, the igniter is weakened or damaged and must be replaced. Replacement parts typically range from $30 to $90 depending on your range model.
Inspect the Safety Valve Solenoid Terminals
If the igniter tests within proper resistance limits, the issue might stem from the gas safety valve itself. The safety valve relies on a continuous electrical current passing through the igniter circuit. When the igniter reaches adequate temperature and draws 3.2 to 3.6 amps, the bi-metal heat element inside the valve expands, allowing gas to flow into the burner tube.
To inspect the safety valve:
- Locate the valve connected directly to the gas supply line near the lower back or bottom of the range cavity.
- Visually inspect the metal terminals for corrosion, loose wire connectors, or burn marks.
- Using your multimeter set to ohms, touch the probes across the dual terminals of the bake valve coil.
Most standard gas safety valves should register approximately 1.0 to 5.0 ohms of resistance across the terminal coil. A reading of zero or infinity indicates an internal coil break, meaning the valve cannot open regardless of igniter performance. Avoiding simple oversights like loose spade connectors helps prevent severe hardware failures down the line—you can read more about common mistakes in our guide to 7 Costly Appliance Care Mistakes That Cause Early Breakdowns.
Clean Burner Ports Around the Igniter Tip
Sometimes the igniter reaches adequate ignition temperatures and the gas valve opens, but gas fails to reach the glowing element quickly enough. Small food spills, baked-on grease, or carbon buildup can clog the tiny port holes along the burner tube adjacent to the igniter tip.
- Remove the mounting screws holding the burner tube to the oven frame.
- Lift the burner tube out gently and inspect the tiny flash holes near the igniter bracket.
- Use a soft-bristled brush or a wooden toothpick to clear away ash, carbon debris, or rust flakes choking the gas ports.
- Clean the exterior burner surface using warm water and mild dish soap, ensuring no moisture remains inside the tube before reassembly.
Never use metal needles or drill bits to clean burner ports, as expanding the precise hole diameter alters gas distribution and flame balance. For top-of-range burner maintenance tips, check out our guide on Why Is My Gas Stove Flame Yellow? 5 Easy Fixes.
Verify Household Gas Line Pressure and Valve
If your igniter is glowing and electrical circuits test fine, an interrupted gas supply might be stopping ignition. A partially closed shut-off valve or inadequate line pressure prevents gas from reaching the igniter zone even if the safety valve opens.
- Verify that the manual shut-off valve behind the range is fully turned parallel to the gas pipe line.
- Check other gas appliances in your home (such as your gas cooktop burners or water heater) to confirm gas supply is active.
- Ensure the appliance's internal regulator leverage switch (if equipped) has not been bumped into the off position during cleaning.
If top surface burners display weak, sputtering flames or fail to light entirely, the problem likely stems from household supply pressure rather than an internal oven component.
Test the Control Board Voltage Output
The main electronic control board (or oven thermostat relay) sends 120-volt power down to the igniter and safety valve circuit when a bake command is selected. If the control board relay contacts are pitted, burned, or failing, the board may supply reduced voltage—just enough to make the igniter glow weakly, but insufficient to actuate the safety valve.
- Reconnect electrical power carefully while leaving access panels open (do not touch active wiring).
- Set your multimeter to AC Voltage (V~).
- Carefully touch the meter probes to the electrical leads supplying the igniter harness while initiating a bake cycle.
If the reading drops significantly below 110-120 volts AC, the control board relay is failing to deliver adequate electrical potential. Because testing live electrical terminals carries inherent risks, homeowners unfamiliar with electrical testing should stop and consult a professional technician.
Quick Troubleshooting Reference
| Component | Visual Symptom | Multimeter Test | Typical DIY Fix |
|---|---|---|---|
| Gas Igniter | Glows orange, no flame | Resistance > 400Ω or open circuit | Replace igniter assembly ($30–$90 part) |
| Safety Valve | Igniter glows, no gas click | Resistance = 0Ω or infinite | Replace dual gas safety valve ($50–$140 part) |
| Burner Tube | Igniter glows, delayed pop/gas smell | N/A (Visual clog) | Clear clogged ports with soft brush |
| Control Board | Weak igniter glow, low voltage | Output < 110V AC during bake call | Replace main control board ($150–$300 part) |
When to Call a Pro
Fixing a glowing igniter by replacing the igniter assembly or cleaning burner ports is often an easy afternoon DIY task. However, working with home natural gas or liquid propane lines requires caution.
You should call a professional technician if:
- You detect a persistent gas smell inside or around the kitchen.
- Multimeter testing points to complex electronic control board failures or hardwired electrical line faults.
- You feel uncomfortable testing live voltage circuits or handling gas line fittings.
- The safety valve or gas pressure regulator requires replacement.
If you need assistance troubleshooting gas components or replacing internal range parts safely, True Appliance Repair can match you with a local appliance pro to diagnose and repair your oven quickly.
FAQ
Why does my gas oven igniter glow if it is broken?
Gas igniters are made from ceramic materials that heat up as electrical current flows through them. Over time, heat stress causes the element to wear down and increase in electrical resistance. The element can still draw enough power to get hot and glow bright orange, but it fails to draw the specific amperage required to open the gas safety valve.
How much does it cost to replace a gas oven igniter?
Doing the replacement yourself typically costs between $30 and $90 for the replacement part, depending on your appliance brand and model. If you choose to hire a technician, professional service fees generally bring the total repair cost between $150 and $300, varying by region and model complexity.
How long should a gas oven igniter last?
Most gas oven igniters last between 3 and 7 years under typical residential cooking patterns. Frequent use of high-temperature cycles, heavy holiday baking, or frequent self-cleaning cycles can shorten the overall lifespan of ceramic igniter elements.
Can I light a gas oven manually with a match if the igniter is glowing?
No. Modern gas ovens use a safety valve that blocks gas flow until the igniter reaches proper operating amperage. Unlike older manual pilot-light ovens, gas will not flow into the burner tube simply because you hold a match near it. Attempting to manually light a modern sealed gas oven is unsafe and will not work.