
Keeping your home appliances running smoothly doesn't have to be a full-time job. With a few quick home appliance maintenance tasks, you can prevent unexpected breakdowns, lower your utility bills, and extend the lifespan of your machines. This step-by-step guide covers seven essential maintenance tasks you can easily tackle this weekend.
Safety First: Before starting any hands-on maintenance, always unplug the appliance from its electrical source and shut off any water or gas supply valves. For complex tasks involving gas lines, sealed refrigerant systems, or electrical panels, stop immediately and call a professional.
1. Inspect and Vacuum Refrigerator Condenser Coils
Your refrigerator works constantly to keep your food fresh, and its condenser coils are responsible for releasing heat from inside the unit. Over time, dust, pet hair, and debris accumulate on these coils, forcing the compressor to work harder and consume more energy. Neglecting this task can lead to your refrigerator not cooling efficiently or running constantly.
To complete this task:
- Unplug the refrigerator or shut off the corresponding circuit breaker.
- Locate the condenser coils, which are typically found behind a bottom grille or on the back of the unit.
- Gently remove the grille if applicable.
- Use a vacuum cleaner with a narrow brush attachment to remove dust and debris from the coils.
- For stubborn pet hair or dust, use a coil brush or a soft-bristled brush to gently loosen the debris before vacuuming again. Be careful not to bend the coils.
- Replace the grille and plug the appliance back in.
Taking time for cleaning refrigerator coils every six months can significantly improve efficiency and prevent compressor failure, a common reason for early appliance replacement.
2. Clear Out the Dishwasher Filter and Spray Arms
A clean dishwasher is essential for spotless dishes. When the filter and spray arms are clogged with food particles and mineral buildup, water cannot circulate effectively, leading to dirty dishes and potential drainage issues. Regular maintenance prevents problems like a dishwasher stopping mid-cycle.
Steps to complete this task:
- Ensure the dishwasher is completely off and cool.
- Remove the bottom dish rack.
- Locate the filter at the bottom of the tub. It usually twists out easily counter-clockwise.
- Rinse the filter under warm running water, using a soft brush and mild dish soap to remove debris. Avoid harsh chemicals.
- Check the spray arms. If they are removable, take them off and check the small water holes for clogs. Use a wooden toothpick or a safety pin to gently clear any debris from the spray holes.
- Rinse the spray arms under running water.
- Reassemble the filter and spray arms, ensuring they are locked securely back in place.
Perform this task once a month to ensure your dishwasher continues to operate at peak efficiency and drains correctly.
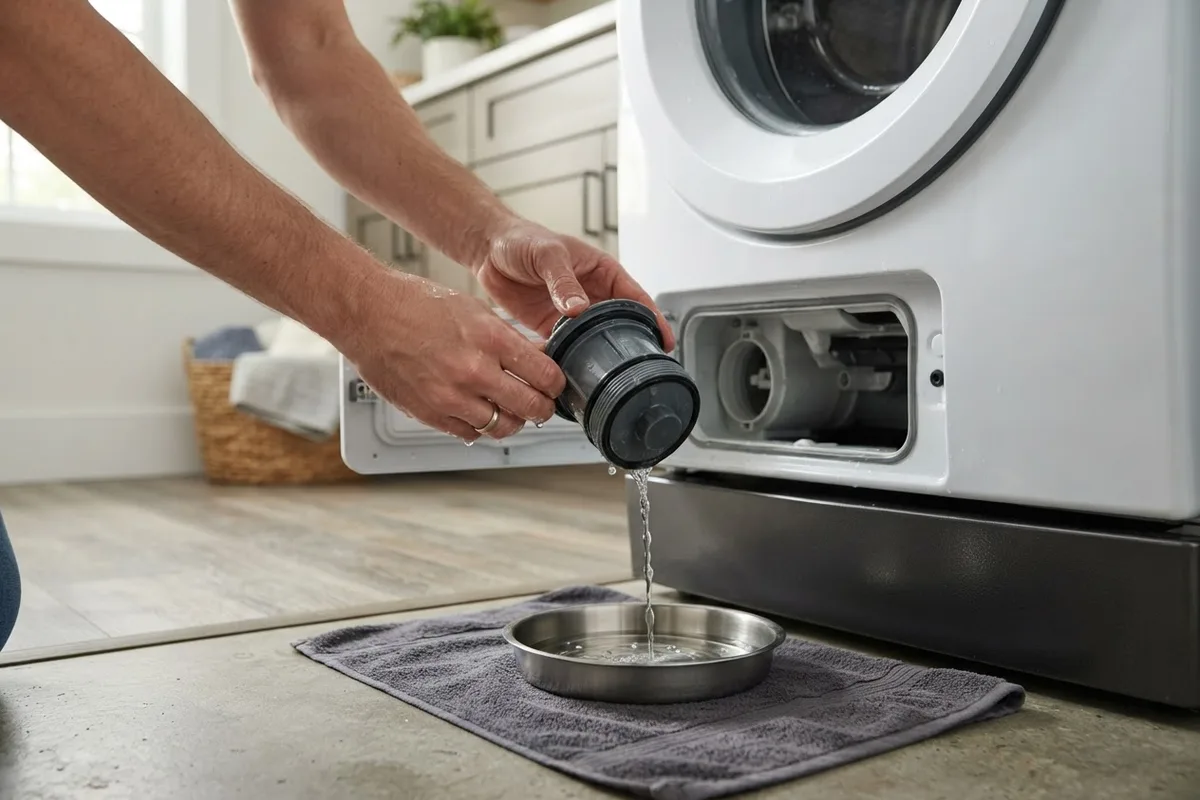
3. Clean the Washing Machine Drain Pump Filter
Front-loading washing machines and many modern top-loaders feature a drain pump filter designed to catch small objects, lint, and debris before they damage the pump. A clogged filter can cause your machine to drain slowly, smell musty, or even fail to spin properly.
To clean the filter:
- Unplug the washing machine and shut off the water supply.
- Locate the access door on the bottom front of the machine. If there is no access door, consult your manual, as you may need to remove the front panel.
- Place a shallow pan and a towel beneath the door to catch excess water.
- Carefully open the access door.
- If there is a small drain tube, uncap it to let the water drain into your pan first.
- Slowly twist the drain pump filter counter-clockwise to remove it. Be prepared for more water to spill out.
- Remove any coins, buttons, lint, and debris from the filter. Inspect the chamber inside the machine for any trapped items.
- Rinse the filter under warm water.
- Reinstall the filter by twisting it clockwise until it is snug, re-cap the drain tube, and close the access door.
Taking ten minutes to clean a washing machine drain pump filter every few months will prevent major drainage headaches and keep your laundry room fresh.
4. Clear the Dryer Drum and External Vent
A clogged dryer vent is more than just an inconvenience; it is a major safety hazard and a common cause of household fires. When lint builds up in the dryer's internal ducts and external vent, it restricts airflow. This forces your dryer to run longer, increasing your energy bills and putting stress on the heating element.
Steps to maintain your dryer:
- Unplug the dryer. If it is a gas dryer, also shut off the gas supply valve.
- Pull the dryer away from the wall and disconnect the exhaust duct from the back of the machine.
- Use a vacuum with a long hose attachment or a specialized dryer vent cleaning brush to clean out the ductwork inside the dryer and the vent leading to the outside.
- Go outside and inspect the exterior vent cap. Ensure the louvers move freely and remove any lint or debris blocking the airflow.
- Inside the dryer, remove the lint screen and vacuum the slot where it sits.
- Reattach the ductwork securely, ensuring there are no kinks or tears in the hose. Push the dryer back into place.
Clearing your dryer vent once or twice a year improves efficiency and drastically reduces the risk of dryer fires.
5. Freshen and Inspect the Garbage Disposal
Garbage disposals are often neglected until they stop working, emit unpleasant odors, or start leaking. Regular maintenance ensures the blades remain sharp and the unit drains properly, avoiding costly kitchen clogs.
Steps to freshen and maintain your disposal:
- Ensure the disposal is turned off.
- To clean and sharpen the blades, drop a few ice cubes and a handful of coarse rock salt into the disposal. Turn on cold water and run the disposal for a few seconds. The ice and salt will help scrape away slime and deposits from the internal components.
- To eliminate odors, cut a lemon or lime into small pieces. With the disposal running and cold water flowing, feed the citrus pieces into the unit one by one. The citrus acid cleans the blades and provides a fresh scent.
- To clean the splash guard, use an old toothbrush and some dish soap to scrub underneath the rubber flaps, where food debris often collects.
- Never use harsh chemical drain cleaners, as they can damage the disposal's internal components and your plumbing.
Taking these quick steps monthly will keep your garbage disposal clean, sharp, and odor-free.
6. Clean and Calibrate the Oven
An inefficient oven can lead to unevenly cooked meals and increased energy consumption. Over time, spills and splatters bake onto the oven walls, potentially creating smoke and unpleasant odors.
Steps to maintain your oven:
- Ensure the oven is completely cool and unplugged if electric (or the circuit breaker is off).
- Remove the oven racks. Soak them in warm, soapy water and scrub away burnt-on grease with a non-scratch pad.
- For the oven interior, avoid harsh chemical cleaners. Instead, mix baking soda and water to create a thick paste.
- Spread the paste over the interior walls (avoiding the heating elements, igniters, and gas vents). Let it sit for several hours or overnight.
- Wipe away the paste with a damp cloth. Spray a little vinegar over any remaining baking soda residue to create a gentle foaming reaction, then wipe clean.
- To check calibration, use an independent oven thermometer. Place it on the center rack and set your oven to 350°F. Once preheated, check the thermometer. If it reads more than 15 degrees off, you may need to adjust your oven's calibration following the manufacturer's instructions.
Regular cleaning prevents smoke and ensures your oven maintains precise temperatures for baking.
7. Inspect Appliance Hoses and Seals
The final task in your weekend maintenance routine is to inspect the hoses and door seals on all your major appliances. A damaged hose can lead to catastrophic water damage, while a worn seal allows heat or cold to escape, decreasing efficiency.
Steps to inspect seals and hoses:
- Washing Machine and Dishwasher Hoses: Inspect the water supply hoses behind your washing machine and under your sink for the dishwasher. Look for signs of cracking, blistering, kinks, or leaks. Ensure the connections are tight. It is generally recommended to replace rubber hoses every five years, preferably with braided stainless steel hoses, which are more durable.
- Refrigerator and Oven Door Seals: Check the rubber gaskets on your refrigerator, freezer, and oven doors. Look for cracks, tears, or signs of wear. A simple test for refrigerator seals is the "dollar bill test." Close the door on a dollar bill. If you can easily pull the dollar bill out without any resistance, your seal is weak and likely needs replacement. Clean the gaskets with warm, soapy water to remove sticky residue that can damage the seal over time.
By catching these small issues early, you can prevent major leaks and efficiency losses.
Appliance Maintenance Quick-Reference Table
To help you stay on track, here is a quick summary of the seven tasks, how often to do them, and the estimated time required.
| Appliance | Maintenance Task | Frequency | Estimated Time |
|---|---|---|---|
| Refrigerator | Vacuum condenser coils; Check door seals | Every 6 months | 15 minutes |
| Dishwasher | Clean filter and spray arms; Inspect seals | Monthly | 10 minutes |
| Washing Machine | Clean drain pump filter; Inspect supply hoses | Every 2-3 months | 10 minutes |
| Dryer | Clear drum, internal duct, and external vent | Every 6-12 months | 30 minutes |
| Garbage Disposal | Grind ice, salt, and citrus; Clean splash guard | Monthly | 5 minutes |
| Oven | Deep clean interior; Check temperature calibration | Every 3-6 months | 45 minutes |
| All Appliances | Inspect all water hoses and door gaskets | Every 6 months | 15 minutes |
When to Call a Pro
While these home appliance maintenance tasks are perfect for a DIY weekend, some situations require professional expertise. If you encounter any of the following, it is time to step back and call in a professional:
- Gas Appliances: If you detect a gas smell, encounter an appliance that will not ignite, or need to work on gas lines or burner assemblies, immediately shut off the gas supply and call a pro.
- Sealed Refrigerant Systems: If your refrigerator is not cooling despite clean coils, the issue may involve the compressor or sealed refrigerant system. These systems require specialized equipment and knowledge to repair safely.
- Electrical Panel and Internal Wiring: If an appliance is tripping your home's circuit breaker, has exposed or frayed wiring, or shows signs of electrical damage, do not attempt to fix it yourself.
- Severe Water Leaks: While replacing a hose is a common DIY task, if you cannot find the source of a major leak or suspect internal pump or valve failure, professional help is needed.
If you are unsure about any step or encounter a problem beyond your comfort level, do not risk damaging your appliance or causing an injury. True Appliance Repair can match you with a local appliance pro who can safely and efficiently handle any complex repair or maintenance needs.
FAQ
How often should I do appliance maintenance?
As a general rule, monthly tasks should include cleaning your dishwasher filter and freshening your garbage disposal. Every three to six months, you should clean your washing machine drain pump filter, vacuum refrigerator condenser coils, and clean your oven. Annually, make sure to clear your dryer vent and thoroughly inspect all appliance water hoses and door seals.
Do I really need to unplug appliances before maintenance?
Yes, always unplug appliances or shut off the corresponding circuit breaker before performing any maintenance. Working on appliances while they are connected to electrical power poses a significant risk of shock or injury. Additionally, always shut off the water supply for water-connected appliances like washing machines and dishwashers, and the gas supply for gas stoves and dryers.
What is the average lifespan of major home appliances?
The typical lifespan of major home appliances varies by type and usage. On average, refrigerators and dryers last about 10 to 13 years, while washing machines and dishwashers typically last 9 to 11 years. Ovens and stoves can last slightly longer, often 13 to 15 years. Regular home appliance maintenance tasks can help you maximize these lifespans and avoid premature replacements.