
Burnt edges on your holiday pies or a roast that takes an extra hour to cook usually means your oven temperature is off by 15 to 35 degrees. Before replacing heating parts, learning how to calibrate an oven Yourself can restore pinpoint baking accuracy in less than an hour. Grab a simple hanging thermometer and follow these six practical steps to test and adjust your digital or mechanical range.
1. Place an Oven Thermometer in the Center
Every oven experiences minor temperature swings as the heating elements or gas burner cycle on and off, so a single quick reading will not tell the whole story. To get an accurate baseline, you need to measure the average heat right where your food sits.
- Position your primary oven rack in the exact center of the cavity, making sure no baking stones or heavy pans are inside to trap extra heat.
- Hang an inexpensive analog dial thermometer or clip a digital probe thermometer directly onto the middle of the center rack.
- Check that the thermometer face is easy to read through the oven window so you do not let heat escape by opening the door during testing.
- If your window is too cloudy or stained to read the dial clearly, wipe down the interior glass first—and if residue is causing smoke during preheating, review our guide on why an oven is smoking when empty before running a long temperature test.
2. Run a 350°F Temperature Cycle Test
Because ovens overshoot their target temperature on the first preheat and then settle into a rhythm, you must average several heating cycles before deciding how to calibrate an oven.
- Set your gas or electric oven to Bake at 350°F and let it preheat completely until the indicator chime sounds.
- Leave the door closed and wait an additional 20 minutes for the interior walls and racks to stabilize.
- Look through the window and write down the thermometer reading.
- Repeat this reading every 15 minutes over the next hour, capturing at least four separate measurements as the oven cycles on and off.
- Add your four numbers together and divide by four to find your true average temperature. If the average is within 5 degrees of 350°F, your oven is already operating normally. If it is off by 10 to 35 degrees, move on to the calibration steps below.
3. Adjust Digital Controls via the Settings Menu
Most modern electric and gas ranges with an electronic touchpad allow you to offset the temperature by up to 35 degrees in either direction without using any tools.
- Check your owner's manual for the exact button combination, or look on the touchpad for a button labeled Options, Settings, or User Pref.
- On models without a dedicated settings button, press and hold the Bake button for 5 full seconds until the current offset (usually
00) flashes on the screen. - Use the number pad or the up/down arrow keys to enter the difference you calculated during your test. For example, if your oven averaged 370°F (20 degrees too hot), adjust the number to
-20. On many ranges, pressing the Autoset or 0 key toggles between positive (+) and negative (-) values. - Press Start or Enter to save the new calibration. This offset only shifts the midpoint temperature and will not affect high-heat broiling or self-cleaning cycles.
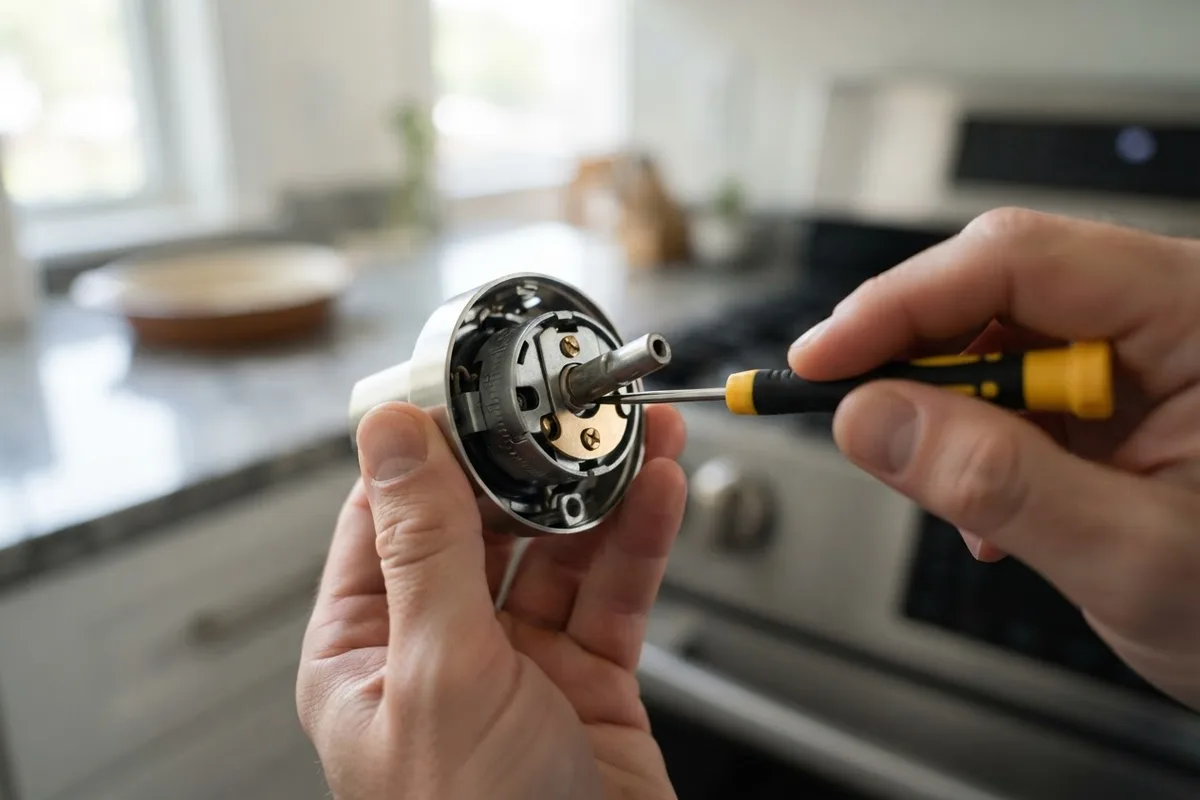
4. Calibrate Mechanical Knobs with Rear Set Screws
Older ovens and many commercial-style gas ranges use a physical thermostat knob rather than a digital touchpad. You can fine-tune these dials using a small flathead screwdriver.
- Safety first: Turn the oven off and unplug the power cord, or switch off the circuit breaker, before removing any control knobs.
- Pull the temperature dial straight off its metal stem on the front panel and flip the knob over.
- Look at the back of the knob for one or two small locking screws holding a toothed metal plate against a series of calibration notches.
- Loosen the two screws slightly—just enough so the inner ring can slide, without removing the screws completely.
- Rotate the inner ring one notch toward Cooler or Hotter depending on your thermometer test; each click or hash mark typically changes the temperature by 5°F to 10°F.
- Tighten the screws firmly, push the knob back onto the stem, restore power, and run a quick 30-minute retest at 350°F to confirm the change.
5. Turn the Hidden Thermostat Stem Screw
If you pull off a mechanical oven knob and find the back is completely hollow plastc with no locking screws, the calibration adjustment is hidden inside the hollow metal shaft that sticks out of the control panel.
- Safety first: Unplug the range or shut off the circuit breaker at your home's electrical panel before inserting a metal screwdriver into the control shaft.
- Shine a flashlight into the center of the hollow D-shaped metal stem where the knob attaches.
- Insert a narrow flathead eyeglass or jeweler's screwdriver into the center of the shaft until you feel it slot into the small recessed brass screw inside.
- Turn the internal screw clockwise in a tiny 1/8-turn increment to lower the oven temperature, or turn it counterclockwise 1/8 of a turn to raise the temperature.
- Slide the knob back onto the shaft, restore power, and test the oven again at 350°F.
| Oven Symptom or Test Result | Variance from 350°F | Best Action to Take |
|---|---|---|
| Average reading is 345°F–355°F | Within ±5°F | No calibration needed; normal cycling swing |
| Average reading is 320°F–340°F | 10°F–30°F too cool | Add +10° to +30° offset or adjust knob hotter |
| Average reading is 360°F–385°F | 10°F–35°F too hot | Add -10° to -35° offset or adjust knob cooler |
| Average reading is off by 40°F+ | Exceeds calibration limit | Inspect temperature sensor probe, element, or igniter |
6. Check the Temperature Sensor Probe Alignment
If your oven is off by more than 35 degrees, or if calibrating the controls does not keep the temperature steady, the culprit is often a displaced or dirty temperature sensor probe rather than a calibration drift.
- Safety first: Unplug the oven or flip the breaker off, and wait until the interior cavity is completely cool to the touch.
- Locate the thin metal rod—about three inches long and the thickness of a pencil—sticking out of the upper back wall of the oven cavity.
- Verify that the sensor rod points straight out and is not bent or touching the metal oven wall or a rack; if it touches metal, it reads surface heat instead of air temperature and shuts the burner off early.
- Gently wipe away any baked-on grease or carbon crust on the probe using a damp cloth and a pinch of baking soda.
- If your range top is also acting up while you are troubleshooting heating issues, check our guide on why an electric stove burner is not heating for quick surface element checks.
When to Call a Pro
Built-in calibration settings are designed to fix minor sensor drift up to 35 degrees. If your thermometer shows the oven is off by 50 degrees or more, or if the temperature swings wildly from one bake cycle to the next, a hardware component is likely failing. Common culprits include a weak gas igniter, a shorted temperature thermistor, a damaged door gasket, or a failing relay on the main control board. Replacing a temperature sensor typically costs between $120 and $250 including parts and labor, while a new gas igniter or bake element usually runs $150 to $300, though exact pricing varies by area and model.
Never attempt to repair gas valves, high-voltage wiring, or sealed control panels yourself. If a simple calibration does not solve your baking problems, True Appliance Repair can match you with an experienced local technician for professional oven and stove repair so you can get back to cooking safely.
FAQ
How often should you calibrate an oven?
Most homeowners only need to check their oven temperature once a year—ideally a few weeks before heavy holiday baking—or whenever baked goods consistently finish much earlier or later than recipe times suggest. Ovens can also drift slightly after a high-heat self-cleaning cycle or a household power surge.
Does calibrating an oven affect the self-clean or broil temperature?
No. Adjusting the calibration on a digital keypad or mechanical dial only shifts the standard Bake and Convection Bake temperatures. Both the Broil setting and the Self-Clean cycle bypass the temperature offset to operate at fixed high heat.
Why is my oven temperature suddenly off by 50 degrees or more?
A sudden, large drop or spike in temperature points to a failed part rather than a calibration issue. In electric ovens, one of the dual heating elements or the temperature sensor probe may have burned out; in gas ovens, a weak glow bar igniter often takes too long to open the gas valve, causing the oven to run cold.
Can I use an instant-read meat thermometer to calibrate my oven?
A standard handheld meat thermometer is designed to measure dense liquid or food and reacts too quickly to tiny air currents when you open the oven door. For an accurate calibration test, use a heavy bimetal dial oven thermometer that hangs from the rack or a digital leave-in oven probe with a heat-proof cord.