
Pulling a load of heavy winter towels out of the dryer only to find them cold and damp—even though the cycle finished—is a classic laundry room headache. Before you assume the heating element is failing, check the two thin metal strips tucked inside the drum: invisible residue from dryer sheets and fabric softener coats these sensor bars and blinds your machine's auto-dry system. Follow these five quick, safe steps to clean dryer moisture sensor bars, restore accurate cycle times, and protect your clothes.
1. Unplug the Dryer and Locate the Sensor Bars
Before reaching inside any laundry appliance, cut the power completely so the drum cannot accidentally turn or send current to internal components.
- Unplug the dryer power cord from the wall outlet (or flip the dedicated double-pole breaker in your electrical panel if the plug is out of reach).
- If you own a gas dryer, leave the gas supply valve undisturbed unless you need to slide the cabinet far from the wall—never yank or kink a flexible gas line. If you ever smell gas, stop immediately, leave the area, and call your gas utility or a qualified pro.
- Open the dryer door and pull out the lint screen to give yourself clear visibility.
- Feel along the lower front bulkhead just inside the door opening, right below or behind the lint trap housing, or check along one of the raised drum baffles.
- Look for two parallel, slightly curved bare metal strips about three to six inches long sitting side by side in a plastic mount.
2. Test Whether Residue Is Blocking the Sensor
Dryer sheets, liquid fabric softener, and heavy-duty detergent leave behind a clear, waxy silicone film that you usually cannot see under laundry room lighting. Moisture sensors work by passing a tiny low-voltage signal across wet fabric as it brushes both metal strips at once; when waxy buildup insulates the metal, the control board thinks the load is bone dry and ends the cycle early.
- Run a clean, dry fingertip across both metal strips—if they feel slick, greasy, or slightly tacky instead of squeaky-clean bare steel, buildup is present.
- Shine a flashlight at a low angle across the bars to spot dull, hazy patches, lint fibers baked onto the edges, or dark marks from melted synthetic fabrics.
- Check whether Timed Dry still heats normally. If a 40-minute Timed Dry gets clothes hot and dry while Sensor Dry quits after ten minutes, dirty sensor bars are almost certainly the culprit rather than a heating failure.
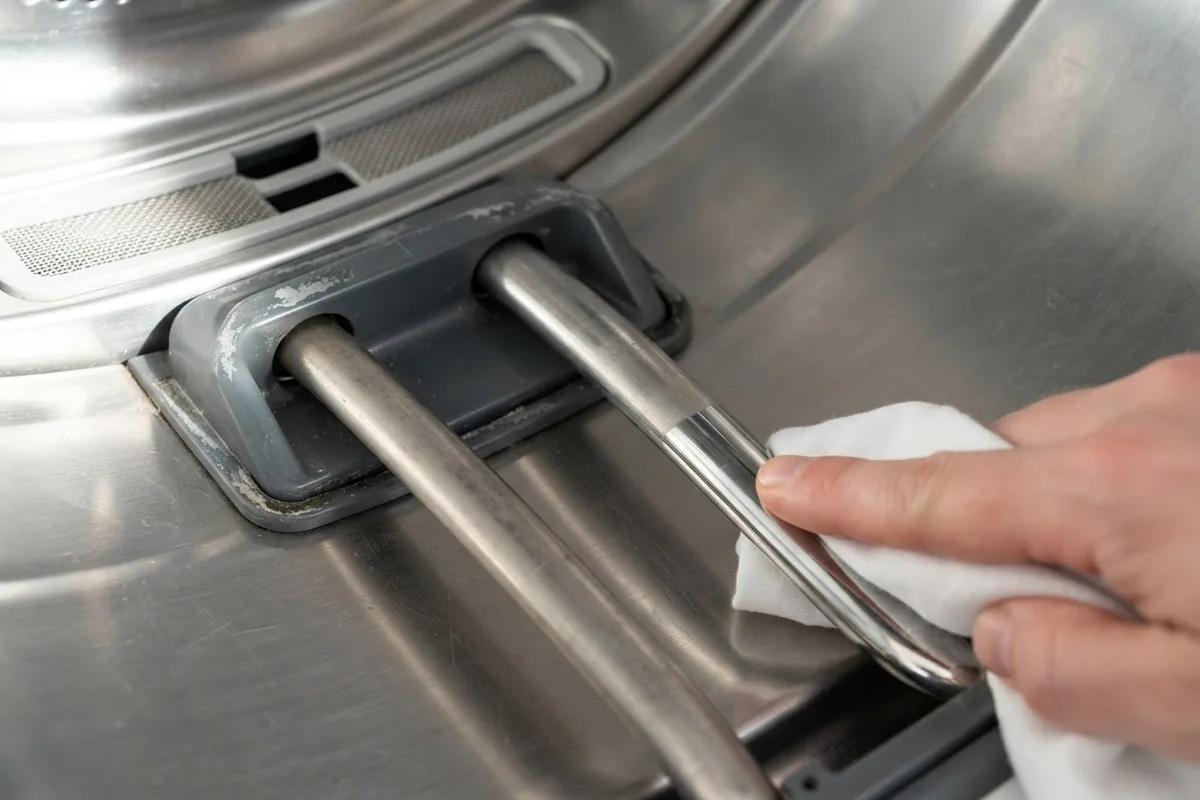
3. Wipe the Metal Strips With Rubbing Alcohol
Standard glass cleaner or soapy water often smears waxy softener residue around rather than dissolving it. Isopropyl rubbing alcohol cuts straight through waxy coatings and evaporates cleanly without leaving a film behind.
- Pour a small amount of 70% or 91% isopropyl rubbing alcohol onto a clean microfiber cloth or a cotton ball—never spray liquid directly onto the sensor housing where it could seep into wiring.
- Press the damp cloth firmly against one end of the metal bars and scrub back and forth along the entire length for 30 to 45 seconds.
- Wrap the cloth over your index finger to clean the narrow plastic gap between the two parallel strips, since wet lint wedged across both bars can trick the dryer into running endlessly.
- Flip to a fresh corner of the microfiber cloth, apply a drop more alcohol, and give both strips a second pass until your cloth glides with a clean, oil-free squeak.
- Buff the bars dry with a clean paper towel.
4. Scrub Stubborn Glaze With Mild Baking Soda Paste
If years of dryer sheets or a stray crayon edge left a baked-on glaze that rubbing alcohol alone will not budge, you need very gentle abrasion. Avoid steel wool, coarse sandpaper, or metal scrapers—deep scratches pit the stainless strips and cause lint and residue to cling even faster.
- Mix one tablespoon of baking soda with a few drops of warm water in a small bowl until it forms a thick, toothpaste-like paste.
- Dab a pea-sized amount onto a damp non-scratch nylon sponge or a soft-bristled old toothbrush.
- Gently scrub lengthwise along the grain of each metal bar using light finger pressure until dull spots brighten.
- Wipe away every trace of baking soda grit using a clean, damp microfiber cloth—leftover powder acts as an insulator too.
- Finish with one quick wipe of rubbing alcohol to remove residue and speed up drying.
| Cleaning Method | Best Used For | Safe on Sensor Bars? |
|---|---|---|
| 70%–91% Rubbing Alcohol | Invisible dryer sheet wax & softener film | Yes — top choice for routine care |
| Distilled White Vinegar | Light mineral haze from hard water | Yes — wipe clean with damp cloth after |
| Baking Soda + Soft Sponge | Baked-on glaze or melted synthetic lint | Yes — gentle pressure only |
| Melamine Foam Eraser (Damp) | Stubborn dark scuff marks | Use sparingly — rinse and dry well |
| Steel Wool / Metal Scrapers | Never recommended | No — scratches metal and ruins readings |
5. Clear the Lint Housing and Run a Diagnostic Check
Even spotless sensor bars cannot save an auto-dry cycle if restricted airflow traps humid air inside the drum. If you also notice the cabinet running unusually warm, review our guide on safe DIY fixes when a dryer gets too hot before starting your next load.
- Vacuum out the lint trap slot around the sensor housing using a narrow crevice attachment to pull up matted fuzz.
- Wash your removable mesh lint screen under hot tap water with a drop of dish soap and a soft brush—dryer sheets coat the mesh screen with the exact same invisible film, blocking airflow.
- Let the lint screen air-dry completely before sliding it back into place.
- Plug the dryer back into the wall outlet (or switch the breaker back on).
- Toss two damp hand towels into the drum, select a normal Sensor Dry or Auto Dry cycle, and confirm the drum heats smoothly and shuts off only when the towels are completely dry.
6. Prevent Buildup With Smarter Laundry Habits
Keeping moisture sensors clean takes less than two minutes a month once you build it into your routine—in fact, it pairs nicely with our weekend home appliance maintenance checklist before heavy winter laundry piles up.
- Swap waxy disposable dryer sheets for reusable wool dryer balls, which soften heavy flannel and fleece naturally by bouncing between fabrics without coating metal parts.
- If you prefer liquid fabric softener in the washer, measure half the cap line or pour half a cup of plain white vinegar into the rinse dispenser instead.
- Wipe the sensor bars with rubbing alcohol once a month (or every 25 to 30 loads) right after cleaning the lint screen.
- Avoid tossing soaking-wet hand-washed sweaters onto Auto Dry alone; single small items often bounce right past the sensor strips without touching both bars, causing early shutoffs.
When to Call a Pro
If you have thoroughly cleaned both moisture sensor bars, scrubbed the lint screen, and verified clear exhaust airflow—yet Sensor Dry still shuts off after five minutes or runs nonstop for hours—an electrical component behind the bulkhead likely needs testing. A loose wire harness behind the sensor mount, a corroded sensor strip that has lost continuity, a failing thermistor, or a faulty main control board can all mimic dirty sensor symptoms.
Stop DIY work whenever diagnosis requires disassembling the front drum bulkhead near live wiring, testing high-voltage 240-volt circuits, or working around gas burner assemblies. Typical professional sensor or thermistor repairs in the US often range from roughly $120 to $280 depending on your dryer brand, part availability, and local labor rates (control board replacements cost more and vary widely by model and region). When a quick alcohol wipe does not solve the issue, True Appliance Repair can match you with an independent local technician through our washer and dryer repair service page to pinpoint the exact electrical fault safely.
FAQ
Where are the moisture sensor bars located if I do not see them near the lint trap?
Most modern front-load and top-load dryers mount the two metal strips on the lower inside lip of the drum opening, curving just beneath the lint filter door facing inward toward your clothes. On a few older or compact models, check the flat back wall of the drum or feel along the plastic lifting baffles inside the cylinder. Note that basic entry-level dryers without an "Auto Dry" or "Sensor Dry" dial setting may use a simple thermostat timer instead of metal sensor bars.
Can cleaning the moisture sensor fix a dryer that runs too long?
Yes, in two common ways. If damp, lint-caked buildup bridges the narrow plastic gap between the two metal strips, it creates a constant electrical path that tricks the dryer into thinking clothes are still wet long after they dry. Conversely, if waxy buildup coats the lint screen at the same time, humid air stays trapped in the drum and forces back-to-back cycles.
Is nail polish remover safe to use on dryer sensor bars?
Stick to plain isopropyl rubbing alcohol or white vinegar instead of acetone-based nail polish remover. Acetone is harsh enough to melt, craze, or crack the plastic sensor bracket holding the metal strips in place, and lingering fumes are flammable inside an enclosed dryer drum.
How often should I clean my dryer's moisture sensor?
If your household uses dryer sheets or liquid fabric softener on every load, wipe the sensor bars with rubbing alcohol once every four to six weeks. Households that use wool dryer balls and low-residue detergents usually only need to clean the strips every three to four months as part of seasonal laundry maintenance.