
Baked-on grease, boiled-over pasta water, and carbon buildup don't just make your range look dingy—they clog burner ports and cause weak, yellow, or uneven flames. Learning how to clean gas stove burners properly before the heavy holiday cooking season hits will restore fast, even heating and keep your kitchen safe. With dish soap, baking soda, and white vinegar, you can knock out this deep clean in under an hour.
Safety First: Before touching any burner components, turn all stove knobs to the OFF position and make sure the grates and burner caps are completely cool to the touch. If you will be wiping deeply around electronic igniters, unplug the range from the wall outlet (or flip the kitchen range breaker off) so you don't trigger sparks. Never spray water or cleaner directly into the central gas valve opening, and never use a toothpick, as wood can snap off inside a gas port.
1. Remove Grates, Burner Caps, and Heads
Clearing the cooktop gives you full access to both the removable burner hardware and the porcelain or stainless steel surface underneath. Take a quick photo of your stovetop with your phone before disassembling so you know exactly which size cap goes back on which burner.
- Lift the heavy cast-iron or enameled steel grates straight up and set them in your sink or on an old towel.
- Lift off the flat circular burner caps sitting on top of each burner assembly.
- Lift the aluminum burner heads (the slotted metal rings that distribute the gas) straight up off the base. On most modern sealed-burner ranges, these are not screwed down; they simply rest on guide pins.
- If a burner head feels stuck due to caramelized grease, wiggle it gently side to side while pulling straight up—never pry it with a screwdriver, which can bend the aluminum or crack the cooktop surface.
- Brush away any loose dry crumbs around the exposed cooktop base with a dry microfiber cloth.
2. Degrease Burner Caps and Heads in Warm Soapy Water
Soaking softens cooked-on cooking oils and starchy spills so you don't have to gouge the metal with harsh abrasives. Avoid putting aluminum burner heads in the dishwasher, as harsh dishwasher detergents will permanently dull, pit, and blacken cast aluminum.
- Fill your kitchen sink or a large plastic basin with very warm water and add two tablespoons of grease-cutting liquid dish soap.
- Submerge all the burner caps and burner heads in the soapy water and let them soak for 20 to 30 minutes.
- While they soak, mix a thick paste of three parts baking soda to one part water in a small bowl.
- Pull each piece out of the water and use a non-scratch nylon scrub pad or an old toothbrush dipped in the baking soda paste to scrub away dark grease rings and carbon stains.
- Pay close attention to the underside of the burner heads and the narrow ignition grooves that channel gas toward the spark igniter.
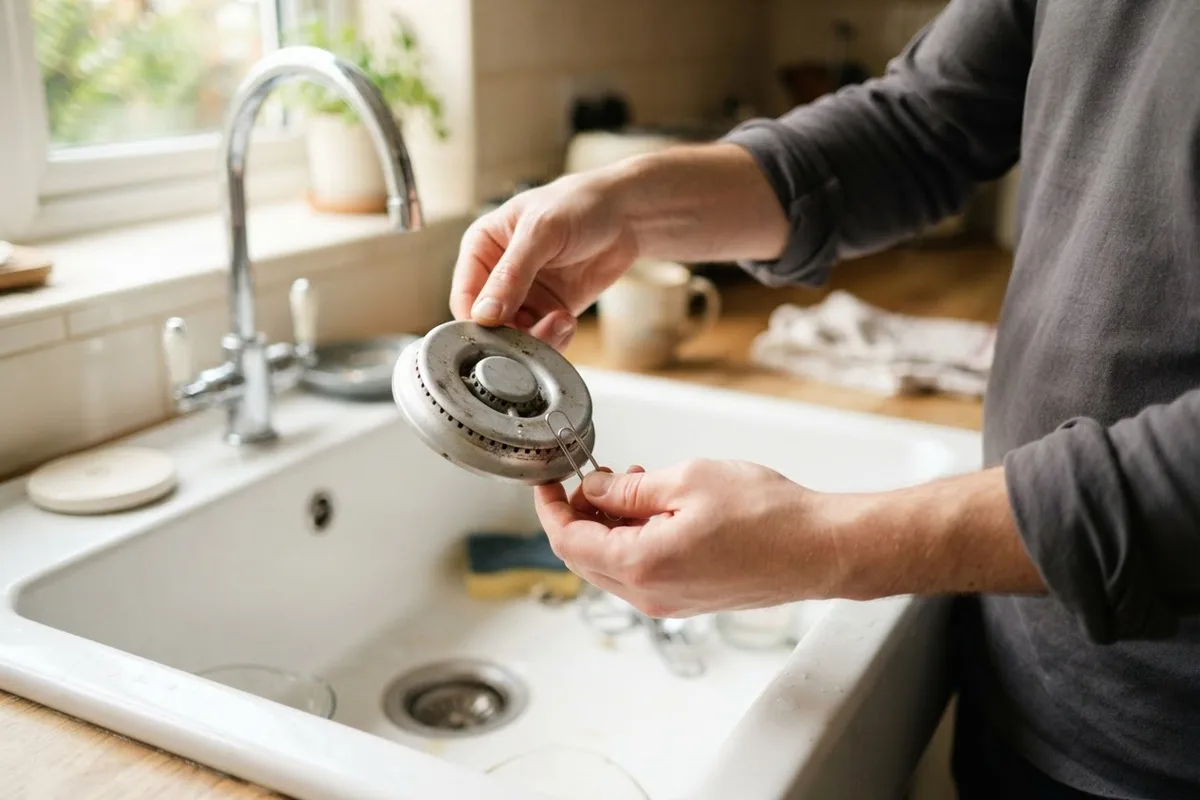
3. Clear Clogged Flame Ports With a Straightened Paperclip
Even a tiny speck of dried food or hardened baking soda paste inside the burner slots will block gas flow, resulting in noisy flames or burners that click endlessly without lighting. Clearing each individual port ensures a uniform circle of blue flames.
- Straighten one end of a standard metal paperclip, or grab a sturdy sewing needle or thin wire brush.
- Hold the scrubbed burner head up to the light and inspect every small hole, slot, and channel around the perimeter.
- Gently push the tip of the paperclip through each individual flame port to dislodge any trapped debris or leftover baking soda paste.
- Check the tiny pilot or ignition hole—usually a tiny pinhole right next to the ceramic igniter notch—and poke it clear as well.
- Hold the burner head upside down under a strong stream of warm tap water to flush out all loosened grit from the interior chamber.
4. Scrub Cast-Iron Stove Grates With Baking Soda Paste
Heavy stove grates take the brunt of skillet splatters and high-heat searing. If your grates are uncoated cast iron, avoid soaking them for hours in water, which can cause surface rust; if they are porcelain-coated cast iron, avoid metal wire brushes that can chip the enamel.
- Place the grates in the warm soapy sink water for 10 to 15 minutes to loosen sticky residue.
- Coat stubborn burnt-on food spots generously with your baking soda and water paste, then spritz a little white vinegar over the paste so it foams.
- Scrub the grates thoroughly using a stiff nylon brush or a non-scratch scouring pad.
- For rock-hard carbon buildup that refuses to budge, seal the grates inside heavy-duty zip-top bags with a quarter cup of household ammonia overnight outdoors (the fumes—not the liquid—dissolve the grease), then rinse thoroughly in the morning.
- Rinse the grates with warm water and immediately dry them with a dish towel to prevent rust.
5. Wipe the Cooktop Base and Ceramic Igniters
While the removable parts are off, clean the recessed wells around the gas valves and the fragile white ceramic igniters. A grease-coated igniter produces a weak spark that struggles to light the gas.
- Spray a 50/50 mixture of white vinegar and warm water onto a microfiber cloth—never spray liquid directly onto the stove base where it can drip into the gas tube.
- Wipe up all grease splatters and food spills around the burner bases, using plastic scraper tools or a baking soda paste on baked-on rings.
- Gently wipe the white ceramic cylinder of each spark igniter using a cotton swab barely dampened with rubbing alcohol to dissolve greasy film.
- Be extremely careful not to bend, bump, or crack the igniter, as the ceramic is brittle and easily damaged.
- If you are prepping the whole unit for seasonal baking and notice a sticky rack inside the cavity too, check out our guide on why your oven rack is stuck and how to fix it.
6. Dry Completely and Test the Flame Pattern
Putting wet or even slightly damp burner heads back on the stove is the number one mistake homeowners make after cleaning. Trapped water droplets block gas flow, causing loud popping noises, orange flames, or relentless clicking from the igniter.
- Pat every burner head and cap dry with a lint-free towel, then set them on a dry rack for at least 30 minutes (or pop them into a warm 175°F oven for 10 minutes) to evaporate hidden moisture inside the ports.
- Reinstall each burner head onto its matching base, making sure the guide pins drop squarely into the alignment notches and the head sits completely flat.
- Center each enameled burner cap flat on top of its matching burner head—a tilted cap will shoot flames out to one side and can melt your stove knobs.
- Set the dry grates back in place, plug the range back in if you unplugged it, and turn on each burner one by one.
- Verify that each burner lights within three to four clicks and burns with a steady, quiet blue flame with tiny light-blue cones.
Quick Reference: Gas Stove Burner Cleaning Guide
| Stove Component | Best DIY Cleaner | Safe Tool to Use | What to Avoid |
|---|---|---|---|
| Aluminum Burner Heads | Dish soap & baking soda paste | Nylon toothbrush & paperclip | Dishwasher detergent, wooden toothpicks |
| Enameled Burner Caps | Warm soapy water & vinegar | Non-scratch scrub sponge | Steel wool, metal scrapers |
| Cast-Iron Grates | Baking soda paste or ammonia fumes | Stiff nylon brush | Overnight water soaking |
| Ceramic Igniters | Rubbing alcohol | Cotton swab | Excess water, bending force |
| Cooktop Surface | 50/50 white vinegar & water | Microfiber cloth | Spraying liquid into gas valves |
When to Call a Pro
Thoroughly cleaning your burner heads, caps, and igniters fixes the vast majority of weak or uneven flame problems. However, you should stop DIY troubleshooting and call a professional technician if you smell raw gas when the knobs are off, if a ceramic igniter is cracked, if the gas valve stem won't turn, or if the spark module keeps clicking nonstop even after the burner is bone-dry. Also, if your range is acting up below the cooktop—for example, if your convection oven fan is not working—it's wise to have both issues checked during a single visit.
Professional gas range repairs (such as replacing a faulty spark electrode, ignition switch harness, or surface burner valve) typically run between $120 and $300, though exact pricing varies by area and model. Never attempt to disassemble internal gas supply lines or regulator valves yourself. When you need hands-on help with a stubborn burner or gas component, True Appliance Repair can match you with an experienced local specialist for oven and stove repair.
FAQ
Can I put my gas stove burner heads in the dishwasher?
No, you should never put cast-aluminum burner heads in the dishwasher. Automatic dishwasher detergent and high-heat drying cycles oxidize and corrode aluminum, leaving the metal permanently dull, chalky black, and pitted. Wash them by hand in the sink with mild liquid dish soap and baking soda instead.
Why is my gas burner flame orange or yellow after cleaning?
An orange or yellow flame right after cleaning usually means there is still moisture or leftover baking soda residue trapped inside the burner ports, or the burner cap isn't sitting flat on the head. Turn the burner off, let it cool, check that the cap is seated properly in its groove, and poke any clogged slots clear with a paperclip. If you are running an ultrasonic cool-mist humidifier nearby using tap water, minerals in the air can also temporarily turn gas flames orange.
Why does my gas burner keep clicking after I cleaned it?
Relentless clicking right after a deep clean almost always happens because the ceramic igniter or the base of the burner head is still damp. Water conducts electricity and prevents the spark sensor from detecting the flame properly. Let the burner air-dry for a couple of hours—or gently warm the area with a hair dryer on low—and the clicking should stop.
How often should I deep clean my gas stove burners?
For an average household that cooks daily, wipe down the grates and burner caps with warm soapy water once a week, and do a full deep clean of the burner heads and flame ports once every one to two months. You should also clean a burner immediately any time a pot boils over or you notice the flames burning unevenly.