
Is your refrigerator running longer than usual or struggling to stay at the ideal temp? The culprit might not be a failed motor, but a thick layer of dust blanketed over your condenser coils. Taking time to clean refrigerator coils is one of the most effective appliance maintenance tasks that save money, yet it is frequently forgotten until a cooling emergency strikes. In this step-by-step guide, you will learn how to safely clean your refrigerator coils using basic tools to restore peak efficiency and protect your compressor.
1. Locate Your Refrigerator Condenser Coils
Before starting, you need to identify where your refrigerator coils reside, as placement varies by model and manufacturer. On older or traditional models, the black tube-and-wire coils run vertically across the exterior back panel of the unit. On most modern side-by-side or French-door refrigerators, the coils are located beneath the cabinet behind a removable front toe kick grille or behind a metal access panel on the lower back.
To find them:
- Check behind the front toe kick panel at the floor level.
- Look at the lower rear section near the bottom compressor.
- Inspect the back wall of older models.
If your refrigerator has a smooth, sealed bottom and no exposed rear wiring, consult your owner's manual. Knowing coil placement helps you gather the correct tools before pulling the refrigerator away from the wall.
2. Shut Off Power and Move the Unit
Safety comes first whenever performing maintenance on major home appliances. Before touching any internal or lower components, always unplug the refrigerator from the wall electrical outlet. If the outlet is difficult to reach behind a heavy cabinet, turn off the dedicated breaker at your home's main electrical panel. Never attempt to clean near electrical components while power is active.
Once power is safely disconnected:
- Turn off the water supply valve connected to your ice maker or water dispenser line to prevent accidental leaks.
- Gently pull the refrigerator outward from the wall by gripping both sides near the base.
- Place a piece of cardboard or a heavy blanket under the feet or casters to shield hardwood, tile, or vinyl flooring from scratches.
- Leave roughly 2 to 3 feet of working space behind or in front of the unit.
3. Vacuum Heavy Dust with a Brush Attachment
Once you have access to the coils, you will likely see a dense buildup of lint, pet hair, and household dust. This layer acts like an insulating blanket, trapping heat inside the coils and preventing the refrigerant from cooling down properly. A standard vacuum cleaner equipped with a crevice tool or hose attachment is your best first line of defense.
Follow these vacuuming steps:
- Turn on your vacuum and hold the hose nozzle a few inches away from the coils to draw off loose dust webs.
- Carefully run a narrow crevice attachment between the coil loops to extract dust pockets.
- Use a soft brush attachment on surrounding components, including the condenser fan blade and motor housing.
- Avoid using hard metal attachments directly against delicate aluminum fins, which can bend or puncture easily under pressure.
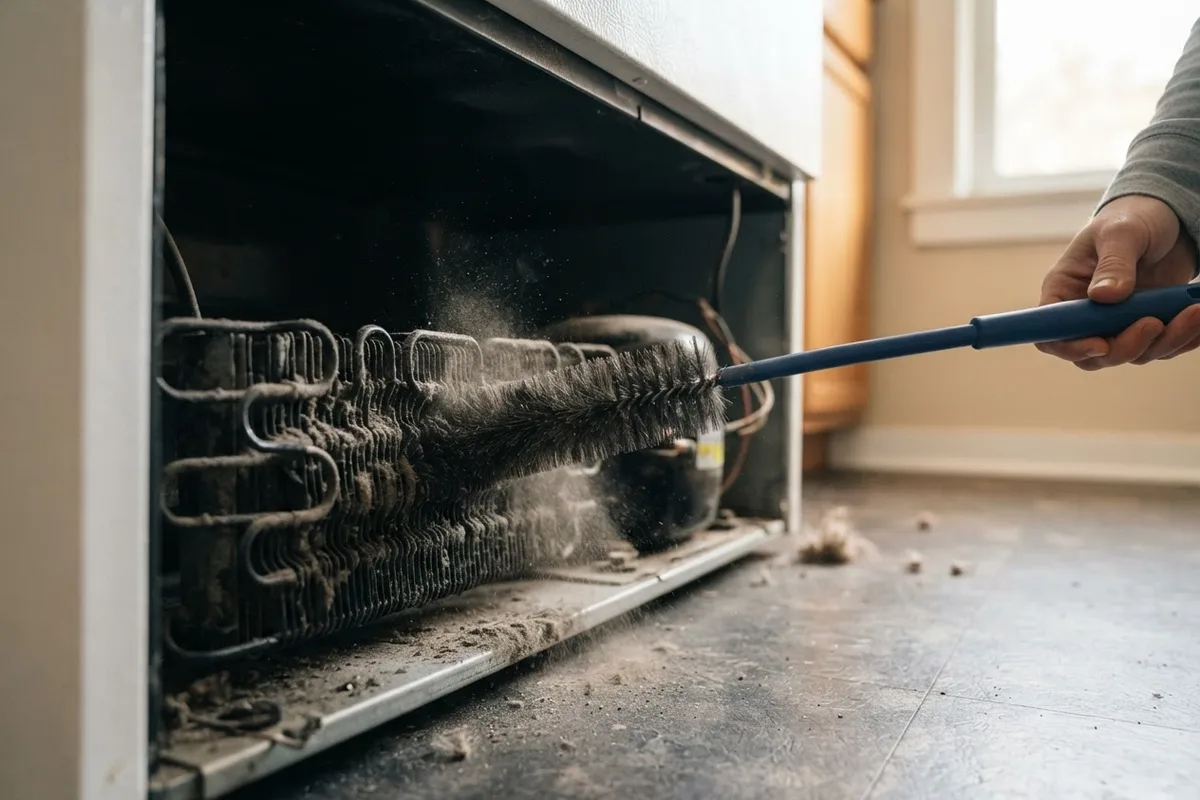
4. Scrape Hidden Grime with a Condenser Coil Brush
Vacuuming alone rarely removes all sticky debris, especially if grease from cooking has settled onto the coils over time. A flexible condenser coil brush—a long, stiff-bristled brush available at any home improvement store—is designed specifically to reach narrow gaps between coil wire loops.
To brush away stubborn buildup:
- Insert the flexible brush gently between the coil coils and push it back and forth using smooth, light strokes.
- Rotate the brush gently to catch lint clinging to the backside of the tubes.
- Sweep from top to bottom so loosened dirt falls onto the floor or drain tray below.
- Vacuum up the dislodged debris that falls to the floor as you work.
Take care not to force the brush into tight spaces or press hard against copper capillary tubes, as bending or kinking these lines can cause refrigerant leaks.
5. Clean the Base Pan and Restore Power
After clearing the coils, turn your attention to the drain pan (condensate tray) located near the bottom of the refrigerator unit. Moisture from defrost cycles drains into this tray, where heat from the condenser coils usually evaporates it. However, standing water combined with dust can harbor mold or unpleasant odors over time.
Finish up with these final steps:
- Wipe down the condensate tray using a damp cloth moistened with warm water and mild dish soap or distilled white vinegar.
- Clean up any dust, pet hair, or stray debris off the floor where the refrigerator sits.
- Carefully push the refrigerator back into position, ensuring you do not kink the water supply line or pinch the electrical cord.
- Reconnect the water supply line and plug the power cord firmly back into the wall outlet.
Refrigerator Coil Care Schedule
Establishing a regular maintenance routine keeps your appliance operating at peak performance and helps lower monthly utility bills. Combining coil cleaning with other smart household practices—like checking door gaskets—is central to effective home care. Learn more by reading our guide on 10 home appliance care habits to cut energy bills.
Below is a quick-reference maintenance schedule based on home environment and lifestyle factors:
| Household Type | Cleaning Frequency | Primary Focus Area | Key Benefit |
|---|---|---|---|
| Standard Household (No Pets) | Every 12 Months | Lower Rear or Front Base Coils | Prevents minor dust buildup & preserves energy efficiency |
| Homes with Pets (Cats/Dogs) | Every 6 Months | Condenser Fan & Front Grille | Stops shedding hair from clogging air intake vents |
| High-Dust or Kitchen-Grease Environments | Every 3 to 6 Months | Coils, Base Pan, & Fan Blades | Prevents sticky residue from overheating the compressor |
| Older Refrigerators (10+ Years) | Every 6 Months | Rear Exterior Wire Coils | Reduces strain on aging electrical motors and parts |
Key Benefits of Clean Condenser Coils
Maintaining clean coils provides noticeable benefits for both your wallet and your kitchen appliances:
- Lower Monthly Energy Bills: When dirty coils cannot release heat efficiently, the compressor must run longer cycles, consuming significantly more electricity. Clean coils allow heat to radiate effortlessly, trimming energy costs.
- Extended Appliance Lifespan: The compressor motor is the most expensive component in your refrigerator. Shielding it from excessive heat prevents premature wear and mechanical breakdown.
- Consistent Internal Temperatures: Clean coils allow your cooling system to maintain steady temperatures, protecting food safety and preventing unexpected spoilage.
- Quieter Operation: A unit with clean coils does not need to run its fan and motor continuously at top speed, resulting in a noticeably quieter kitchen environment.
When to Call a Pro
While cleaning your refrigerator coils is an ideal DIY project, certain situations call for professional assistance. If you notice signs like complete loss of cooling despite clean coils, clicking noises from the start relay, or pooling water under the cabinet, the issue may involve electrical components or the sealed refrigerant system.
Never attempt to open or repair sealed refrigerant lines, handle electrical panel wiring, or replace internal sealed system parts yourself. Handling refrigerant requires specialized equipment and safety protocols. If basic maintenance does not resolve your refrigerator's performance issues, True Appliance Repair can match you with a local appliance pro to diagnose complex mechanical problems quickly. For broader home issues, you can also reach out via our contact page or explore our full range of appliance repair services. Typical repair diagnostic fees range between $75 and $150 depending on your location and appliance brand, while component repairs vary by area and model.
FAQ
How do I know if my refrigerator coils need cleaning?
Common signs include a refrigerator that feels warm on the outside cabinet walls, food that isn't as cold as usual, or a compressor running constantly without stopping. If you hear the motor humming non-stop or notice dust buildup around the bottom kick plate, it is time to clean the coils.
Can I clean refrigerator coils without moving the refrigerator?
If your unit has coils located behind the front bottom toe kick panel, you can clean them by snapping off the grille and using a narrow coil brush and vacuum crevice tool. However, for models with coils at the bottom rear or exterior back, gently pulling the unit away from the wall provides necessary access for thorough cleaning.
Can dirty coils cause a refrigerator to stop cooling completely?
Yes. Excessively dirty coils trap heat, forcing the compressor to work continuously until it overheats. When the compressor overheats, thermal overload switches may trip, causing the cooling system to shut down entirely to prevent fire or motor damage.
What tools do I need to clean refrigerator coils safely?
You only need a vacuum cleaner with a hose and narrow attachment, a flexible condenser coil brush, safety gloves, and a soft microfiber cloth. Avoid using sharp metal scrapers, harsh chemical solvents, or wet sponges directly on electrical components.