
If your dish racks roll forward on their own, the door rubs against the cabinet, or steam sneaks out around the top edge during busy kitchen weeks, an unlevel frame is often the culprit. Even a quarter-inch tilt strains hinges, twists the door latch, and puts extra wear on moving parts. Knowing how to level a dishwasher takes basic hand tools and about 30 minutes—and saves you from bigger cabinet and hardware headaches down the road.
1. Shut Off Power and Water First
Before you kneel down near the base of the dishwasher, cut both electricity and water to the unit. The lower toe-kick area sits inches away from the electrical junction box, heating terminals, and hot water supply valve, so never work behind that panel while the machine is live.
- Open your home electrical panel and flip the dedicated dishwasher circuit breaker to the OFF position. If your model plugs into a standard receptacle under the kitchen sink, unplug the cord instead.
- Confirm power is off by pressing any button on the control panel—no lights should appear.
- Reach inside the sink cabinet and turn the hot water shutoff valve clockwise until it stops.
- Gather your tools before opening the base: a 6- to 9-inch torpedo bubble level, a screwdriver or 1/4-inch nut driver, an adjustable wrench, a flashlight, and a folded towel to protect the floor.
2. Remove the Lower Kickplate Panel
With power and water safely off, expose the front leveling mechanism tucked behind the lower access panel (often called the toe kick or kickplate). Removing it gives you clear sightlines to both front legs and, on many modern dishwashers, a center adjustment screw for the rear foot.
- Place a folded towel or piece of cardboard on the floor directly in front of the dishwasher to catch dropped screws and shield wood or vinyl flooring from scratches.
- Shine your flashlight along the left and right edges of the kickplate to locate the mounting screws—usually two Phillips, Torx, or hex-head fasteners.
- Back the screws out completely and place them in a small mug so they do not roll under the cabinets.
- Gently pull the kickplate straight forward and lift away any loose insulation backing tucked behind it, noting how it sits for easy reassembly.
3. Check Level Front-to-Back and Side-to-Side
Never eyeball a dishwasher against nearby cabinets—kitchen floors and countertops settle over time, so a machine that looks lined up with a door edge can still sit noticeably crooked. Check the frame itself along two planes before touching any feet.
- Open the dishwasher door fully and pull the lower rack out of the way so you have a flat metal surface inside the tub opening.
- Lay your torpedo level left-to-right across the flat lip just inside the bottom door opening to check side-to-side alignment.
- Move the level onto the flat inner rail or tub track running front-to-back to check whether the unit leans forward or backward.
- Close the door halfway and note any uneven gaps along the top countertop edge or side cabinet frames. A slight lean forward is especially common and often explains dishwasher steam escaping onto cabinets when the upper seal cannot press evenly.
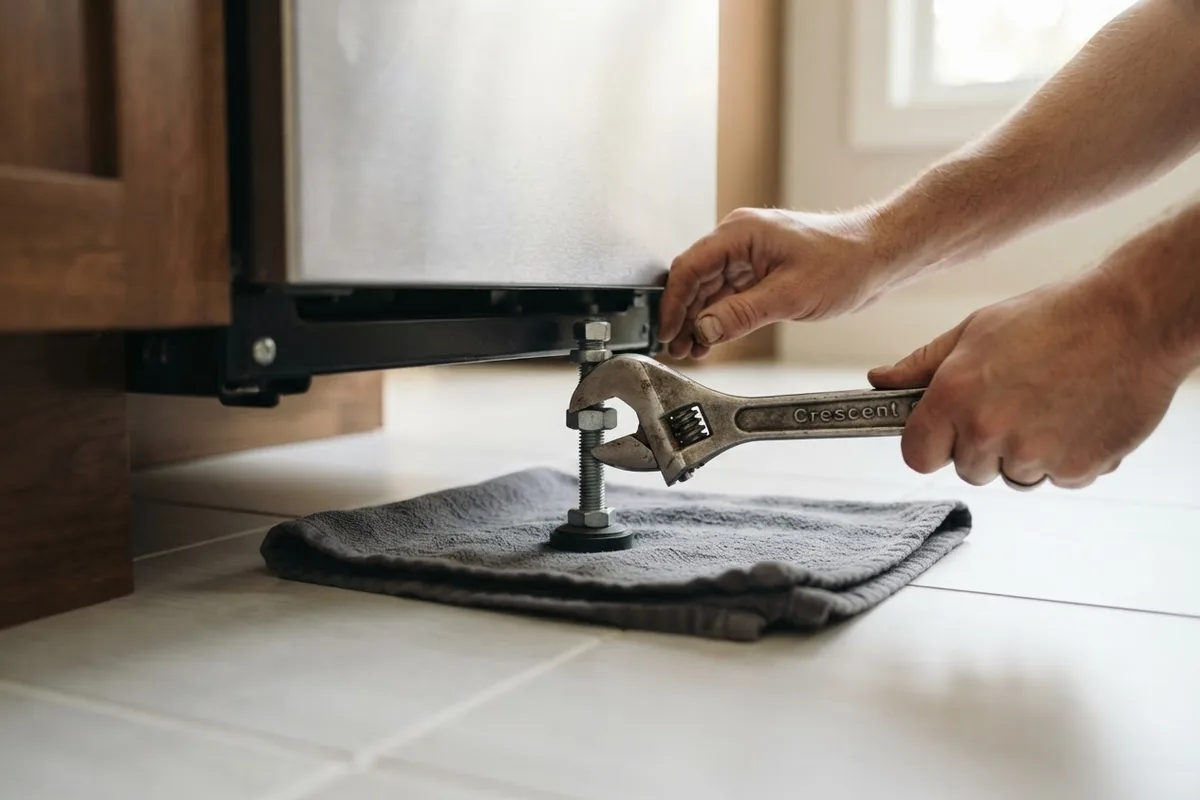
4. Adjust the Front Leveling Legs
Once you know which corner sits too high or too low, adjust the two front threaded legs first. Because the dishwasher weighs heavily on these feet, lightening the load slightly makes turning them much easier and keeps you from stripping plastic or metal threads.
- Loosen the two mounting bracket screws fastening the dishwasher to the underside of the countertop or the side cabinets by several turns—just enough so the tub can move up or down freely.
- Look under the front corners to identify the leg style: most US models use plastic or steel hex-base feet that turn with an adjustable wrench or 1/4-inch socket, while some include slotted bases for a flathead screwdriver.
- Support the front lip of the dishwasher frame lightly with one hand while turning the foot with your wrench.
- Looking from above, turning a foot counterclockwise usually extends the leg to raise that corner, while clockwise retracts it to lower that corner. Make quarter-turn adjustments, then recheck with your bubble level.
5. Fine-Tune the Rear Leveling Feet
Adjusting the front alone will not fix a dishwasher that leans noticeably forward or sits too low in back. How you adjust the rear feet depends on your model's design, so inspect the center base area with your flashlight before sliding the machine out.
- Check the front-center bottom rail behind the kickplate for a single exposed hex head or Torx adjustment screw. Many newer dishwashers link that screw to a rear leveling leg through an internal rod—turning it clockwise raises the back, and counterclockwise lowers it, without moving the unit.
- If there is no center screw, disconnect the top or side mounting brackets and gently slide the dishwasher forward only 4 to 6 inches on a protective towel.
- Watch the hot water supply line and power cable underneath so nothing kinks, stretches, or pulls tight.
- Turn the rear threaded feet evenly, slide the dishwasher carefully back into its alcove, and verify front-to-back level with your torpedo level.
| What You Notice | Likely Tilt Direction | Feet to Adjust | Quick Correction |
|---|---|---|---|
| Dish racks roll out by themselves | Tilting forward (front too low) | Both front legs | Extend front legs equally until bubble centers |
| Door swings shut or feels stiff | Tilting backward (front too high) | Front legs or rear adjuster | Lower front legs slightly or raise the rear foot |
| Door scrapes left or right cabinet | Tilting side-to-side | Single lower-side front leg | Raise the low side until vertical gaps match |
| Upper door seal gaps on one corner | Twisted frame (uneven diagonal) | Opposite front leg + rear foot | Square front corners first, then fine-tune rear |
6. Secure Brackets and Test the Door
A level dishwasher will drift out of alignment within weeks if its mounting brackets stay loose or the cabinet opening pinches the frame. Lock everything back down gently and test the door mechanics before putting the toe kick back on.
- Confirm the dishwasher sits flush with adjacent cabinets and leaves roughly 1/8 to 1/4 inch of clearance beneath the countertop so the tub is not wedged tight.
- Tighten the top or side mounting bracket screws snugly without over-torquing, which can pull one corner upward and undo your work.
- Re-check side-to-side and front-to-back level one last time after tightening the brackets.
- Reinstall the insulation backing and kickplate, then turn the hot water valve back on and restore power at the breaker.
- Open and close the door several times to confirm a crisp latch and smooth motion; a straight frame also prevents twisted hinges that lead to a squeaking dishwasher door.
When to Call a Pro
Most leveling jobs take only basic tools, but stop and bring in a technician if you hit structural, plumbing, or electrical roadblocks. Call a pro right away if your dishwasher is hardwired with very little slack in the junction box, if rigid copper water lines bind when you try to slide the unit, or if you suspect any electrical panel fault. You should also avoid forcing rusted or stripped leveling feet, since snapping a bracket can leave the tub unstable.
If your bubble level reads dead-center in both directions yet the door still gaps or refuses to latch smoothly, a bent door hinge or warped inner tub may be the real cause. A typical US service call for professional dishwasher leveling, re-mounting, or hinge alignment generally runs around $100 to $250, though pricing varies by area and dishwasher model. When a job goes beyond DIY, True Appliance Repair can connect you with a local pro for dishwasher repair.
FAQ
Should a dishwasher lean slightly backward or sit completely level?
Aim for completely level from side to side and front to back unless your specific owner's manual calls for a tiny rearward pitch. Modern dishwashers are engineered to operate flat; leaning too far back can strain door hinges, while leaning forward makes racks roll out and puts stress on the top seal.
How do I adjust the back legs of a dishwasher without pulling it out?
Look right in the front-center gap behind the lower kickplate for a long hex or Torx adjustment screw connected to a rear leveling rod. Turning that screw with a socket driver or wrench raises or lowers the back of the unit smoothly from the front. If your model lacks that screw, you will need to loosen the mounting brackets and slide the unit forward a few inches to turn the back feet by hand.
Can I put shims under a dishwasher if the leveling legs aren't tall enough?
Yes, if your kitchen floor was replaced outside the dishwasher alcove and left a recessed drop, sturdy waterproof composite shims or a flat plywood platform cut to the alcove width work well. Place solid support evenly under the feet rather than propping up one corner with thin scrap wood that can compress or slip over time. Make sure the added height still leaves safe clearance under the countertop.
How tight should the dishwasher be under the countertop?
The dishwasher should sit snugly secured by its top or side mounting brackets, not jammed upward against the underside of the countertop. Cranking the legs up so hard that the tub presses tightly into stone or laminate counters can warp the metal frame and throw off the door latch. Leave a tiny clearance gap and let the brackets hold the unit steady.