
Turning your oven dial only to hear a loud snap from your electrical panel is an immediate headache, especially when you are preparing dinner. When an oven trips the circuit breaker the instant you set a baking mode, it usually signals an internal electrical short that draws an unsafe surge of power. Tracking down the fault takes a methodical approach, basic safety precautions, and a few minutes of visual inspection.
Before touching any tool to your appliance, safety must come first. Always switch off the double-pole circuit breaker dedicated to your range at the main electrical panel, or unplug the appliance from its heavy-duty 240-volt wall receptacle. Never touch interior wiring or heating elements while the unit has power. If your troubleshooting requires panel repairs, testing live high-voltage feeds, or working with gas connections, stop immediately and call a professional technician.
Inspect the Bake Element for Cracks or Blisters
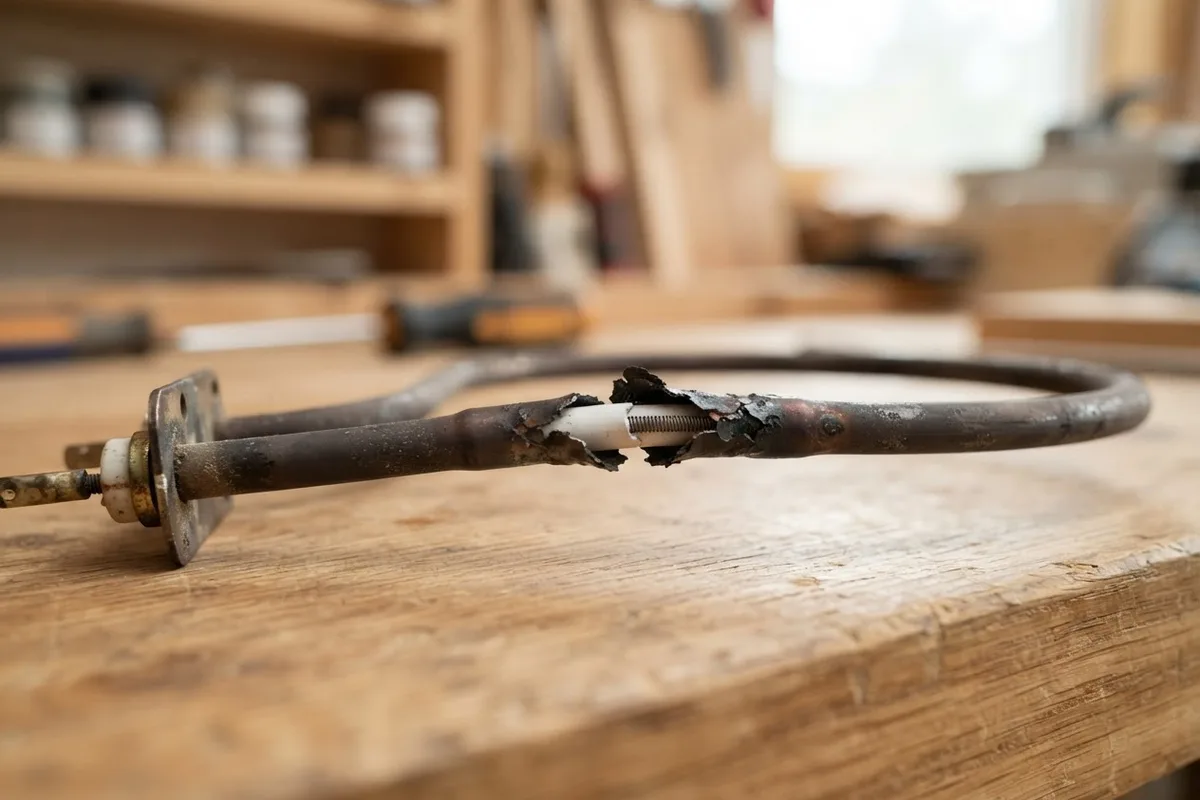
The lower bake element is the most common culprit when an electric oven repeatedly trips the breaker. As metal heating elements age, thousands of heating and cooling cycles cause the outer metal sheath to expand and contract. Eventually, microscopic hairline cracks form, exposing the interior nichrome resistance wire to the grounded outer shell. The moment power flows through the element, electricity jumps directly to the metal chassis, creating a dead short that instantly trips your panel breaker.
- Confirm the range is completely unplugged or the dedicated breaker is switched off.
- Open the oven door and remove the interior baking racks to give yourself clear workspace.
- Look closely at the black circular or serpentine element along the floor of the oven cavity.
- Use a bright flashlight to inspect the entire length of the tube for blistering, bubbled metal, white powdery residue, or obvious burned gaps.
- If you see physical deformation or a complete break in the coil, the element has shorted out internally.
Replacing a bad bake element is typically straightforward. Most models secure the element to the back cavity wall with two hex-head screws. Once unfastened, gently slide the element forward an inch or two, clip each wire with an insulated clothespin so they do not snap backward into the insulation hole, and disconnect the push-on spade terminals. Replacement elements generally cost between $25 and $65, though pricing varies by area and appliance model.
Check the Broil Element for Short Circuits
If your breaker only trips when you switch the oven to "Broil" or during high-heat preheating cycles where both elements engage, the upper broil element is likely damaged. Modern ovens frequently cycle the upper broil element alongside the lower element to reach set temperatures faster. A failure in the top element will therefore trip the breaker even if you only selected a standard 350°F bake.
- Ensure the oven remains disconnected from all power sources.
- Examine the upper ceiling of the oven cavity where the broil element is suspended.
- Check the support brackets holding the element off the roof. If a bracket has rusted through or detached, the energized element may be sagging and grounding out against the metal wall.
- Run your eyes along the loops of the element, checking for melted metal or pitting.
- If the element looks intact, you can verify an internal ground using a basic digital multimeter set to ohms (Ω). Disconnect the leads from the element, touch one multimeter probe to a spade terminal, and touch the other probe to the metal mounting bracket. If the meter registers anything other than infinite resistance (open line), the element has shorted to ground and must be replaced.
Dry Out Moisture Trapped After Deep Cleaning
A surprising trigger for tripped breakers happens right after a deep kitchen cleaning session. If you recently washed the interior walls, ran a manual steam-clean cycle, or used heavy liquid degreasers on stubborn baked-on spills, liquid can seep through the insulation openings where the heating element terminals pass through the back wall. Water provides a conductive path between the high-voltage electrical terminal and the grounded metal chassis.
- Keep the appliance powered off at the main electrical panel.
- Check behind the bottom bake element and around the convection fan housing for signs of dampness or pooled cleaner.
- Wipe down all accessible moisture with clean, dry microfiber cloths.
- If cleaner seeped into the rear terminal insulator boots, leave the oven door wide open for 24 to 48 hours to allow the internal mineral wool insulation to dry out thoroughly.
- You can speed up the drying process by pointing a small oscillating room fan directly into the open oven cavity.
Attempting to force-dry the appliance by repeatedly resetting the tripped breaker will only scorch the terminal insulation and can permanently damage the oven's electronic control board. Give the cavity adequate drying time before restoring power.
Examine the Rear Terminal Block for Burn Marks
Freestanding electric ranges draw substantial amperage through a thick three- or four-prong power cord connected to a terminal block mounted on the lower back of the stove. Over years of normal operation, heat expansion and vibration from opening and closing the heavy oven door can loosen the terminal screws. A loose connection creates electrical resistance, which generates intense localized heat that melts the plastic terminal block and causes arcing against the rear metal cover.
- Verify power is off, then carefully slide the range away from the wall just enough to access the lower back panel.
- Locate the metal access plate covering the electrical power cord entry point, usually secured by one or two small screws.
- Remove the cover plate and shine a flashlight directly on the terminal block.
- Inspect the heavy brass or copper connection posts. Look for melted plastic, scorched wire insulation, blackened metal, or loose mounting nuts.
- If the terminal block shows heat melting or charred wires, do not turn the range back on. The terminal block and power cord must both be replaced to prevent fire hazards.
For homeowners preparing their kitchens ahead of busy cooking periods, completing simple visual checks can prevent unexpected disruptions. Reviewing a holiday appliance checklist well before hosting large family dinners helps catch subtle wiring and heating problems before they ruin meal prep.
Test the Oven Temperature Sensor and Wiring
Inside the upper corner of your oven cavity sits the temperature sensor, a thin metallic probe that measures internal heat and signals the control board when to cycle power. While the probe itself operates on low voltage, the wiring harness feeding it runs behind the oven walls alongside 240-volt supply lines. In older appliances, rodents or deteriorating thermal insulation can allow internal wires to rub against sharp sheet-metal edges, stripping the wire casing and grounding out the entire circuit.
- Disconnect range power at the panel.
- Locate the pencil-thin metal sensor probe mounted to the upper back wall inside the oven.
- Unscrew the two mounting screws holding the sensor bracket in place.
- Carefully pull the sensor probe forward into the oven cavity until you see the small plastic harness connector emerge.
- Inspect the wiring insulation just behind the connector plug for chafing, pinching, or bare copper touching the metal cavity wall.
- Unplug the harness clip and test the sensor resistance with a multimeter. At normal room temperature (roughly 70°F), a standard RTD sensor should read around 1,080 ohms. A reading of zero ohms indicates an internal short circuit.
| Component | Visual Symptom | Typical Diagnostic Test | Typical DIY Part Cost |
|---|---|---|---|
| Bake Element | Blisters, cracks, or burnt spots on lower coil | Visual check or element-to-ground ohms test | $25 – $65 (varies by model) |
| Broil Element | Sagging coil, separated support brackets | Visual check or element-to-ground ohms test | $30 – $75 (varies by model) |
| Moisture / Liquid | Occurs right after cleaning or liquid spillage | Visual inspection of terminal entry holes | $0 (dry out 24–48 hours) |
| Terminal Block | Scorched plastic, burnt cord terminals at back | Visual inspection behind rear access plate | $20 – $50 (varies by model) |
| Wiring Harness | Melted insulation or bare copper touching frame | Visual inspection along rear harness paths | $15 – $40 (varies by model) |
If you have already ruled out heating elements and your unit still shuts off randomly, review our guide on why your oven keeps shutting off to explore control board and safety thermostat issues.
When to Call a Pro
While swapping a blistered bake element or drying out wet insulation is manageable for many DIYers, electrical panel issues and deep cabinet wiring require specialized expertise. If your oven trips the breaker the instant you reset the switch—even when the oven dial is turned completely off—the short circuit is likely within the internal selector switch, control board, or the in-wall 240-volt branch circuit.
Never attempt to service electrical panels, replace circuit breakers, or dismantle internal gas-range spark ignition wiring yourself. High-voltage electricity carries severe shock and fire risks. If your visual inspections reveal no obvious element damage or if your home’s breaker feels loose, smells hot, or trips immediately upon power-up, stop and call an expert. True Appliance Repair can match you with an experienced local technician who can pinpoint hard-to-find electrical shorts, test high-voltage relays, and complete dependable appliance repair safely.
FAQ
Why does my oven trip the breaker only when preheating?
During preheat, modern electric ovens draw maximum electrical current by engaging both the lower bake element and upper broil element simultaneously, along with convection fans. If either element has an internal insulation fault that only arcs under heavy thermal expansion, the extra load pushes the circuit over its limit or grounds out, causing the breaker to trip.
Can a faulty circuit breaker cause this instead of the oven?
Yes. Circuit breakers are mechanical safety devices that degrade over time. If a breaker has tripped multiple times in the past, its internal spring tension weakens, causing it to trip at lower amperage than its official rating. A technician can test whether the oven is pulling excessive current or if the breaker itself is failing.
Is it safe to reset an oven breaker multiple times?
No. If a circuit breaker trips immediately upon turning on the oven, resetting it repeatedly can cause electrical arcing, melt household wiring inside your walls, or ruin the range's electronic control boards. Always leave the breaker turned off until you have visually checked the elements and verified there is no dead short.
How much does professional oven short-circuit repair cost?
Professional repair costs generally range between $150 and $380, depending on your region, the specific appliance brand, and whether the issue is a standard heating element, terminal block, or complex main electronic control board. Labor rates and part availability vary widely by area and model.