
Your refrigerator runs nonstop every day of the year, quietly protecting hundreds of dollars in groceries while dust, worn door seals, and drifting temperatures build up out of sight. Skipping basic upkeep leads to spoiled produce, heavy freezer frost, strange noises, and avoidable breakdowns right before busy winter gatherings. Follow this six-step refrigerator maintenance checklist once or twice a year to keep cooling steady, extend appliance life, and catch small issues early.
1. Verify Fridge and Freezer Temperatures
Built-in control dials and digital displays can drift by several degrees over time, leaving milk souring early or lettuce freezing near the back wall. Confirm actual storage temperatures twice a year, especially before stocking up for winter holidays or resetting your kitchen for the new year.
- Place a freestanding appliance thermometer in a glass of water on the middle refrigerator shelf, and set a second thermometer between packages in the center of the freezer.
- Leave both doors closed for at least eight hours, ideally overnight, for an accurate baseline reading.
- Aim for 37°F in the refrigerator (staying between 35°F and 38°F) and 0°F in the freezer.
- Adjust the controls in small increments if needed, then wait a full 24 hours before checking the thermometer again so the cabinet can stabilize.
2. Vacuum Dust Off Condenser Coils and Vents
Condenser coils release heat pulled from inside your fridge. When pet hair and kitchen lint blanket those coils, heat stays trapped, forcing the compressor to run longer and hotter than designed.
- Unplug the refrigerator from the wall outlet before touching any panel or moving the unit. If your model has an ice maker, shut off the cold water supply valve behind the cabinet before rolling it forward so you do not kink or strain the tubing.
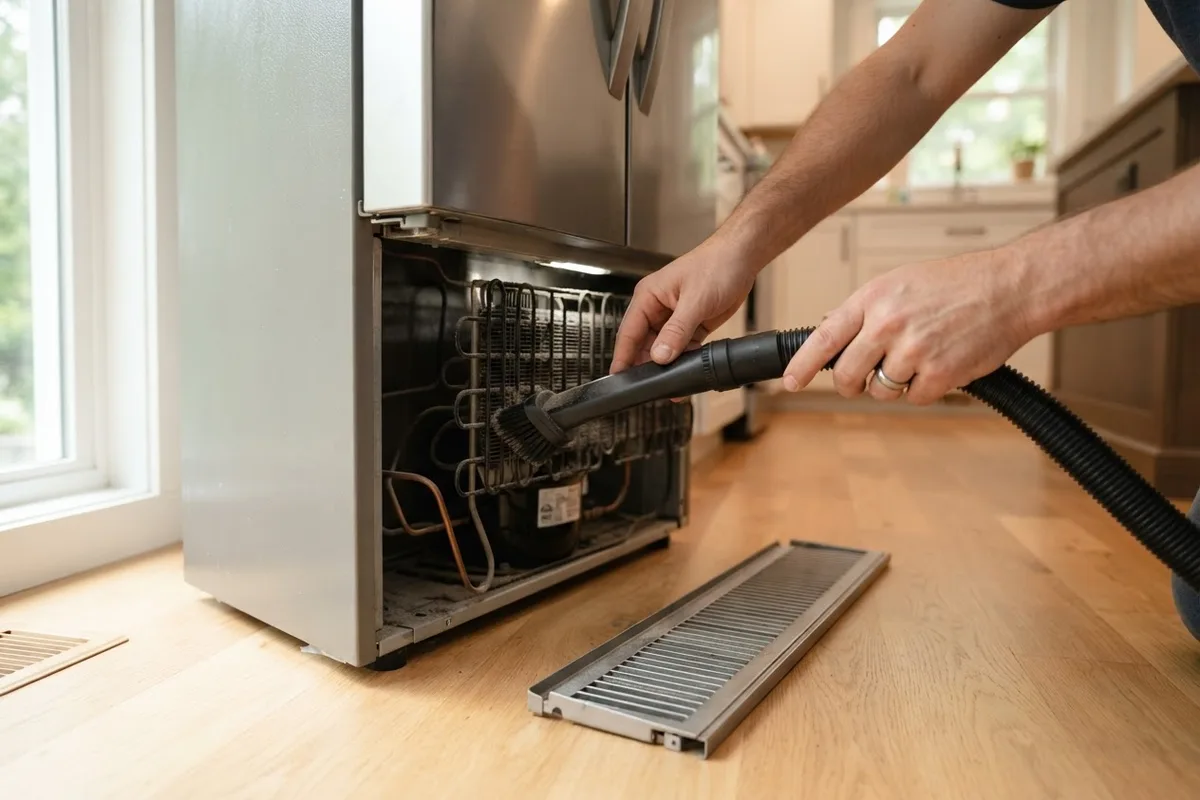
- Remove the lower front toe-grille or gently pull the fridge out to reach rear coils. Our guide on how to clean behind home appliances explains how to slide heavy units safely without scratching kitchen floors.
- Use a soft coil brush and a vacuum crevice attachment to lift dust off the coils, fan blades, and floor area without bending thin metal fins.
- Slide the unit back, leaving one to two inches of airflow space behind the cabinet before restoring power and water.
3. Clean and Test Door Gaskets for Air Leaks
Sticky spills harden flexible rubber door gaskets over time, creating tiny gaps that pull warm, humid kitchen air inside. That extra moisture quickly turns into thick freezer frost, interior condensation, and unnecessary wear on the compressor.
- Mix warm water with a few drops of mild dish soap and wipe all four edges of both the fridge and freezer seals using a soft microfiber cloth. Skip bleach and harsh abrasive cleaners, which dry out and crack rubber.
- Dry the seals completely with a clean towel, paying close attention to the pleated folds where crumbs collect.
- Close each door on a crisp dollar bill and gently tug it free. You should feel steady resistance all the way around the perimeter.
- If the bill slips out easily or the rubber looks torn, review these fixes for a refrigerator door not closing properly before cold air escapes all season.
4. Replace the Water Filter and Flush the Ice Bin
A clogged water filter slows dispenser flow, shrinks ice cubes, and can leave drinking water tasting stale. Old ice sitting in the freezer also absorbs food odors and freezes into solid clumps that jam the auger.
- Turn off the ice maker switch or lift the metal shutoff arm before removing the ice bucket.
- Check your filter installation date and swap in a fresh, compatible water filter every six months—or sooner if water flow drops noticeably. Shut off the cold water supply valve first if you need to inspect rear water lines for drips or kinks.
- Empty the ice bin completely, wash it with warm soapy water, rinse well, and dry it thoroughly with a lint-free towel before sliding it back into the freezer.
- Run about two gallons of water through the dispenser to clear trapped air, and discard the first two batches of newly made ice.
5. Clear the Defrost Drain and Wipe the Drip Pan
Frost-free refrigerators melt ice off the hidden evaporator coils on a regular cycle, channeling water down a small defrost drain into an evaporation pan underneath. When crumbs or biofilm plug that drain, water backs up onto the freezer floor as a sheet of ice or pools beneath the crisper drawers.
- Unplug the refrigerator before reaching behind lower kickplates or inspecting the rear machine compartment.
- Check the freezer floor and underneath your vegetable drawers for standing water or ice buildup, which points to a slow or blocked drain tube.
- If your model has an accessible drain opening inside the back of the freezer or fresh-food section, gently flush it with warm water using a clean turkey baster until it drains smoothly. Avoid poking sharp metal wire down the tube.
- Slide out the removable drip pan if accessible, wash it with warm soapy water and a splash of white vinegar, dry it completely, and reinstall it before plugging the fridge back in.
6. Check Cabinet Leveling and Interior Airflow
Even a clean, well-sealed fridge cools unevenly if doors hang out of alignment or tightly packed containers block interior air vents. Taking five minutes to check cabinet stance and shelf spacing prevents warm top shelves and frozen produce drawers.
- Place a carpenter's level across the top of the refrigerator from side to side, adjusting the front leveling legs until it sits flat so doors do not twist.
- Tilt the cabinet back very slightly—about a quarter inch higher in front—so both doors swing shut smoothly on their own when nudged.
- Locate the cold-air supply vents near the top back wall of the fridge and freezer, and leave at least two inches of open space in front of them.
- Set crisper drawer sliders to high humidity for leafy greens and low humidity for ethylene-producing fruits like apples and pears.
Quick-Reference Maintenance Schedule
Use this quick schedule to space out upkeep throughout the year without letting small tasks pile up.
| Maintenance Task | Recommended Timing | Main Benefit |
|---|---|---|
| Wipe spills and check interior air vents | Monthly | Prevents odors and uneven cold spots |
| Clean door gaskets and run dollar-bill test | Every 3–6 months | Stops warm air leaks and freezer frost |
| Replace water filter and wash ice bin | Every 6 months | Keeps water flow steady and ice fresh |
| Vacuum condenser coils and rear vents | Every 6–12 months | Protects compressor and reduces strain |
| Verify fridge (37°F) and freezer (0°F) temps | Every 6 months | Reduces food spoilage and icy produce |
| Flush defrost drain and check cabinet level | Annually | Prevents interior leaks and door gaps |
When to Call a Pro
Routine cleaning and temperature checks prevent many everyday cooling headaches, yet some symptoms point to a failing internal component rather than simple dust or buildup. Stop DIY troubleshooting and call an appliance repair pro if your refrigerator runs continuously without cooling, thick frost coats the entire rear freezer wall, the compressor clicks repeatedly without starting, or the unit trips your home circuit breaker.
Never open sealed refrigerant tubing, bypass safety switches, or work inside your home's electrical panel. Sealed-system repairs require specialized recovery equipment, and live electrical diagnostics carry shock risks. In the US, common refrigerator repairs such as replacing a defrost heater, evaporator fan motor, or temperature sensor typically run around $150 to $450, while sealed-system or compressor work can exceed $500—actual pricing varies by area and model. If your fridge still struggles to hold steady temperatures after you complete this checklist, True Appliance Repair can match you with a local pro for refrigerator repair.
FAQ
How often should I do refrigerator maintenance?
Plan a quick check of door seals, interior vents, and spills once a month, then tackle deeper tasks like vacuuming condenser coils, replacing the water filter, and verifying temperatures every six months. Homes with shedding pets or dusty kitchens benefit from cleaning the coils every three to four months.
Should I unplug my refrigerator before cleaning the coils?
Yes, always unplug the refrigerator from the wall outlet before removing lower grilles, pulling the cabinet forward, or brushing near the compressor and condenser fan. Moving a powered unit risks pinching the power cord, touching live wiring, or catching a brush on a spinning fan blade.
What temperature should my refrigerator and freezer be set to?
Keep your refrigerator compartment close to 37°F (within the 35°F to 38°F range) and your freezer at 0°F. Setting the fridge colder than 34°F can freeze produce near air vents, while temperatures above 40°F shorten the shelf life of dairy and leftovers.
How much clearance does a refrigerator need behind it?
Most freestanding refrigerators need at least one to two inches of open space behind the cabinet and roughly one inch above the top so warm exhaust air can escape freely. Check your owner's manual for exact clearance numbers, since built-in and counter-depth models sometimes vent exclusively through the front lower grille.