
Finding a puddle of standing water around your kitchen cabinets during a wash cycle is every homeowner's nightmare. A dishwasher leak can range from a minor door drizzle to a major floor-soaking overflow that damages hardwood and subflooring. Fortunately, most dishwasher leaks are caused by simple, accessible issues like debris buildup, worn rubber gaskets, or loose connection clamps that you can fix in less than an hour.
Before you begin troubleshooting any dishwasher leak, safety comes first. Turn off the electrical power to the appliance at your home's breaker panel or unplug it from the wall outlet. Next, locate the shutoff valve on the hot water supply line under your kitchen sink and turn it off completely to prevent unexpected flooding while you work.
Here are 6 common reasons your dishwasher is leaking and the step-by-step DIY fixes to restore a dry kitchen floor.
Inspect and Clean the Door Gasket Seal
Over time, grease, food debris, and soap scum accumulate along the perimeter of the flexible rubber door gasket. This buildup prevents the seal from seating flush against the tub cabinet frame, allowing water to trickle out onto your kitchen floor during high-pressure spray cycles.
- Open the door fully and inspect the entire rubber seal along the top and sides of the door frame.
- Dip a microfiber cloth into warm water mixed with a few drops of mild dish soap.
- Wipe down the entire length of the rubber gasket, taking care to clean out the deep folds where food particles collect.
- Check the bottom tub door seal (the lower lip) for cuts, rips, or hardening. If the rubber is brittle or torn, strip the old seal away and press a fresh replacement door gasket into the channel.
Regularly cleaning your seals as part of your seasonal appliance maintenance checklist extends their lifespan and keeps water contained where it belongs.
Level Your Dishwasher Front to Back
If your appliance leans forward or tilted sideways, water inside the basin will slosh over the front tub lip before reaching the drain filter, escaping underneath the front access door panel.
- Place a bubble level along the top inside rim of the open dishwasher door frame to check side-to-side balance.
- Lay the level along the inner side rail to check front-to-back tilt.
- Unscrew the bottom kickplate grill using a screwdriver.
- Locate the adjustable leveling legs beneath the front corners.
- Use an adjustable wrench to turn the legs clockwise to raise the front or counterclockwise to lower it until the bubble centers.
Ensuring your unit sits perfectly level prevents water from pooling at the front door seam and eliminates unexplained mystery drips.
Clear Obstructed Lower Spray Arms
When spray arm jet holes become clogged with hard water mineral deposits or food scraps, water pressure gets redirected downwards against the bottom door seal. Additionally, cracked plastic spray arms can shoot concentrated jets of high-pressure water directly against door seams, bypassing designed splash guards.
- Unlatch and lift out the lower dish rack to access the main spray arm.
- Unscrew the center mounting nut or release the locking tab to remove the spray arm.
- Inspect the small nozzle holes along both arms for blockages.
- Use a wooden toothpick or needle-nose pliers to clear debris from each hole.
- Hold the spray arm under a running faucet to verify water flows freely through every port.
- Inspect the plastic seam along the edge of the spray arm for fine cracks. If split, replace the spray arm assembly.
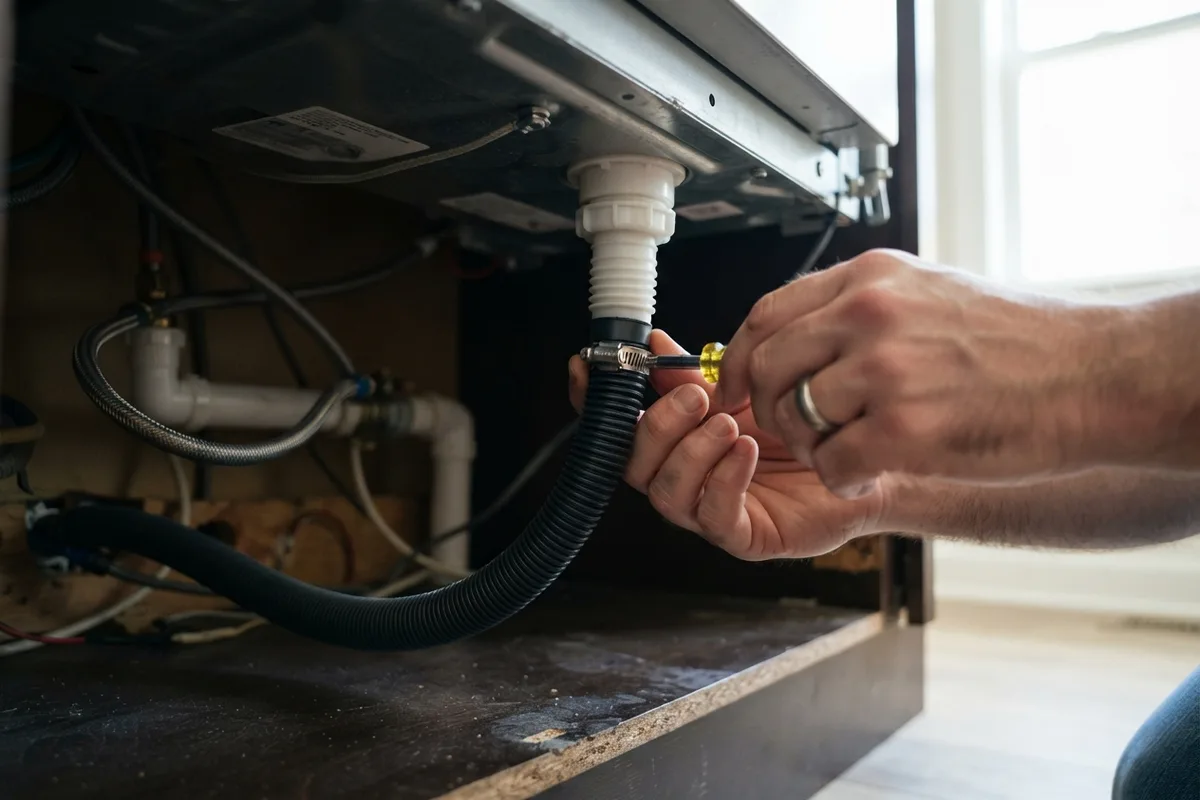
Check and Tighten the Drain Hose Connections
A leak originating beneath the center or back of the appliance frequently points to a loose clamp or damaged drain hose connection. Vibrations from high-speed pump drain cycles can loosen hose clamps over time.
- Shut off power and water, then remove the front kickplate beneath the door.
- Use a flashlight to inspect the corrugated plastic drain hose running from the drain pump to your sink drain tailpiece or garbage disposal.
- Feel along the length of the hose for wet spots, punctures, or crimps.
- Tighten any loose worm-gear hose clamps securing the connections at both ends using a nut driver or flathead screwdriver.
- If the rubber hose ends appear cracked, dry-rotted, or stretched, replace the drain hose with a new OEM-compatible part.
Inspect the Water Inlet Valve Assembly
The water inlet valve controls water flow from your home line into the dishwasher basin. A cracked plastic valve body or a worn internal solenoid seal can leak water constantly, even when the appliance is turned off.
- Remove the lower access kickplate panel to reveal the water inlet valve, located near the front left or right corner.
- Look for active drips around the brass elbow fitting and plastic valve body.
- Inspect for chalky white mineral buildup or rust stains, which indicate a slow, ongoing leak.
- Verify that the incoming copper or braided stainless steel water line compression fitting is tight.
- If water leaks directly from the plastic valve housing itself, disconnect the wiring harness and water line, unbolt the valve, and install a replacement water inlet valve.
Replace a Faulty Float Switch Assembly
The float assembly acts as a flood prevention safety valve inside the tub. As water fills the basin, the plastic float rises until it trips an electrical microswitch, telling the controller to shut off incoming water. If the float gets stuck on food particles or the switch fails, the tub overfills and leaks onto the floor.
- Lift out the lower dish rack and locate the dome-shaped plastic float in the front corner of the tub basin.
- Manually lift and drop the float; it should move up and down smoothly with an audible click from the switch below.
- Clean away dried soap, grease, or debris trapped underneath the plastic dome.
- If the float moves freely but the machine continues to overfill and leak, test the float switch beneath the tub with a multimeter or replace the switch assembly.
If you notice your dishes are also coming out wet after cycles, you might want to troubleshoot why your dishwasher is not drying to address heating and venting issues at the same time.
Quick Troubleshooting Reference Guide
Use this handy guide to match the location of your leak with the most likely cause and action steps:
| Leak Location | Most Likely Cause | DIY Fix Action |
|---|---|---|
| Front door lip / puddle in front | Dirty or damaged door gasket | Clean gasket or replace door seal |
| Water pooling under kickplate | Loose drain hose clamp or faulty inlet valve | Tighten clamps or replace inlet valve |
| Leaking during wash cycle only | Clogged or split spray arm | Clear nozzle holes or replace arm |
| Overfilling / water spilling over rim | Stuck tub float or failed float switch | Clean float dome or replace microswitch |
| Sloshing water out front corners | Appliance front legs set too low | Adjust leveling feet with a wrench |
When to Call a Pro
While cleaning seals, tightening hose clamps, and replacing accessible spray arms are quick DIY tasks, some leaks require expert technical tools. If your leak stems from a worn main pump motor shaft seal, an internal sump basin failure, or wiring damage caused by standing water, it is best to turn the job over to an experienced technician.
Working with electrical wiring, delicate control boards, or plumbing connections inside tight cabinet enclosures carries real safety risks. Typical professional dishwasher leak repairs across the US range between $150 and $350, though exact costs vary by area and model.
When DIY troubleshooting reaches its limits, True Appliance Repair can match you with a local appliance pro to diagnose and repair your machine quickly and safely.
FAQ
Why is my dishwasher leaking from the bottom of the door?
A leak at the bottom of the door is usually caused by a dirty or cracked door gasket, a clogged lower spray arm directing water against the seam, or an unlevel appliance that tilts forward. Cleaning the rubber seal and leveling the front legs usually solves this issue.
Can wrong detergent cause a dishwasher to leak?
Yes. Using regular liquid hand dish soap or non-dishwasher detergents creates excessive foam and suds inside the tub. These suds overflow past the door seals and float switch, leaking heavy volumes of soapy water onto your kitchen floor.
How much does it cost to fix a dishwasher leak?
Minor DIY repairs like replacing a door seal or drain hose cost around $15 to $50 for parts. If you hire a professional for internal pump or valve repairs, service costs typically range between $150 and $350, though pricing varies by area and model.
How do I know if my dishwasher pump is leaking?
A leaking pump usually leaves water directly beneath the center of the machine on the floor panel or subfloor. You may notice water accumulating during the drain cycle or hear a grinding noise coming from the pump motor beneath the kickplate.