
Hearing a loud clatter coming from the laundry room can make you worry that a major breakdown is moments away. Fortunately, a dryer making a rattling noise is usually caused by something simple, like a rogue coin in the blower housing or a loose exterior panel. Use these five practical DIY checks to track down the rattle and get your dryer running quietly again.
Safety First: Before inspecting internal components or removing any access panels, always unplug your dryer from the wall outlet. If you have a gas dryer, turn off the gas shut-off valve behind the unit and take care not to kink or strain the flexible gas line when moving the appliance.
1. Clear Loose Coins From the Drum Baffles
Before taking anything apart, check the interior of the dryer drum. Dryer drum baffles—the three plastic or metal fins inside the cylinder that lift and tumble your laundry—often loosen over time. Small items like coins, buttons, metal collar stays, andbra underwires can also slip underneath a loose baffle or catch in the narrow gap at the front and back of the drum, creating a rhythmic metallic rattle with every rotation.
- Open the dryer door and use a flashlight to inspect the seam where the rotating drum meets the stationary front and rear bulkheads.
- Pull gently on each of the three drum baffles inside the cylinder to see if any wiggle or rattle.
- If a baffle is loose, check the exterior of the drum (accessible by popping the top panel on many models) or look for mounting screws along the inside edge of the baffle.
- Tighten the mounting screws with a Phillips screwdriver or a nut driver, making sure not to overtighten and crack the plastic.
- Empty the lint trap and shine your flashlight down into the lint chute to spot any coins or screws sitting at the bottom, retrieving them with a flexible grabber tool.
2. Inspect and Tighten the Blower Wheel
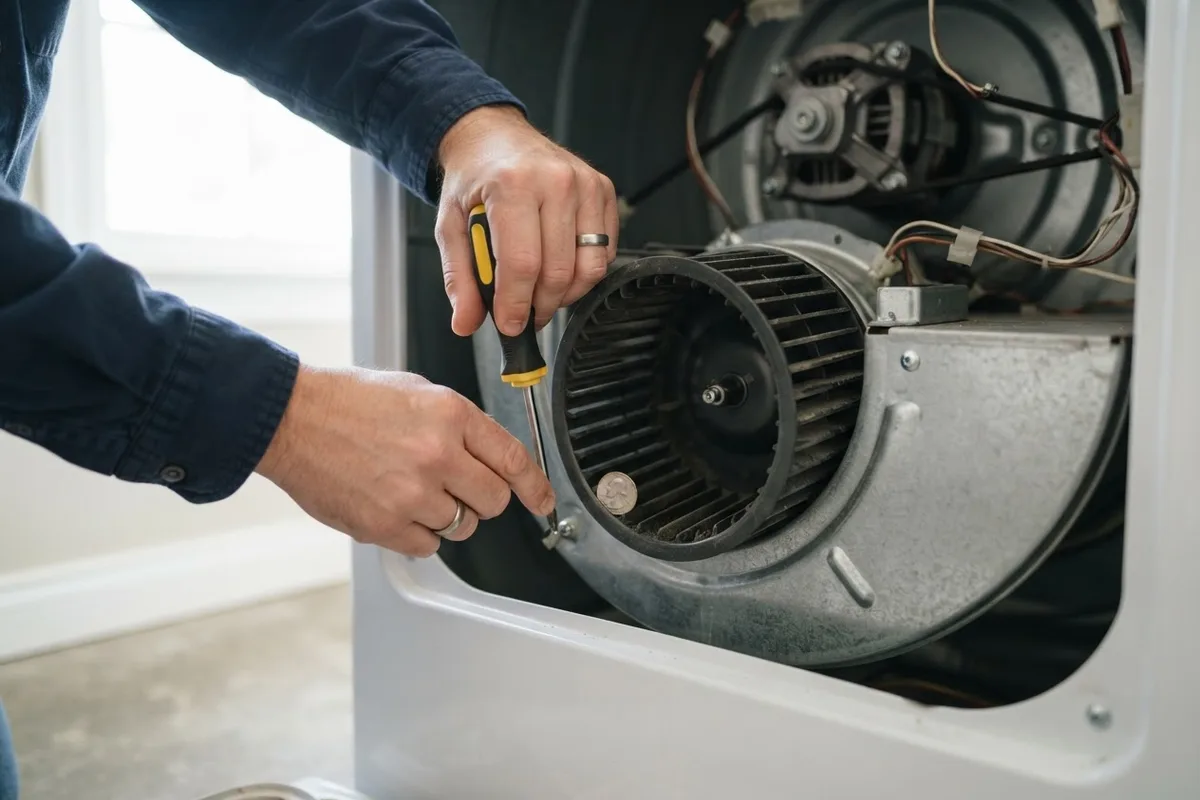
If the rattling noise sounds fast, frantic, or like a playing card stuck in bicycle spokes, the culprit is almost always the blower wheel. Located at the bottom of the lint chute, the blower wheel pulls moist air through the drum and pushes it out the exhaust vent. If a small sock, dryer sheet, or coin slips past the lint screen, it lands directly in the blower blades. Over time, the plastic center hub of the wheel can also strip out, causing it to wobble and rattle against the metal housing.
- Unplug the dryer and pull it away from the wall so you can access the rear panel (or the front lower kickplate, depending on your model).
- Disconnect the flexible exhaust vent hose from the back of the dryer and reach inside the exhaust port (with the power strictly unplugged) to feel for foreign objects.
- Remove the blower housing cover using a 1/4-inch or 5/16-inch nut driver.
- Clear out any compacted lint, coins, buttons, or plastic debris trapped inside the blower fins.
- Hold the motor shaft steady and try to wiggle the blower wheel by hand; if the wheel spins freely on the shaft or rocks back and forth, the center hub is stripped and the wheel needs to be replaced.
3. Level the Feet and Tighten Cabinet Panels
Sometimes the rattle isn't coming from a broken internal part at all—it is simply sheet metal vibrating against sheet metal or the laundry room floor. If one of the four leveling legs is slightly off the ground, the fast spin of the motor creates a rapid chattering vibration through the cabinet. That vibration will also make a loose rear access panel or a metal exhaust duct rattle loudly against the wall. Addressing cabinet stability works much like fixing a washer walking across the floor, starting right at the feet.
- Place a carpenter's level across the top of the dryer from side to side, and then from front to back.
- Rock the dryer diagonally by pushing on opposite top corners to feel which foot is not making solid contact with the floor.
- Use an adjustable wrench or channel-lock pliers to unscrew the low leveling leg until all four feet sit firmly on the floor.
- Tighten the locknut on each leg up against the bottom of the dryer cabinet so the feet cannot vibrate loose during a cycle.
- Use a nut driver to check all the hex screws holding the rear metal access panel in place, snugging up any that have backed out.
4. Check the Idler Pulley and Drive Belt
Your dryer drum is turned by a long rubber drive belt that loops around the outside of the drum, the motor pulley, and a spring-loaded tension wheel called the idler pulley. As the dryer ages, the idler pulley bearing can dry out or wear down, developing side-to-side play that creates a fast chattering or rattling sound. Similarly, if the rubber drive belt begins to fray, a loose strip of rubber will slap rapidly against the inside of the metal cabinet as the drum spins.
- With the dryer unplugged, open the cabinet (usually by removing two screws in the lint trap housing and lifting the top deck, then removing the front panel).
- Inspect the thin rubber drive belt wrapping the outside of the drum for missing ribs, splits, or frayed threads.
- Reach down to the bottom of the cabinet and locate the idler pulley bracket next to the drive motor.
- Release belt tension by pushing the spring-loaded idler arm toward the motor and slipping the belt off the pulley.
- Spin the idler pulley wheel by hand and wiggle it side to side; if it rattles, wobbles on its shaft, or feels gritty, replace the idler pulley assembly and the belt together.
5. Replace Worn Drum Rollers or Front Glides
While worn drum support rollers are famous for causing a heavy thump, a roller with a failing center bushing or a missing triangular retaining clip will rattle loudly on its metal axle shaft. Likewise, the front of the drum rides on smooth plastic or felt glides mounted to the front bulkhead. When those glides wear completely through, the front edge of the drum chatters and rattles against the metal frame—a problem closely related to a dryer making a scraping noise.
- With the cabinet open and the drive belt disconnected, lift the dryer drum straight up and out of the cabinet and set it aside.
- Inspect the rubber drum rollers mounted on the rear bulkhead (and front frame on some models).
- Check that the small metal triangular clip (E-clip) holding each roller onto its shaft is firmly seated in its groove.
- Spin each roller by hand; if a roller wobbles loosely on the steel shaft, inspect both the roller bearing and the shaft itself for wear.
- Clean the roller shafts with rubbing alcohol (never grease them, as grease attracts lint and causes the roller to seize) and slide on new drum rollers along with fresh retaining clips.
Dryer Rattling Noise Quick-Reference Guide
Use this table to match the specific sound you hear to the most likely cause and typical US part or repair cost ranges (actual costs vary by area, brand, and model).
| What the Rattle Sounds Like | Most Likely Culprit | DIY Difficulty | Typical Part Cost | Typical Pro Repair Range |
|---|---|---|---|---|
| Random clinking that changes speed with clothes | Loose coins in drum baffles or lint chute | Easy | $0 – $25 | $100 – $180 |
| Fast, rhythmic ticking or card-in-spokes sound | Debris in blower wheel or stripped blower hub | Moderate | $20 – $55 | $150 – $260 |
| Hollow buzzing or sheet-metal chatter | Uneven leveling feet or loose rear panel | Easy | $0 – $15 | $95 – $150 |
| High-speed slapping or mechanical chatter | Frayed drive belt or worn idler pulley | Moderate | $20 – $45 | $150 – $250 |
| Heavy clattering from the back of the drum | Worn drum roller bushing or missing E-clip | Moderate | $25 – $65 | $160 – $280 |
When to Call a Pro
Clearing pocket change from the blower housing, leveling the feet, and tightening cabinet screws are safe, rewarding weekend projects for most homeowners. However, if the rattling noise is coming directly from inside the drive motor itself, if the rear drum bearing on a rear-mounted dryer is seized and grinding, or if you have a gas dryer sitting in a tight alcove where you cannot safely move it without straining the gas line, it is best to step back.
Disassembling a dryer drum takes patience and space, and putting the belt back onto the idler pulley blindly underneath the drum can be tricky on your first try. If you would rather skip the disassembly, True Appliance Repair can match you with a local pro for dependable washer and dryer repair. You can also reach out through our contact page to get connected with an independent technician in your neighborhood.
FAQ
Is it safe to keep running my dryer while it makes a rattling noise?
It is best to pause the cycle and investigate before running another load. Even a small object like a coin or screw wedged in the blower housing can shatter the plastic blower wheel or jam the motor, turning a free five-minute cleanout into a costly part replacement.
How do coins get past the lint trap and into the blower wheel?
Most coins slip into the blower housing when a homeowner pulls out the lint screen to clean it while loose change is sitting on the lip of the trap opening. If the lint screen has a torn mesh or does not sit flush in its slot, small items like collar stays, bobby pins, and coins can also slide straight down the chute during a cycle.
Why does my dryer only rattle when it is empty or has a small load?
When the dryer has a heavy load of wet towels, the weight of the laundry presses the drum down firmly onto the support rollers and dampens cabinet vibrations. With an empty drum or a very light load, a slightly loose drum baffle, worn front glide, or uneven leveling foot has enough slack to bounce and chatter loudly.
How much does it typically cost to fix a rattling dryer?
If you tackle the job yourself, fixing a rattling dryer is often free—just the time it takes to remove trapped debris or level the legs—or between $20 and $65 for a replacement blower wheel, belt, or roller kit. Hiring an independent technician typically runs between $140 and $280 total for parts and labor, though prices vary by area and dryer model.