
Hearing a high-pitched chirp or steady squeal from the laundry room is more than just an annoyance—it is usually your dryer's way of asking for a little mechanical attention before a part snaps completely. As heavier fall and winter laundry loads like flannel sheets, hoodies, and thick towels go into rotation, aging moving parts inside the cabinet work much harder and start to vocalize their wear. By walking through the six checks below, you can identify why your dryer is making a squeaking noise, fix simple issues yourself, and know when a deeper repair makes sense.
Safety First: Before inspecting any internal components, always unplug an electric dryer from the wall outlet or switch off its circuit breaker. If you have a gas dryer, unplug the power cord and turn the gas shut-off valve behind the machine to the closed position. Never reach into a running appliance, and stop immediately to call a professional if you smell gas or encounter damaged electrical wiring.
1. Remove Coins and Debris Caught in the Drum Seals
Before taking tools to the cabinet, check the easiest culprit: a small foreign object wedged between the spinning drum and the stationary front or rear bulkhead. Underwire bras, collar stays, zippers, and coins frequently slip into the narrow felt-lined gap around the edge of the drum and scrape against the metal housing with a sharp, rhythmic squeak.
- Unplug the dryer completely from the power source.
- Open the dryer door and shine a bright flashlight along the entire perimeter where the rotating drum meets the front frame and the rear wall.
- Slowly rotate the drum by hand in both directions while listening closely to pinpoint where the friction happens.
- Run a wooden craft stick or plastic putty knife gently along the felt drum seal to feel for trapped metal items.
- Pull any lodged coins, pins, or wires straight out with needle-nose pliers, taking care not to tear the felt seal.
2. Inspect and Clean Worn Drum Support Rollers
Most modern clothes dryers rest the back (and sometimes the front) of the tumbling drum on two or four hard rubber wheels called drum support rollers. Over years of heat and lint exposure, hair and fibers wrap tightly around the roller shafts, drying out the factory lubrication and creating a loud, rapid squeak that speeds up as the drum turns.
- Disconnect power (and gas, if applicable) and pull the dryer away from the wall so you can access the cabinet panels.
- Consult your owner's manual to remove the top panel, front bulkhead, and drum—or the rear access panel on select models—to expose the rubber support rollers.
- Spin each roller by hand; it should glide smoothly and silently without wobbling from side to side on its metal shaft.
- Pull off the retaining clip holding the roller in place, slide the wheel off the axle, and wipe the metal shaft clean using a cloth dampened with rubbing alcohol.
- If the rubber edge is flat-spotted, cracked, or wobbles loosely on its center bearing, replace all rollers at the same time along with their shafts (avoid spraying standard household lubricants like WD-40 inside a hot dryer, as they attract lint and create a fire hazard).
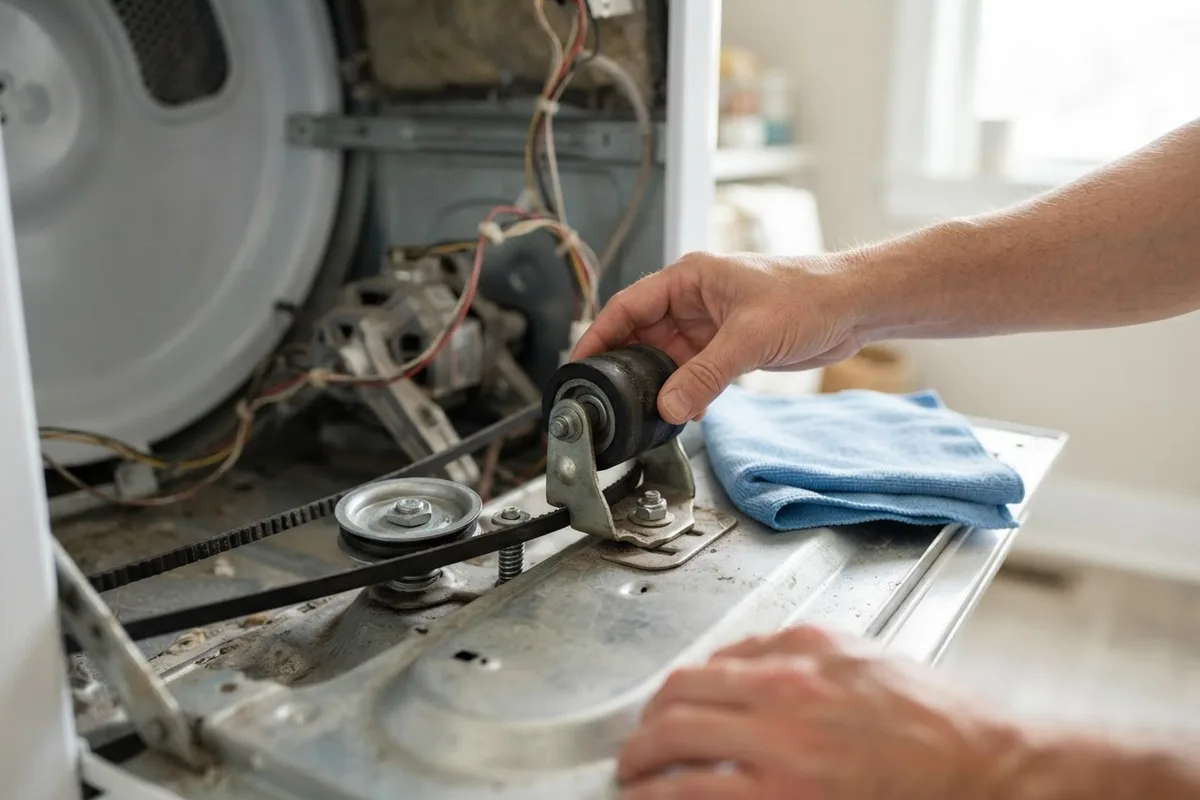
3. Replace a Squealing Idler Pulley Wheel
The idler pulley is a small spring-loaded wheel near the bottom of the dryer that keeps tight tension on the drive belt so the motor can spin the drum. Because this tiny plastic or metal wheel spins at very high speeds under constant spring pressure, its internal bearing is the number-one source of a shrill, continuous squeaking noise.
- With the dryer unplugged and the drum removed, locate the idler pulley bracket right next to the drive motor at the bottom of the cabinet.
- Spin the pulley wheel with your finger to feel for roughness, stiffness, or a high-pitched chirp.
- Inspect the plastic wheel surface for deep grooves, melted spots, or a loose center bushing that allows the wheel to tilt.
- Unhook the tension spring or slide the idler arm out of its slot in the dryer baseplate.
- Install a matching replacement idler pulley assembly, route the drive belt around the pulley and motor shaft according to your model's diagram, and reassemble the cabinet.
4. Check for a Frayed or Glazed Drive Belt
A thin rubber drive belt wraps all the way around the outside of the dryer drum and connects to the motor and idler pulley. When the rubber dries out, develops shiny glazed spots, or starts fraying along the edges, it can slip slightly against the drum or pulley and produce a chirping sound—especially right when a heavy load starts tumbling.
- Unplug the dryer and open the top or front access panel so you can see the black rubber belt encircling the drum.
- Press down firmly on the belt; it should feel taut and spring back immediately without excessive slack.
- Rotate the drum slowly by hand to inspect the entire length of the belt for missing ribs, peeling threads, cracks, or glossy, hardened sections.
- Check the outside of the metal drum where the belt rides and wipe away any sticky black rubber residue with a damp rag.
- If the belt shows any cracking or glazing, release the tension on the idler pulley, slip the old belt off the drum, and loop a new OEM belt around the drum marks before re-engaging the pulley.
5. Replace Worn Front Drum Glide Bearings
While the back of the dryer drum usually rides on rubber rollers, the front lip of the drum on many models slides across smooth plastic or Teflon strips called drum glides (or bearing slides) mounted on the inside of the front panel. Once those thin plastic pads wear all the way down, bare metal rubs directly against metal, causing a harsh squeak or screech.
- Disconnect the dryer from power and remove the lint screen.
- Take out the screws securing the top and front panels, carefully unplug the door switch wire harness, and lift the front panel away.
- Look along the upper inside curve of the front panel where the lip of the drum rests.
- Examine the plastic glide strips and their underlying felt pads for uneven wear, broken tabs, or dark metal-on-metal rub marks.
- Pop out the worn plastic glides using a flathead screwdriver, snap a full set of new glides into the metal slots, and reinstall the front panel.
6. Clear Lint and Debris From the Blower Wheel
The blower wheel draws hot, moist air through the drum and pushes it out the exhaust vent. Normally, a loose blower wheel causes a rumble, much like a washer making a bang noise when its load shifts, but a small dryer sheet corner or pet hair clump tangled behind the blower wheel can rub against the blower housing and mimic a high-pitched squeak.
- Unplug the appliance and locate the blower housing, which sits either behind the lower front panel or behind the rear access panel depending on your brand.
- Remove the metal cover over the blower fan or detach the exhaust duct from the back of the dryer to view the plastic wheel.
- Shine a flashlight inside and pull out any compacted lint balls, dryer sheets, or small socks stuck between the fins and the housing.
- Try wiggling the blower wheel gently by hand; if the wheel spins freely while the motor shaft stays still, the center hub is stripped and the wheel needs replacement.
- While you have the laundry area open for maintenance, consider pairing this task with our guide on how to clean a top-load washing machine so both machines run smoothly through the busy season.
Quick-Reference Guide: Dryer Squeak Symptoms and Typical Costs
| Squeak Pattern | Most Likely Cause | Typical Part Cost (US) | Typical Pro Repair Range (US) |
|---|---|---|---|
| Rhythmic chirp once per drum turn | Coin in seal or flat-spotted roller | $0 – $45 | $130 – $260 |
| Continuous high-pitched squeal | Worn idler pulley bearing | $15 – $35 | $150 – $250 |
| Squeaks mostly at startup with wet clothes | Glazed or slipping drive belt | $15 – $30 | $140 – $230 |
| Harsh squeak near the dryer door | Worn front plastic drum glides | $20 – $50 | $150 – $260 |
| Constant metallic screech + hot smell | Failing drive motor bearings | $120 – $220 | $250 – $420 |
Note: Part and labor prices are broad US estimates and vary by area, dryer brand, and whether you own an electric or gas model.
When to Call a Pro
If you have cleared the drum seals and inspected the accessible rollers, belt, and glides, yet the squeaking persists—or comes accompanied by a burning smell or a drum that struggles to start—the issue is likely worn bearings inside the drive motor itself. Replacing a dryer motor or tearing down a complex stacked laundry center requires specialized tools and careful wiring work. And if you own a gas dryer and are uncomfortable moving the appliance near the gas flex line, it is always wisest to leave the cabinet closed.
Rather than spending your weekend wrestling with spring tensioners and wiring harnesses, True Appliance Repair can connect you with a local washer and dryer repair technician who can replace the rollers, pulley, and belt in a single visit. Many repair kits bundle all three wear items together, saving you money over replacing parts one by one.
FAQ
Is it safe to keep using a dryer that is making a squeaking noise?
It is best to stop using the dryer until you inspect it. A squeaking roller, pulley, or glide creates extra friction and heat inside a cabinet full of dry lint, and if a seized roller or snapped belt suddenly locks up the drum while the heating element is running, it can scorch your clothes or burn out the motor.
Can I spray WD-40 on my dryer rollers or pulley to stop the squeak?
No, never spray WD-40, silicone spray, or household grease onto dryer rollers or pulleys. Standard lubricants break down quickly under high dryer temperatures, collect lint into a gummy paste that seizes the wheel faster, and introduce a serious flammability risk near the heating element or gas burner.
Why does my dryer only squeak when it has a heavy load inside?
Heavy wet loads like towels and jeans press down hard on the drum support rollers, front glides, and idler pulley. When those bearings and plastic pads are in the early stages of wearing out, the extra downward weight is just enough to force metal-on-metal contact or make a glazed drive belt slip.
Should I replace just the squeaky roller or all of them at once?
Always replace all drum rollers, the idler pulley, and the drive belt at the same time using a manufacturer maintenance kit. Because these parts experience the exact same number of laundry cycles, replacing only one worn roller usually means another wheel will start squeaking a few months later, forcing you to disassemble the entire dryer a second time.