
If your clothes come out damp after a standard 45-minute cycle, running a second cycle feels like an easy workaround. However, double drying consumes excessive electricity or gas, bakes fabric fibers, and puts severe wear on internal blower components. In most homes, a dryer taking two cycles to dry is caused by restricted exhaust airflow or coated moisture sensors rather than a completely broken heating element.
By following a systematic checklist, you can identify why humid air stays trapped inside the drum and restore fast, efficient drying times. Always put safety first before attempting any hands-on inspection: unplug electric dryers from the wall outlet or switch off the dedicated circuit breaker, and turn off the gas shutoff valve for gas models. If you encounter complex electrical issues or gas valve malfunctions, stop and consult a professional. Here is how to fix long drying times in five practical steps.
Clean the Lint Screen and Housing Mesh
A clogged lint filter is the single most common cause of extended drying times. Even if you clear the visible lint sheet before every load, fine wax residues from fabric softeners and dryer sheets accumulate in the mesh over time. This invisible barrier blocks warm air from escaping the drum, forcing moisture back into your laundry.
Start by sliding out the lint screen and peeling away all surface fuzz. Take the screen to the sink and scrub both sides using warm water, a small amount of liquid dish soap, and a soft nylon brush. Rinse thoroughly and hold the screen under a running faucet—if water pools instead of flowing straight through, continue scrubbing until the mesh clears completely. Allow the screen to dry fully before reinserting it.
While the screen is drying, inspect the lint filter housing slot. Use a narrow vacuum crevice attachment or a flexible lint brush to clean out packed debris lying at the bottom of the duct. Removing this hidden buildup instantly improves system static pressure and restores proper airflow through the drum.
Clear Obstructions from the Exterior Vent Line
Even a perfectly clean lint screen cannot overcome a blocked exhaust duct. Dryers push heavy, moisture-laden air through metallic ductwork to the outside of your home. When lint, bird nests, or crushed ducting restrict this path, humid air circulates repeatedly over your clothes, forcing you to run back-to-back drying cycles.
To test your vent path, turn on the dryer on a high-heat cycle and step outside to inspect the exterior exhaust hood. You should feel a strong, warm breeze and see the vent flap open fully. If the air stream feels weak or cool, perform a full vent cleaning:
- Unplug the dryer and disconnect the flexible transition duct from the wall exhaust opening.
- Insert a flexible rotary dryer vent cleaning brush into the wall duct, attached to a cordless drill.
- Spin the brush while pushing it forward through the ductwork to dislodge packed lint clumps.
- Use a leaf blower or shop vacuum to clear the loosened lint out of the exhaust hood.
- Check the exterior hood flap to ensure it swings freely without stuck lint or pest guard blockages.
Performing regular exhaust maintenance prevents long drying times and reduces fire risks. Incorporating this task alongside general appliance maintenance checks keeps your entire laundry setup operating efficiently.
Scrub the Internal Moisture Sensor Bars
Modern dryers rely on auto-moisture cycles to detect when clothes are dry. These systems use two thin, metallic sensor strips located near the lint filter housing inside the front of the drum. As wet clothes tumble across the strips, water conducts a tiny electrical current that tells the control board to keep heating. Once laundry dries, electrical resistance rises, and the dryer terminates the cycle.
Over time, dryer sheets and liquid fabric softeners leave an invisible chemical film across these metal bars. This residue insulates the sensors, causing the dryer to mistakenly register clothes as dry too early—or to run inefficiently on low heat settings, leaving clothes damp after the cycle stops.
Locate the two metallic bars inside the front rim of the drum casing. Dip a microfiber cloth into rubbing alcohol and scrub both metal strips vigorously to dissolve film buildup. Wipe the bars dry with a clean towel. Avoid abrasive steel wool or harsh chemical cleaners that can scratch the sensor coating. Test an auto-dry cycle on your next load to verify accurate moisture detection.
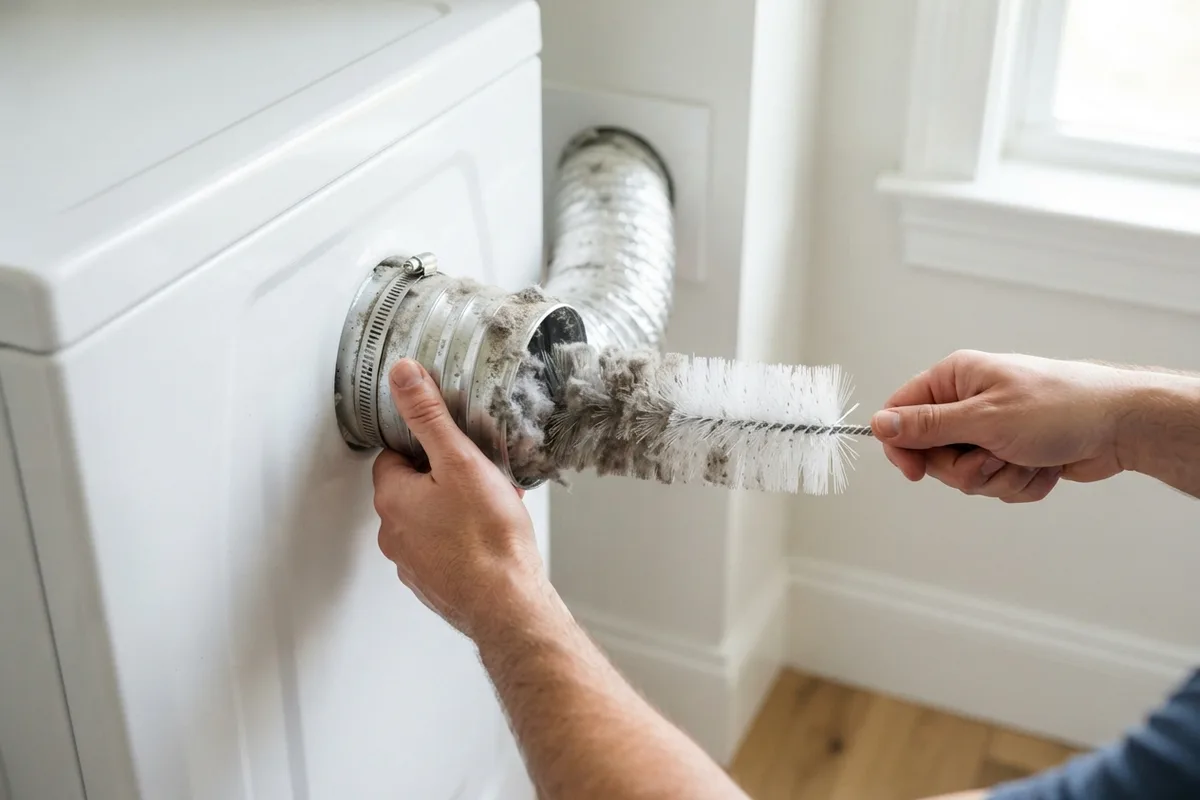
Straighten and Upgrade Rigid Ducting
The material and layout of your dryer transition hose play a massive role in cycle duration. Flexible foil-accordion hoses and corrugated plastic ducts create severe air turbulence, collect lint rapidly, and crush easily when pushed against laundry room walls. A single crushed bend in a flexible foil hose cuts airflow by more than half.
Pull the dryer away from the wall and inspect the exhaust transition duct:
- Discard any thin plastic or foil accordion ducting immediately, as these materials pose safety hazards.
- Measure the distance between the dryer exhaust outlet and the wall connection.
- Replace soft ducting with heavy-duty semi-rigid or rigid aluminum ductwork.
- Keep the total duct path as short and straight as possible, avoiding sharp 90-degree turns.
- Secure all metal duct joints using aluminum foil tape rather than duct tape or sheet metal screws, which catch flying lint inside the pipe.
Properly supported rigid ducting minimizes friction, allowing damp air to vent outdoors rapidly so your clothes dry in a single 30-to-45-minute cycle.
Test the Heating Element or Gas Igniter
If your dryer has unrestricted airflow and clean moisture sensors but still takes two cycles to dry, an internal heating component may be failing partially. Electric dryers use dual heating coils inside an assembly casing; if one coil breaks, the dryer produces moderate heat rather than full heat. Similarly, a weakening gas valve solenoid on a gas dryer may ignite initially but fail to reopen as the machine warms up.
For electric dryers, unplug the power cord and test the heating element for continuity using a digital multimeter set to ohms (Rx1):
- Remove the rear panel or lower front access panel depending on your appliance model.
- Locate the cylindrical heating element housing and disconnect the two wiring leads.
- Place multimeter probes across the terminal posts. A healthy element reads between 15 and 50 ohms.
- Touch one probe to the metal casing and the other to each terminal. Any continuity to ground indicates a shorted element that must be replaced.
If your washer leaves loads soaking wet before they even reach the drum, review causes for why a washer leaves clothes wet or damaged to ensure your washer spin cycle is properly extracting water first.
| Issue Identified | Primary Cause | Recommended DIY Solution |
|---|---|---|
| Weak air flow outside | Lint clogging vent line | Clean ductwork with a rotary vent brush kit |
| Clothes damp on Auto-Dry | Softener film on sensors | Scrub drum moisture bars with rubbing alcohol |
| Clothes warm but damp | Kinked exhaust hose | Install short, semi-rigid aluminum ducting |
| Dryer stays lukewarm | Burnt heating coil | Test continuity with multimeter; replace element |
| Takes 2 cycles on heavy items | Overloaded drum capacity | Reduce load size to allow proper tumble space |
When to Call a Pro
If you have cleared the vent lines, scrubbed the moisture sensors, and verified that your transition hose is uncrushed, but your dryer still requires two cycles, the issue may involve a failing thermal fuse, damaged blower wheel impeller, or faulty control board relay. High-voltage 240-volt electrical circuits and gas line connections require specialized diagnostic tools to repair safely.
Never attempt to repair internal gas lines, gas valves, or main electrical panels yourself. Typical professional repairs for heating elements, thermal limiters, or blower assemblies range between $150 and $300, though final costs vary by area and model. When DIY troubleshooting does not fix long drying times, True Appliance Repair can connect you with an experienced local technician who can diagnose complex electrical or heating components and restore your laundry routine quickly.
FAQ
Why does my dryer feel hot inside but clothes stay wet?
When a dryer feels hot but fails to dry clothes, humid air cannot escape the drum. This condition is almost always caused by a severe restriction in the vent line or exterior hood flap. Because the moist air cannot vent outdoors, it re-condenses onto your clothes during the cycle.
Do dryer sheets make a dryer take longer to dry?
Yes, overuse of dryer sheets can lengthen drying cycles. Dryer sheets transfer a thin layer of wax and silicone to clothing and internal drum surfaces. This coating clogs the fine mesh of the lint screen and coats the metal moisture sensors, causing auto-dry cycles to shut off prematurely or restrict airflow.
How long should a normal dryer cycle take for a full load?
A standard load of mixed cottons or towels should take between 30 and 45 minutes to dry completely in a modern dryer. Heavy items like thick blankets or jeans may take up to 60 minutes. Cycles taking 80 to 90 minutes or requiring two full runs indicate a ventilation block or heating component issue.
Is running a dryer for two cycles back-to-back dangerous?
Running back-to-back cycles repeatedly on damp clothes increases internal temperatures and accelerates lint buildup inside the cabinet. Overheated lint trapped near heating elements or gas burner assemblies creates a significant fire hazard. Cleaning your vent system promptly restores safety and cuts energy consumption.