
A clothes dryer that shuts off power to your laundry room mid-cycle disrupts your routine and signals an electrical overload. When your dryer trips the circuit breaker, the breaker is doing its job by cutting off power before overheating wiring can spark a fire.
Before you inspect any components, always prioritize safety. Unplug your electric dryer from the wall receptacle or shut off the dedicated 240-volt double-pole breaker in your main electrical panel. If you have a gas dryer, unplug the unit and turn off the gas supply line before checking internal parts. If you suspect an issue inside the main electrical panel itself, stop and call a professional technician or electrician.
1. Clear Severe Lint Blockages in the Vent Line
A restricted dryer exhaust vent is one of the most frequent reasons a dryer trips its electrical breaker. When lint, pet hair, and debris accumulate inside the ductwork or exterior exhaust hood, hot air cannot escape the drum. This buildup forces internal temperatures past safe thresholds. Modern dryers have high-limit safety thermostats designed to shut the unit down, but excessive sustained heat draws surplus electrical current and causes the breaker to trip.
- Disconnect the flexible duct from the rear outlet of the dryer.
- Inspect the interior of the duct and the wall opening for dense lint mats.
- Feed a rotary dryer vent brush through the entire duct run out to the exterior vent cap.
- Vacuum out the lint trap housing beneath the removable lint screen using a narrow vacuum attachment.
- Reattach the duct tightly using a metal clamp instead of standard duct tape, which deteriorates under heat.
Regular duct cleaning keeps your appliance safe and extends the lifespan of internal heating coils. You can also explore our guide on 6 hidden appliance filters you should clean regularly to prevent similar issues across your laundry and kitchen appliances.
2. Inspect the Heating Element for Grounded Coils
On electric dryers, a damaged heating element is a leading cause of instant breaker trips. The heating assembly consists of a coiled Nichrome wire strung along ceramic insulators inside a metal housing. Over time, metal fatigue or excess heat causes the coil to sag or break. If a broken segment touches the grounded metal casing, it creates a direct electrical short circuit that trips the breaker the second heat is called for.
- Unplug the dryer and remove the rear access panel (or lower front panel on certain models).
- Locate the heating element chamber, usually positioned on the lower right side.
- Visually inspect the coiled wire inside the metal housing for breaks, dark burn marks, or sagging coils touching the metal frame.
- If you own a digital multimeter, set it to the lowest ohms setting (resistance) and place one probe on a terminal and the other against the metal casing. If the meter shows continuity (any reading other than infinite/open), the element is grounded and must be replaced.
- Swap the damaged heating element assembly with a matching replacement for your exact dryer model.
3. Test the High-Limit Thermostat and Thermal Fuse
Dryers rely on safety switches to monitor operating heat. The cycling thermostat regulates normal drum temperatures, while the high-limit thermostat and thermal fuse protect against runaway overheating. If a thermostat fails closed (sticking in the "on" position), the heating element continues heating without shutting off, drawing excessive power until the breaker trips.
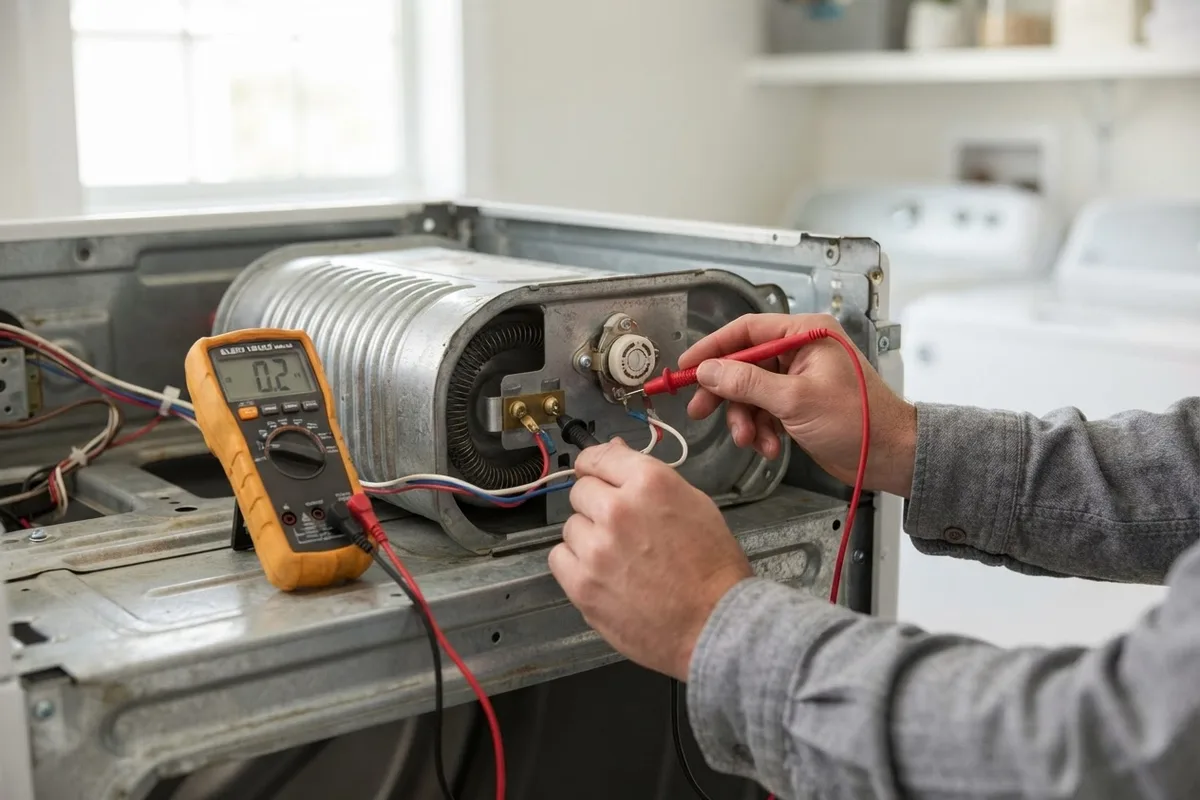
- Disconnect the dryer from power and remove the rear access cover.
- Locate the high-limit thermostat mounted directly on the heating element housing, alongside the thermal fuse.
- Tag and pull the wire slip-connectors off the thermostat terminals.
- Test for electrical continuity across the two terminals at room temperature using a multimeter. It should show near-zero ohms.
- Check the component body for signs of scorching, warped plastic, or blistering, which indicate electrical arcing. Replace both the thermostat and thermal fuse as a matched set if either shows heat damage.
4. Check the Drive Motor for Internal Binding
The drive motor turns the drum via a rubber belt and powers the blower fan wheel simultaneously. Over years of use, lint and dust work their way into the motor bearings, causing heavy friction. A seized or struggling motor draws significantly more amperage than its normal operating rating to turn the drum. Within 30 to 90 seconds of starting, this surge will trip your electrical breaker.
- With the dryer unplugged, open the door and rotate the empty drum by hand. It should turn smoothly with slight resistance from the drive belt.
- If the drum feels completely locked or requires heavy force to turn, remove the drive belt and try spinning the motor shaft directly.
- Vacuum out heavy lint clumps surrounding the motor housing and blower wheel.
- Check the blower fan wheel attached to the motor shaft to ensure foreign objects (like coins or stray socks) are not jamming the blades.
- If the motor hums loudly, feels hot to the touch, or fails to spin freely without the belt attached, the motor windings or bearings have failed and require a replacement motor.
5. Examine the Terminal Block and Power Cord
The point where the heavy 240-volt power cord connects to the dryer's internal wiring is called the terminal block. Loose screw connections or strained cord wires can generate intense resistance and heat, eventually melting the plastic block and creating an intermittent short circuit against the dryer chassis.
- Ensure the dryer power cord is unplugged from the wall receptacle.
- Remove the small metal cover plate over the power cord entry point at the back of the machine.
- Inspect the three or four wire terminals for loose mounting nuts, frayed wire strands, or melted plastic.
- Tighten any loose terminal screws securely to ensure solid electrical contact.
- If the terminal block shows signs of black soot, melting, or burnt insulation, replace both the terminal block and the power cord to ensure fire safety.
To keep your laundry pair running safely alongside your other major appliances, adopting routine maintenance is essential. Check out our guide on how to extend appliance lifespan for practical upkeep habits.
| Cause of Breaker Trip | Typical Timing | DIY Difficulty | Key Indicator |
|---|---|---|---|
| Grounded Heating Element | Trips instantly when cycle starts | Moderate | Visible coil break touching metal housing |
| Clogged Vent Duct | Trips after 10–20 minutes of running | Easy | Exterior dryer vent has weak airflow, dryer exterior is hot |
| Seized Drive Motor | Trips within 30–60 seconds | Moderate / Advanced | Humming sound, drum hard to rotate by hand |
| Damaged Terminal Block | Trips intermittently during vibration | Moderate | Black soot or melted plastic at power cord connection |
| Faulty High-Limit Switch | Trips mid-cycle under continuous heat | Moderate | Burn marks or loss of electrical continuity |
When to Call a Pro
Simple tasks like vacuuming out ductwork, replacing a thermal fuse, or tightening terminal screws are manageable DIY repairs for handy homeowners. However, diagnosing intermittent electrical shorts, testing main control boards, or addressing circuit breaker panel wear requires specialized equipment and training.
If your dryer continues tripping the breaker immediately after you have replaced the heating element, or if the circuit breaker feels hot or buzzes at the main electrical panel, stop using the appliance. Replacing major electrical harness wiring or dealing with main household supply lines carries serious shock and fire hazards. Typical dryer repairs by a technician average between $130 and $320 depending on parts and labor rates in your region. When you need dependable diagnostic help, True Appliance Repair can match you with an experienced local appliance pro to get your laundry room running safely.
FAQ
Can a bad wall outlet cause my dryer to trip the breaker?
Yes. 240-volt dryer receptacles can loosen internally over time due to thermal expansion and mechanical strain. Loose contact blades create high resistance and heat, which can trip the breaker or scorch the outlet face. If the outlet looks discolored or the plug fits loosely, have an electrician inspect the receptacle.
Why does my dryer trip the breaker only on high heat settings?
When a dryer runs on high heat, both sections of the heating coil draw maximum electrical current. If your circuit breaker is weakened from age or if the ventilation line is partially restricted, the higher electrical load pushes the circuit over its limit. Running on "Air Fluff" or low heat draws less current, which may keep the breaker from tripping temporarily.
Is it safe to keep resetting the breaker for my dryer?
No. A circuit breaker is an essential safety mechanism designed to prevent electrical fires. Repeatedly resetting a breaker that trips under load weakens the breaker switch and risks damaging internal dryer wiring. Diagnose and fix the underlying issue before restoring power to the unit.
How many amps should a dryer circuit breaker be?
A standard electric clothes dryer in the United States requires a dedicated 30-amp, 240-volt double-pole circuit breaker wired with 10-gauge copper wire. Gas dryers use a standard 120-volt, 15-amp or 20-amp single-pole circuit since gas produces the heat and electricity only turns the drum and powers controls.