
Opening your freezer to find soft ice cream, melted ice cubes, and thawing meat is an urgent household headache. When a freezer fails to maintain sub-zero temperatures, acting quickly prevents food spoilage and rising energy bills. This guide covers the five most common reasons a freezer stops freezing and provides step-by-step DIY solutions to restore maximum cooling fast.
Clear Blocked Vents and Rearrange Food
Cold air in your freezer circulates from the evaporator coils behind the back panel into the compartment through internal air vents. When boxes of frozen pizza, bags of vegetables, or thick ice blocks crowd these vents, air circulation grinds to a halt. Cold air cannot distribute evenly, leaving food soft even while the cooling system runs continuously.
- Locate the supply and return air vents along the back wall or roof of your freezer compartment.
- Rearrange packages so that there is at least two inches of clear clearance around every air vent.
- Avoid packing shelves completely to the edges; leave open gaps for cold air to cascade down through lower shelves.
- If ice crusts over the vent grilles, unplug the appliance and allow a brief manual defrost to clear the air passages.
If unpleasant odors persist inside your cabinet due to poor air movement, reviewing simple refrigerator odor fixes can help eliminate stale smells after restocking.
Clean Dust and Debris off Condenser Coils
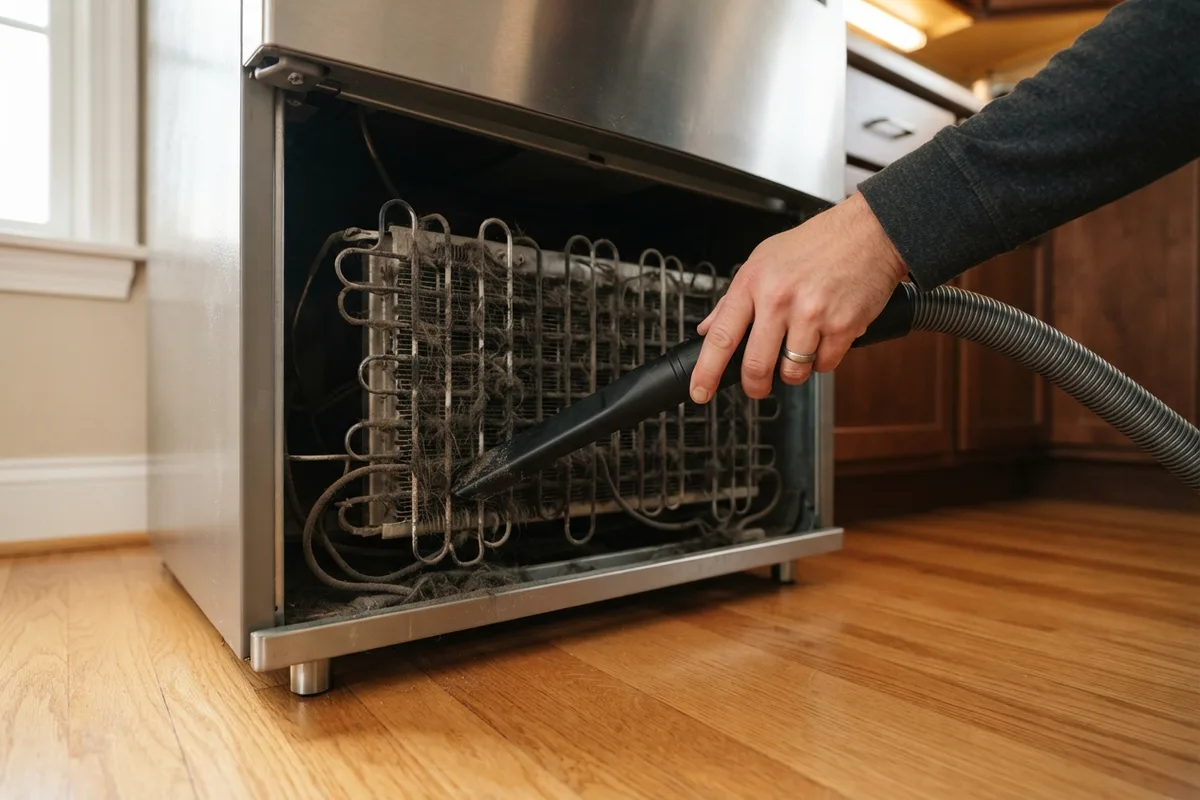
Condenser coils shed heat removed from inside the freezer cabinet into your kitchen air. Located behind the lower toe kick plate at the front or on the lower back of the cabinet, these coils attract pet hair, dust mats, and airborne cooking grease. Thick dirt acts like an insulating jacket, forcing the compressor to work overtime while internal temperatures steadily climb.
- Unplug the refrigerator from the wall outlet before starting any maintenance work.
- Access the coils by unclipping the front base grille or sliding the appliance away from the wall to reach the rear panel.
- Use a flexible condenser coil brush to loosen stubborn lint and hair wedged between wire loops.
- Vacuum away all loose debris using a narrow crevice tool or brush attachment.
- Plug the power cord back into the outlet and evaluate cooling performance after four to six hours.
Performing coil maintenance twice a year is a primary step highlighted in our guide on home appliance safety checks to prevent sudden cooling breakdowns.
Test and Restore the Door Gasket Seal
The rubber door gasket forms an airtight barrier that traps freezing air inside while sealing out warm room humidity. If the magnetic gasket becomes stiff, warped, dirty, or cracked, moist room air continuously leaks inside. This creates heavy frost buildup on cooling coils and prevents food from remaining rock-solid.
- Inspect the entire rubber seal along all four edges of the freezer door for cracks, tears, or physical gaps.
- Wipe down the gasket using warm water and mild dish soap to remove sticky residue that impairs magnetic grip.
- Perform the dollar bill test: place a dollar bill across the seal line and shut the door. Pull the bill gently. If it slides out without resistance, the magnetic seal is failing.
- Recondition minor gaps by gently heating flattened vinyl sections with a hair dryer on low setting while reshaping the rubber with your fingers.
- Replace the entire gasket assembly if the vinyl is cracked, split, or missing magnet segments.
Inspect the Evaporator Fan Motor
The evaporator fan draws air across the freezing cooling coils and blows it through the freezer and fresh food compartments. If the fan motor fails, stops turning, or gets jammed by thick frost, cold air stays trapped inside the coil housing. The compressor may continue running normally, but cold air never reaches your food shelves.
- Unplug the unit and remove freezer shelving to access the back wall panel.
- Remove the retaining screws and lift off the interior rear cover panel to expose the fan blade and evaporator coils.
- Check for physical obstruction, such as thick frost or loose plastic packaging blocking the fan blades.
- Spin the fan blade manually with your finger. If the blade feels stiff or resists turning, the internal motor bearings have seized.
- Plug the refrigerator back in briefly—keeping hands clear of wiring—and depress the door frame switch. If the compressor hums but the fan blade remains motionless, the motor requires replacement.
Check the Defrost System and Thermostat Settings
Modern frost-free freezers use a defrost system—consisting of a defrost timer or electronic board, defrost heater, and defrost termination thermostat—to melt frost off evaporator coils several times each day. If any component in this loop fails, heavy frost coats the coils completely, choking off airflow and causing interior temperatures to soar above freezing.
- Check your temperature dial or digital control pad to confirm it is set to 0°F (-18°C).
- Look closely at the back wall of the freezer interior. A thick sheet of white frost or ice build-up indicates a failed defrost cycle.
- Locate the mechanical defrost timer (often located inside the fresh food control housing or behind the bottom toe grille).
- Turn the center advance screw slowly clockwise with a flathead screwdriver until you hear an audible click.
- Observe if the compressor turns off and the defrost heater energizes to melt coil frost. If the unit stays stuck in defrost for hours or refuses to heat, the timer, heater, or thermostat requires replacement.
Freezer Troubleshooting Quick Reference
| Problem Symptom | Primary Cause | Recommended DIY Action | Difficulty Level |
|---|---|---|---|
| Soft food & warm air, compressor silent | Incorrect thermostat or stuck defrost timer | Reset controls or advance defrost timer | Easy |
| Thick frost on back wall, fan buzzing | Defrost heater failure or blocked air vents | Perform manual defrost & clear air vents | Easy to Moderate |
| Freezer warm, coils coated in thick lint | Dirty condenser coils | Vacuum coils behind front/rear panel | Easy |
| Freezer warm, loose door closure | Worn door gasket or unlevel cabinet | Perform dollar bill test / adjust seal | Easy |
| Freezer warm, fan blade stiff or motionless | Faulty evaporator fan motor | Inspect fan blade & replace fan motor | Moderate |
When to Call a Pro
While simple maintenance tasks like cleaning coils, clearing vents, and adjusting door seals solve many freezer problems, certain mechanical failures demand specialized repair tools. You should stop troubleshooting and call an expert if:
- The compressor clicks repeatedly every few minutes but fails to start up.
- You suspect a sealed-system failure, such as a refrigerant leak or compressor valve failure, where the compressor runs continuously but the evaporator coils show no frost pattern.
- Electrical testing reveals damaged internal wiring, failed control boards, or burnt start relays.
- Temperatures remain well above 15°F despite cleaning coils and verifying fan operation.
Working on sealed refrigerant lines or electrical components carries inherent risk. Typical professional repair costs for fan motors, defrost heaters, or control boards range between $150 and $400 depending on parts and local labor rates. If your cooling system requires advanced testing, you can request a refrigerator repair service through True Appliance Repair to match you with a local appliance pro.
FAQ
How long does a freezer take to get cold after fixing?
After clearing blocked vents, cleaning coils, or replacing a component, a freezer typically requires 6 to 12 hours to pull temperatures back down to 0°F (-18°C). Keep the freezer door closed as much as possible during this pull-down period so temperatures can stabilize.
Why is my freezer warm but my refrigerator is cold?
This condition often occurs when air vents between the two compartments are blocked by food items or jammed shut by a failing damper door. It can also signal an early defrost system failure where evaporator coils are partially frosted over, allowing limited cold air to sink into the fridge while the freezer stays warm.
What temperature should my freezer be set at?
The ideal storage temperature for a home freezer is exactly 0°F (-18°C). Maintaining this temperature prevents ice crystals from destroying food texture, stops ice cream from turning soft, and allows automated defrost cycles to function smoothly.
How often should I clean freezer condenser coils?
Condenser coils should be cleaned at least twice every year. If you have shedding pets in your home or keep an extra freezer in a garage or basement, consider inspecting and vacuuming the coils every three to four months to maintain peak efficiency.