
Flipping the switch on your sink disposer should produce a steady hum, not a violent rattle that shakes the entire kitchen counter. If you are asking yourself, "Why is my garbage disposal vibrating?" the culprit is usually an off-balance flywheel, a loose sink mounting ring, or a worn rubber baffle. Left alone, heavy shaking can loosen plumbing slip nuts and crack the putty seal around your sink flange. Use these six safe, straightforward DIY checks to restore smooth, quiet operation in under an hour.
1. Clear Off-Balance Debris From the Impellers
The most common reason a garbage disposal vibrates is a small piece of hard food—like a fruit pit, bone fragment, or fibrous peel—wedged under one of the two metal impellers (also called lugs) on the spinning flywheel. Even if the turntable still spins, a stuck lug throws the rotating assembly out of balance, much like an unbalanced load in a washing machine.
- Turn off and unplug the unit: Flip the wall switch off, then look under the sink and unplug the disposal power cord from the outlet. If your unit is hardwired, switch off the dedicated circuit breaker at your electrical panel. Never put your hands inside a disposal chamber.
- Shine a flashlight down the drain: Pull back the rubber flaps and inspect the outer edge of the metal turntable.
- Check both impellers: Use a long wooden spoon handle to gently push each swivel lug on the flywheel. Both lugs should swing freely back and forth.
- Remove stuck objects: If a lug is pinned down by debris, tap the side of the lug lightly with the wooden handle to free it, then lift the object out with long needle-nose pliers or kitchen tongs.
2. Tighten the Lower Mounting Ring and Screws
When a disposal isn't held tightly against the bottom of the sink basin, the torque of the motor makes the entire housing wobble and rattle against the stainless steel or cast iron sink.
- Disconnect power: Unplug the unit beneath the sink or shut off the circuit breaker before working around the housing.
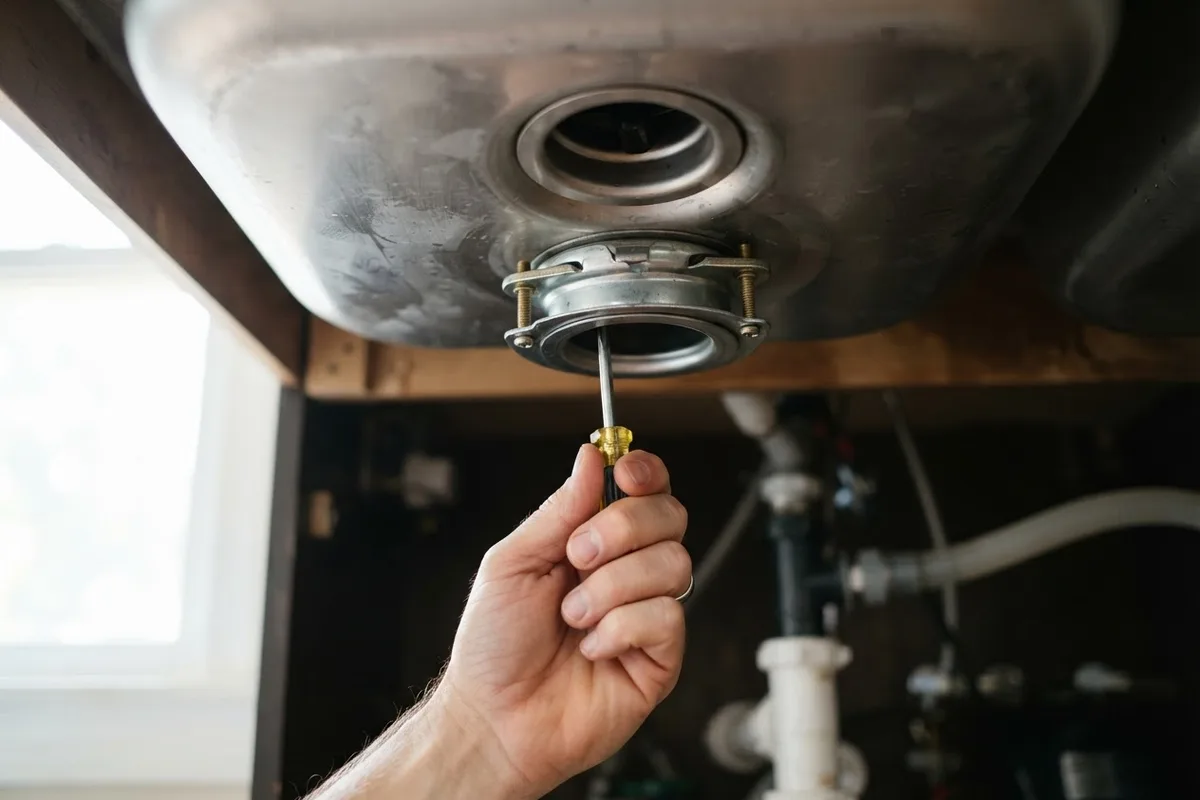
- Inspect the three mounting screws: Look at the metal collar directly below the sink drain opening. Three vertical clamping screws press against a flat metal backup ring.
- Snug the clamping screws: If the disposal shifts when you gently nudge it by hand, use a screwdriver to tighten all three mounting screws evenly until the flange sits flat and firm.
- Lock the lower mounting ring: Insert a hex wrench or screwdriver tip into one of the loops on the lowest rotating ring (the collar that attaches the disposal body to the mount) and push it to the right until it locks securely up its ramp.
3. Clean or Replace the Rubber Splash Guard
On many ”sound-insulated” or ”quiet” models, the black rubber splash guard (baffle) doubles as the cushioned mounting gasket between the top of the disposal collar and the sink mount. Over time, grease and food buildup deform this rubber ring, or the rubber hardens and loses its grip, allowing the motor housing to vibrate loudly against the metal collar.
- Unplug the disposal: Always cut electrical power before reaching near the drain opening.
- For pull-out baffles: Grab the rubber splash guard from above the sink and pull it straight up. Scrub both sides—especially the grooved bottom lip—with warm dish soap and an old toothbrush to remove hardened grease. If ours is torn or warped, order a replacement baffle for a few dollars.
- For collar-mounted gaskets: If the baffle is attached to the top of the disposal, support the bottom of the unit with one hand (or a stack of books), unlock the lower mounting ring to drop the unit down, and inspect the thick rubber cushion ring. Replace it if the rubber is cracked or flattened. While you have it out, check our guide on fixing a dirty garbage disposal splash guard to keep odors away.
4. Secure the Discharge Elbow and Drain Pipes
Sometimes the disposal motor itself is running smoothly, but the vibration travels into loose PVC or metal drain traps under the sink, creating a loud chattering sound against the cabinet walls.
- Keep the power off while inspecting under-sink plumbing.
- Check the discharge tube bolts: Locate the curved black pipe exiting the side of the disposal. Make sure the one or two metal flange bolts holding it to the disposal body are snug. Inside that flange is a rubber gasket that dampens vibration; do not overtighten to the point of cracking the plastic flange.
- Hand-tighten P-trap slip nuts: Wiggle the U-shaped P-trap pipes gently. If any plastic slip nuts have vibrated loose, tighten them by hand plus a quarter turn with channel-lock pliers.
- Inspect the dishwasher drain hose: If a rubber hose runs from your dishwasher to the top port of the disposal, ensure the metal hose clamp is tight and the hose isn't slapping against the cabinet floor.
5. Free a Partially Jammed Flywheel with a Hex Wrench
If rust or starch buildup underneath the flywheel is dragging against the stationary shredder ring at only one spot in its rotation, the disposal will shudder and vibrate heavily as it runs.
- Ensure the unit is unplugged and the wall switch is off.
- Locate the bottom center hole: Look underneath the center of the disposal casing for a quarter-inch hexagonal socket.
- Work the wrench back and forth: Insert a 1/4-inch Allen wrench (often included with the disposal) and crank it clockwise and counterclockwise several times. You should feel smooth, even resistance all the way around a 360-degree turn.
- Flush with ice and cold water: Reconnect power, turn on a steady stream of cold water, drop one cup of ice cubes into the chamber, and run the disposal for 15 seconds. The ice helps scour rust scale off the shredder ring and balances the spinning plate. If you notice any acrid odor or heat while testing, stop immediately and read our safe DIY checks for a smoking garbage disposal.
6. Check for a Bent Flywheel or Worn Motor Bearings
If you have cleared the chamber, tightened the mounting collar, and checked the pipes, but the unit still shakes violently and makes a low, rumbling roar, an internal mechanical component has likely failed.
- Unplug the disposal and shine your flashlight inside.
- Check for a broken impeller: If one of the two metal swivel lugs has snapped off entirely, the flywheel is permanently unbalanced and cannot be safely repaired at home.
- Test for bearing play: Reach in with a long wooden dowel and press sideways against the center cone of the turntable. If the central motor shaft wobbles from side to side, the lower motor bearings have worn out (often due to an internal water seal leak).
- Plan for a replacement: Because disposal motors and flywheels are sealed assemblies, a broken lug or failed bearing means it is more practical to replace the entire unit than to rebuild it.
Garbage Disposal Vibration Quick Troubleshooting Guide
| Symptom You Notice | Most Likely Cause | Typical Fix / US Cost Range* |
|---|---|---|
| Sudden shaking right after grinding food | Hard pit, bone, or peel stuck under one impeller | Clear debris with tongs or wooden spoon ($0 DIY) |
| Entire disposal body swings or rattles under sink | Loose lower mounting ring or clamping screws | Tighten 3 mount screws and lock collar ($0 DIY) |
| Rattling sound comes from pipes under cabinet | Loose P-trap slip nuts or discharge flange | Hand-tighten slip nuts and flange bolts ($0 DIY) |
| Cushioned mount feels mushy; black grime at collar | Worn or grease-swollen rubber splash guard/gasket | Clean or replace rubber baffle ($8–$25 part) |
| Loud metallic clanging + violent shaking | Broken impeller lug or loose mounting screw inside | Remove stray screw or replace unit ($120–$350+) |
| Deep rumbling vibration + rusty water underneath | Failed internal water seal and motor bearings | Replace garbage disposal ($150–$450+ installed) |
Note: Typical US price ranges are broad estimates for parts and labor; actual costs vary by area, sink configuration, and disposal horsepower.
When to Call a Pro
Clearing a jammed impeller, tightening mounting screws, and swapping a rubber splash guard are safe, beginner-friendly projects as long as the unit is unplugged. However, you should stop and call a professional if:
- Your disposal is hardwired directly into household electrical cabling and shows signs of loose wiring, sparking, or repeatedly tripping the circuit breaker.
- The sink flange seal has broken loose and water is actively leaking down through the mounting assembly onto electrical connections.
- The flywheel is broken or the motor bearings have failed, and you are not comfortable disconnecting under-sink plumbing and lifting a heavy new disposal into place.
If you need a hand diagnosing a stubborn vibration or installing a replacement unit, True Appliance Repair can match you with a local pro for professional appliance repair in your area.
FAQ
Is it safe to use a vibrating garbage disposal?
No, you should avoid running a garbage disposal that is vibrating heavily. Continued shaking will quickly loosen the sink flange putty seal and the plastic P-trap connections, leading to under-sink water leaks. If the vibration is caused by a foreign object, running the motor can also snap an impeller blade or burn out the windings.
Can ice cubes cause a garbage disposal to vibrate?
Yes, grinding a hopper full of ice cubes will cause temporary, loud vibration for 10 to 15 seconds while the ice breaks down, which is completely normal. However, once the ice has cleared and cold water is flushing the drain, the unit should return to a smooth, steady hum. If it keeps shaking after the ice is gone, a small fragment may be lodged beneath one of the swivel lugs.
How tight should the garbage disposal mounting ring be?
The three vertical screws on the mounting assembly should be tightened evenly until the backup ring presses firmly against the underside of the sink with zero play. Then, the lower rotating mounting ring should be pulled to the right until the mounting ears climb at least halfway to three-quarters of the way up the locking ramps. It should feel rock-solid when you push on the side of the disposal housing.
How long does a garbage disposal typically last before needing replacement?
Most household garbage disposals last between 8 and 12 years with normal kitchen use. Units with stainless steel grinding components and higher horsepower (3/4 HP to 1 HP) tend to resist corrosion and vibration longer than basic 1/3 HP builder-grade models. If your disposal is over 10 years old and begins shaking due to worn bearings or a rusted shredder ring, replacing the unit is usually the smartest move.