
Is your refrigerator running constantly without ever taking a break? A unit that stays on continuously inflates your monthly electric bill and subjects vital cooling components to unnecessary wear. Fortunately, continuous running is often caused by routine maintenance issues that you can diagnose and fix at home.
Under normal conditions, a healthy refrigerator cycles on and off throughout the day to maintain a stable interior temperature. When internal temps rise or airflow is restricted, the compressor works overtime to compensate. Before assuming you need a costly replacement, work through these six straightforward troubleshooting steps to restore normal cooling cycles.
Clean Dusty Condenser Coils
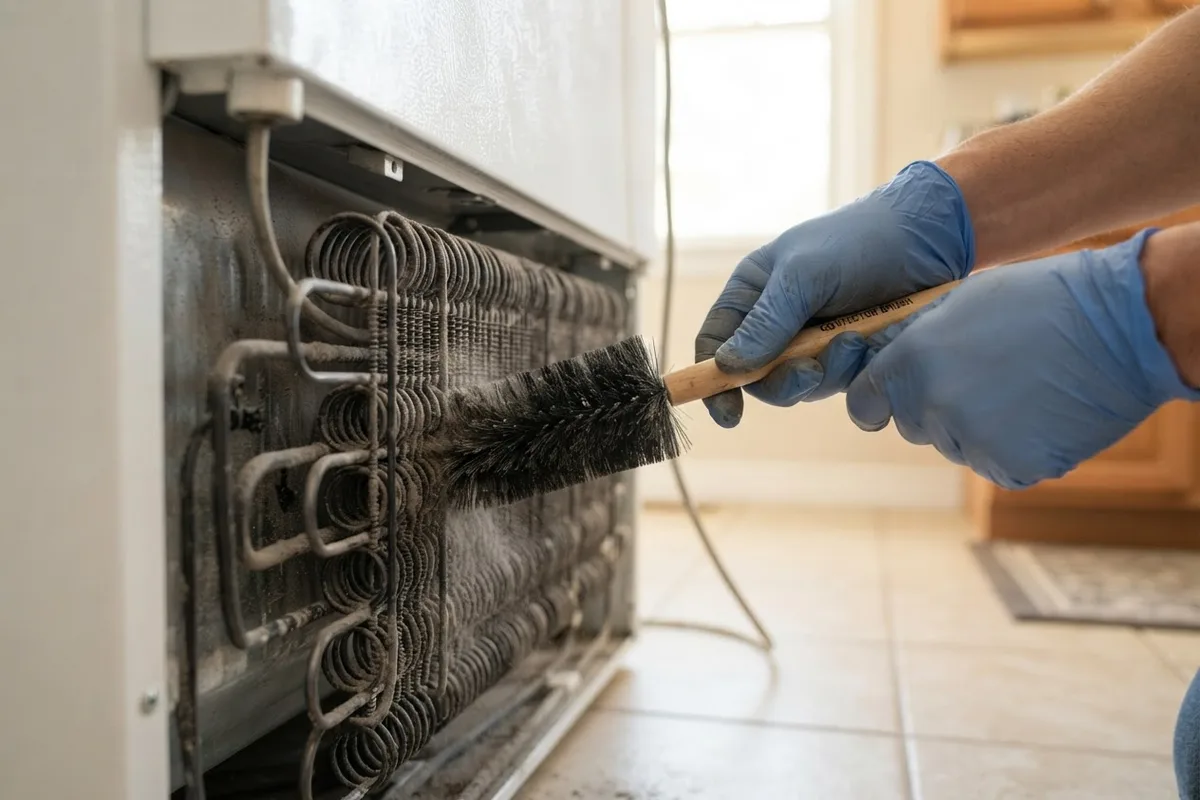
Dirty condenser coils are the single most common reason a refrigerator runs continuously. Condenser coils release heat removed from the interior of the appliance into the surrounding room. When covered in dust, pet hair, and kitchen grease, they cannot dissipate heat efficiently, forcing the compressor to run constantly to reach the target temperature.
- Unplug the refrigerator or shut off power at the circuit breaker for safety before starting.
- Locate the coils, which are typically behind the front bottom toe kick plate or mounted on the lower back exterior panel.
- Remove the access grille or pull the unit away from the wall to reach the back panel.
- Use a narrow vacuum hose attachment and a flexible condenser coil brush to gently remove loose dust and debris from between the coils.
- Vacuum the surrounding floor area to prevent loose dirt from immediately settling back onto the clean coils.
Performing this quick chore twice a year is one of the best routine appliance maintenance tasks to lower energy costs and extend your unit's operating life.
Check and Clean the Door Gasket
If warm room air leaks into the fresh food or freezer compartment, the internal thermostat continuously signals the compressor to run. A dirty, warped, or cracked rubber door seal (gasket) is usually the culprit behind air leaks.
Inspect the entire perimeter of both refrigerator and freezer door seals for visible gaps, tears, or sticky food residue. Clean sticky gaskets using a soft sponge soaked in warm water and mild dish soap. Avoid harsh chemicals that degrade rubber.
To test the seal strength, use the dollar bill test:
- Open the refrigerator door and place a flat dollar bill across the frame.
- Close the door on the bill so half sticks out.
- Pull the bill outward slowly. You should feel firm resistance.
- If the bill slides out easily without tension, the gasket is no longer sealing tightly and needs replacement.
Replacing a worn gasket is a budget-friendly DIY project that instantly stops air infiltration.
Adjust Temperature Settings Properly
Setting your refrigerator or freezer dial to an excessively cold temperature causes the cooling system to stay engaged indefinitely. Setting temperatures too low forces the unit to fight ambient home heat constantly.
Verify that your controls are set to recommended operational ranges:
- Fresh Food Section: 37°F to 40°F (3°C to 4°C)
- Freezer Section: 0°F (-18°C)
- If your appliance uses a manual dial numbered 1 through 9, set it to the midpoint setting (usually 4 or 5) rather than the coldest extreme.
Place an inexpensive appliance thermometer in a glass of water on the center shelf. Check the reading after 24 hours. Adjusting your temperature setting up just a degree or two often allows the compressor to complete its cooling cycle and shut off periodically.
Unblock Air Circulation Vents
Cold air originates in the freezer compartment and travels into the fresh food section through narrow air vents (damper passages). Blocking these internal vents with tall cereal boxes, large milk jugs, or tightly packed food containers restricts circulation.
When air cannot circulate freely, temperature sensors detect localized warm spots and instruct the system to continue running nonstop.
- Locate the air vents inside both the freezer and fresh food compartments.
- Rearrange food items so there is at least two inches of clear space around every vent opening.
- Avoid overpacking shelves to maintain optimal convection throughout the interior.
- Leave breathing room around sidewalls so cold air drops evenly to lower drawers.
Defrost Frost-Clogged Evaporator Coils
Modern frost-free refrigerators rely on an automated defrost system to melt ice off the evaporator coils inside the freezer wall. If the defrost heater, bi-metal thermostat, or control board fails, frost builds up thick ice layers over the coils.
Thick ice insulates the evaporator coils, blocking heat absorption and preventing cold air from circulating into the cabinet. As a result, the unit runs constantly while interior temperatures steadily rise.
Signs of frosted coils include heavy ice buildup on the back wall of the freezer compartment or a freezer that remains cold while the fresh food section warms up. To fix this temporarily:
- Unplug the refrigerator and safely store perishable foods in an insulated cooler with ice packs.
- Leave both refrigerator doors open for 24 to 48 hours to allow built-up ice to melt completely.
- Soak up melting water with towels placed in the bottom of the freezer cabinet.
Once defrosted, restore power. If frost rebuilds within a few days, a defrost component has failed and requires replacement.
Test the Defrost Thermostat and Timer
If manual defrosting restored proper cooling temporarily but the unit returns to continuous running a week later, the automatic defrost system needs repair. The defrost timer periodically pauses cooling to turn on a heating element that melts coil frost.
- Disconnect power to the unit completely before touching electrical wires or sensors.
- On mechanical models, locate the defrost timer (often inside the control housing or behind the bottom toe kick plate).
- Use a flathead screwdriver to slowly turn the timer knob clockwise until you hear a sharp click. This forces the unit out of cooling mode and into defrost mode.
- If the compressor shuts off instantly, the timer is functioning, but the bi-metal thermostat or heating element may be open-circuited.
- Test components for electrical continuity using a digital multimeter. Replace any part showing an open circuit reading.
Quick-Reference Troubleshooting Summary
| Issue | Primary Cause | Difficulty | Action Required |
|---|---|---|---|
| Heavy Dust on Back/Bottom | Dirty Condenser Coils | Easy | Vacuum and brush coils clean |
| Loose Door Sealing | Worn or Dirty Gasket | Easy | Clean seal or replace rubber gasket |
| Cabinet Set Too Cold | Dial Set to Maximum | Easy | Adjust thermostat to 37°F–40°F |
| Blocked Internal Flow | Overpacked Shelves | Easy | Clear space around interior vents |
| Frost on Freezer Wall | Defrost System Failure | Moderate | Perform manual defrost; test components |
When to Call a Pro
While cleaning coils, clearing vents, and swapping door gaskets are simple DIY tasks, complex mechanical or electrical issues require specialized equipment. If you notice any of the following symptoms, stop DIY attempts and contact a professional technician:
- The compressor runs nonstop, but the interior remains warm.
- You hear clicking sounds every few minutes from the back panel.
- You spot oily residue near copper tubing, which indicates a sealed system refrigerant leak.
Working with sealed refrigerant lines or high-voltage control boards carries safety hazards. Standard repair costs for mechanical issues typically range between $150 and $400, depending on parts and local labor rates (costs vary by area and model). If your unit is approaching the end of its useful lifespan, check our detailed appliance lifespan guide to evaluate whether repair or replacement makes the most sense.
When basic fixes do not resolve continuous running, True Appliance Repair can match you with a local appliance pro to diagnose complex compressor or sealed system problems quickly.
FAQ
Is it safe to leave a refrigerator running constantly?
Leaving a refrigerator running continuously for a day or two while troubleshooting is generally safe, but prolonged continuous operation strains the compressor and starter relay. Overheating can lead to premature motor burnout, higher energy bills, and potential food spoilage if internal temperatures begin rising.
How often should a refrigerator compressor cycle on and off?
In a typical household kitchen, a healthy compressor operates roughly 40% to 80% of the time. Exact cycle duration depends on room ambient temperature, how frequently doors are opened, and food load. Older models cycle on for 15 to 30 minutes and remain off for similar intervals, whereas modern variable-speed compressors run continuously at very low, energy-efficient power levels.
Why does my new refrigerator seem to run all the time?
Modern energy-efficient refrigerators often use variable-speed linear compressors designed to run up to 80% to 90% of the day at low speeds. Unlike older compressors that turned on at maximum power and shut off completely, variable-speed units maintain ultra-consistent internal temperatures while consuming less electricity overall.
Will cleaning condenser coils really reduce running time?
Yes, cleaning dirty condenser coils can significantly reduce compressor run time. When coils are caked with dust, heat transfer efficiency drops by as much as 30% to 50%, forcing the compressor to work continuously to keep the interior cold. Routine cleaning quickly restores normal cooling cycles.