
A puddle inside your freezer bin or dripping down the back of your refrigerator usually points straight to the ice maker assembly. When a leak starts, it quickly leads to giant solid ice blocks, frozen food packaging, and water pooling beneath the bottom drawers.
Before you let an active leak ruin your kitchen flooring, you can diagnose and resolve the most common issues with a few basic tools. Always prioritize safety: unplug the refrigerator from the wall outlet and turn off the dedicated water shut-off valve behind the unit or under the kitchen sink before inspecting any mechanical or electrical parts.
1. Level the Ice Maker Mold and Refrigerator Cabinet
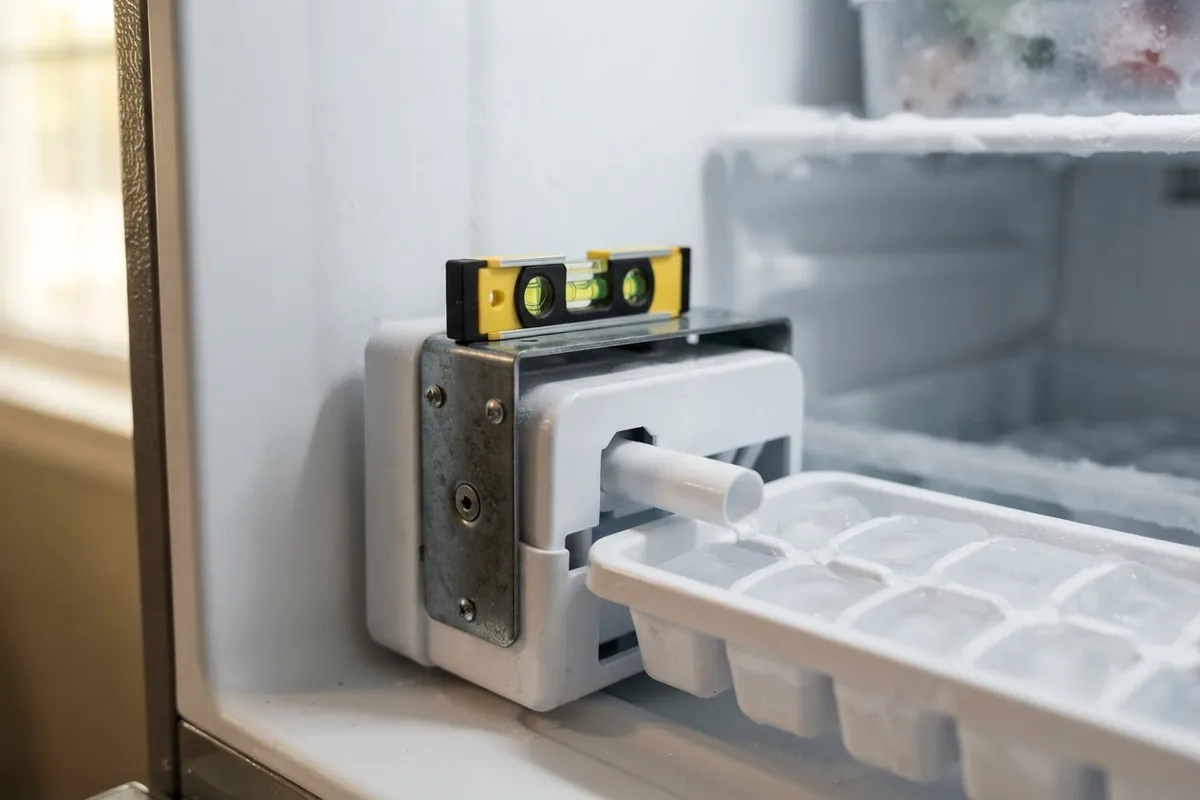
An unlevel ice maker is one of the simplest yet most overlooked causes of water overflow. When the internal fill cup fills the mold with water, an off-kilter unit allows water to spill over the low edge before it freezes into cubes. This excess water drips into the ice bucket, creating a solid frozen brick, or runs down the back interior wall.
- Place a small torpedo level across the top edge of the ice maker assembly inside the freezer compartment.
- Check whether the bubble sits dead center. If the ice maker itself is tilted, loosen the mounting screws on the side or rear wall, adjust the bracket until level, and retighten firmly.
- Check the refrigerator cabinet itself by placing the level across the top exterior roof. Adjust the leveling legs at the front base using an adjustable wrench until the entire appliance sits level side-to-side with a slight backward tilt (about 1/4 inch) to assist door closure.
2. Unfreeze and Realign the Fill Tube
The water fill tube is the small plastic or metal spout that extends through the freezer wall to funnel water directly into the ice maker tray. If this tube gets clogged with frost or ice, water backs up, sprays at an angle, or drips down the exterior of the ice housing instead of filling the mold cavities.
- Locate the fill tube extending above the rear of the ice maker mold.
- Inspect the spout opening with a flashlight for white frost or a solid ice plug.
- If frozen, hold a standard hair dryer on medium heat a few inches away from the tube for 3 to 5 minutes to melt the blockage completely, catching drips with a rag. Never use an open flame or high heat that could melt plastic lining.
- Ensure the tip of the tube aims straight down into the fill cup without touching the edges.
3. Clear the Frozen Defrost Drain Line
When a freezer defrosts automatically, melting frost flows down a small drain trough into a drain tube leading to the pan underneath the fridge. If this drain freezes over, meltwater backs up, pools in the freezer floor, and is frequently mistaken for an active ice maker leak. If you have already checked why is my refrigerator hot on the outside, poor airflow from frozen drain passages can cause compounding temperature issues.
- Remove the bottom freezer baskets to expose the floor and back panel.
- Locate the defrost drain hole along the bottom trough beneath the evaporator coils.
- Flush the drain hole using a turkey baster filled with hot tap water and a few drops of mild dish soap until you hear water freely trickling into the drain pan below.
- Snake a flexible piece of weed trimmer line or a soft tubing brush down the drain opening to push out mineral buildup and algae.
4. Tighten or Replace the Water Inlet Valve and Line
The water inlet valve at the rear bottom of the appliance electronically opens to supply fresh water to the ice maker. If the compression fitting is loose, the plastic tubing is cracked, or the internal solenoid valve fails to close completely, water will either leak across the floor or slowly seep into the ice mold between cycles.
- Pull the refrigerator away from the wall and remove the lower cardboard or metal access cover.
- Inspect the plastic 1/4-inch water supply tubing and brass compression nuts connected to the dual water inlet valve.
- Tighten any weeping compression fittings by a quarter turn using two open-ended wrenches (one holding the valve body, the other turning the nut).
- Inspect the translucent supply line running up the back of the fridge for pinhole leaks or brittle cracks; trim damaged sections with a utility knife and secure them with a fresh quick-connect union.
5. Replace a Cracked Ice Mold Tray or Stripper Arm
Over years of continuous expansion and contraction during the freezing cycle, the non-stick coating on the ice tray can peel, or the plastic housing can develop hairline fractures. When water enters a cracked tray, it seeps through the mold body and drips into the storage bin before the freezing cycle finishes.
- Shine a bright flashlight into the empty ice maker mold pockets.
- Look for flaking teflon, warped divider walls, or visible hairline cracks across the underside of the plastic assembly.
- Check the plastic stripper arm (the comb-like teeth along the ejector blades); if bent or snapped, cubes will jam, causing subsequent water fills to spill over.
- If the mold or housing is damaged, disconnect the multi-pin wire harness, unhook the mounting bracket screws, and install a direct replacement ice maker assembly designed for your refrigerator model.
| Leak Symptom | Likely Cause | Primary DIY Fix |
|---|---|---|
| Solid ice block in storage bin | Unlevel ice maker or cracked mold | Level mounting bracket; replace mold assembly |
| Water pooling under crisper drawers | Frozen defrost drain or misaligned fill spout | Flush drain trough with hot water; aim fill tube |
| Water spraying inside freezer walls | Clogged or frozen water fill tube | Thaw tube with hair dryer; clear ice plug |
| Puddle behind or under the fridge | Loose water line fitting or faulty inlet valve | Tighten compression nut; replace inlet valve |
| Slow continuous drip into ice tray | Weeping water solenoid valve | Replace rear dual water inlet valve assembly |
When to Call a Pro
Most ice maker leaks stem from frozen tubes, loose tubing connections, or minor alignment errors that you can handle in under an hour. However, if the leak originates from an internal cabinet water line foamed inside the insulated refrigerator walls, or if replacing the water inlet valve does not stop continuous high-pressure dripping, it is best to bring in an experienced technician.
Working with pressurized household plumbing and electronic control boards requires specialized testing equipment. Typical repair costs for refrigerator water supply and ice maker repairs generally run between $150 and $350, depending on your appliance model and local labor rates. If you need assistance diagnosing complex electrical faults or sealed-system issues, True Appliance Repair can match you with an independent local appliance pro to get your refrigerator working cleanly again. For routine upkeep on your other appliances, remember to review our guide on hidden appliance filters you should clean to keep your entire kitchen running smoothly.
FAQ
Why does my ice maker leak water into the ice bin?
Water leaks into the bin when the ice mold is cracked, the unit is not level, or the water inlet valve fails to seal shut completely between cycles. When the valve seeps, excess water trickles into the mold, overflows the edges, and freezes the existing cubes into a solid chunk.
Can low water pressure cause an ice maker to leak?
Yes. Refrigerator water inlet valves require a minimum of 20 psi of household water pressure to snap firmly closed after a fill cycle. If your home's water pressure is too low or your inline water filter is clogged, the valve may linger partially open, causing a slow, persistent drip into the freezer.
How often should I replace the refrigerator water filter to prevent leaks?
Manufacturers generally recommend replacing the refrigerator water filter every 6 months. A clogged, overdue filter reduces water flow rate, creates backpressure on the water lines, and increases the likelihood of valve sticking and fitting leaks.
Is it worth fixing a leaking ice maker or should I replace the whole unit?
If the leak is caused by a frozen fill tube, unlevel bracket, or loose external fitting, a DIY fix costs virtually nothing. If the mold itself is cracked or the motor is damaged, installing a complete replacement ice maker kit is usually very economical compared to buying a new refrigerator.