
An overflowing refrigerator ice maker quickly turns a convenient kitchen appliance into a wet mess. Whether water is splashing into the ice storage bin, freezing into one massive solid block of ice, or trickling down the back of the freezer wall, an overflowing ice assembly indicates that too much water is entering the mold or water is escaping during the fill cycle.
Most modern ice makers rely on a timed water fill cycle that lasts between four and seven seconds. When key components like the water inlet valve, fill tube, or level sensor malfunction, water keeps running past the fill window. Before calling for service, you can troubleshoot and resolve the issue yourself using a few basic household tools.
Safety First: Always unplug your refrigerator from the wall outlet and turn off the main water shutoff valve behind the unit before inspecting electrical components or disconnecting water lines.
Adjust the Ice Maker Water Fill Level Switch
Many mechanical and modular ice makers feature an internal adjustment screw that regulates how long the water valve stays open during a fill cycle. If this setting is adjusted too high, the fill valve opens for too many seconds, causing water to spill over the sides of the ice crescent mold into the storage bin.
To check and adjust the water level switch on standard modular ice makers, follow these steps:
- Disconnect Power: Unplug the refrigerator or flip the circuit breaker serving the kitchen.
- Remove the Front Cover: Gently pull off the plastic front cover on the ice maker head assembly to expose the drive gear and electrical contacts.
- Locate the Adjustment Screw: Look for a small plastic screw marked with plus (+) and minus (-) symbols near the center or lower side of the housing module.
- Turn the Screw: Use a small flathead or Phillips screwdriver to turn the screw clockwise toward the minus (-) symbol. A full turn typically alters the water fill time by roughly one second. Reduce the setting by one full turn.
- Reassemble and Test: Reattach the plastic cover, restore power, and monitor the next two ice-making cycles to confirm the water fills just below the rim of the mold cups.
If your unit uses an electronic control board without a manual adjustment screw, the fill volume is governed by the main control system or an automatic sensor optical beam.
Clear a Frozen or Partially Blocked Fill Tube
The fill tube is the small plastic nozzle that delivers water from the back of the freezer wall into the ice maker tray. Over time, low water pressure or mineral buildup can cause residual droplets inside the tube to freeze. When the tube becomes partially constricted with ice, incoming water cannot flow smoothly into the tray.
Instead of pouring cleanly into the mold, water sprays sideways, splashing out of the tray and dripping into the ice bin or onto the freezer floor. If you noticed puddle problems earlier, you may also want to check our guide on why water builds up under refrigerator drawers to prevent cabinet leaks.
To clear a frozen fill tube:
- Turn off power and water supply valves.
- Inspect the tube: Shine a flashlight behind the ice maker where the plastic spout enters the mold area.
- Melt the ice bridge: Use a hairdryer set to low heat to gently warm the plastic spout until all frozen obstructions melt into a catch bucket or rag. Avoid holding high heat in one spot to keep plastic parts from warping.
- Flush debris: Squeeze warm water through the line using a turkey baster to clear remaining ice or mineral sediment.
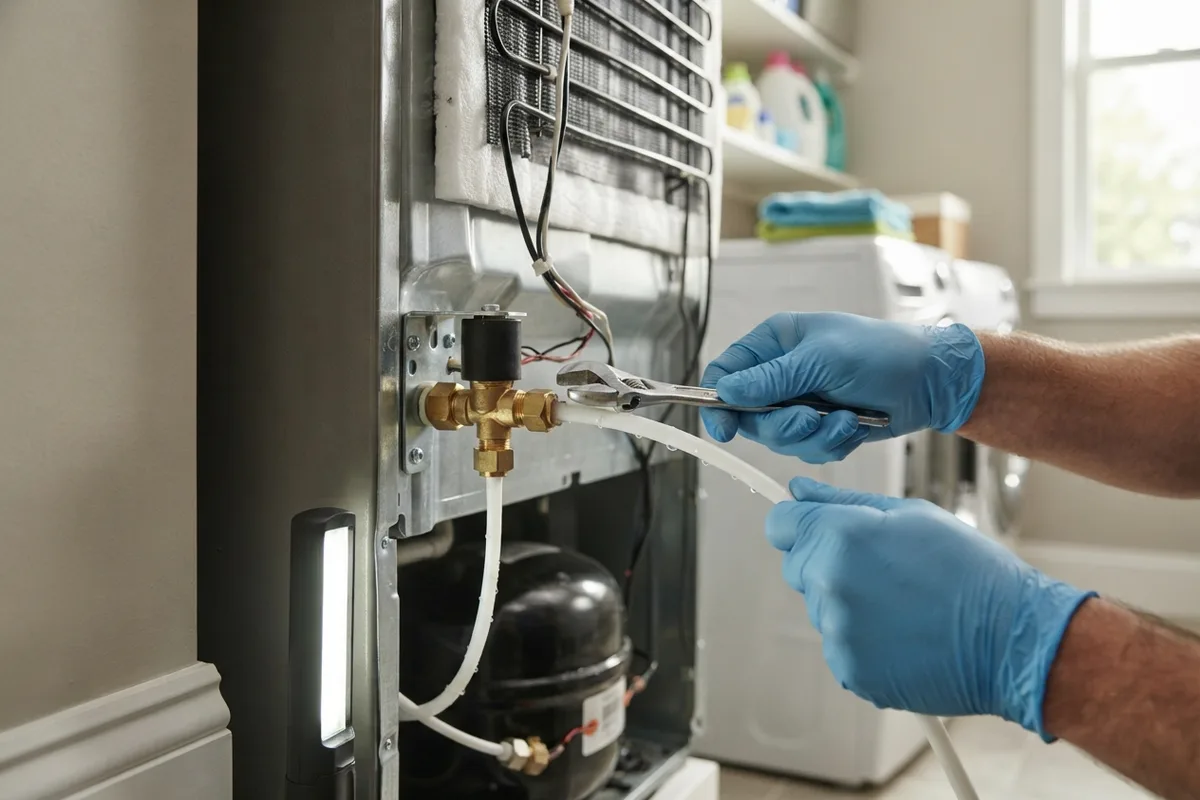
Replace a Stuck-Open Water Inlet Valve
The water inlet valve is an electro-mechanical component located at the lower back exterior of the refrigerator. It opens when signaled by the ice maker to send water through the supply line. If sediment gets trapped inside the valve diaphragm, or if the internal electrical solenoid fails, the valve can stick partially open.
When a valve fails to close completely, water continuously trickles into the freezer compartment long after the fill cycle ends. This leads to massive ice slabs forming over the ice tray and overflowing into the dispenser chute, causing issues similar to a jammed refrigerator ice dispenser.
How to Inspect and Replace the Valve
- Shut Off Water and Power: Turn off the saddle valve or quarter-turn valve on the supply line and unplug the appliance cord.
- Access the Rear Panel: Pull the refrigerator away from the wall and remove the lower metal or cardboard access cover using a nut driver.
- Inspect for Seepage: Check the plastic outlet ports on the valve for continuous drips or white mineral crusting.
- Test Solenoids: Disconnect the wire harness and test the solenoid terminal pins using a multimeter set to Rx1 ohms. A reading outside 200–500 ohms indicates electrical coil damage requiring valve replacement.
- Swap the Component: Disconnect the water supply line, unscrew the mounting bracket, attach the new inlet valve assembly, and tighten brass fittings securely.
Standard replacement inlet valves typically cost between $25 and $75 depending on your refrigerator brand and model.
Check Household Water Pressure to the Fridge
Water inlet valves require a minimum water pressure—typically between 20 and 120 PSI—to snap completely shut when electrical current cuts off. If your home's water pressure drops below 20 PSI, the valve spring may lack sufficient force to close the internal diaphragm tightly against incoming line pressure.
As a result, water slowly weeps past the seal into the fill tube, continuously overflowing the ice tray inside the cold freezer cavity.
Common Causes of Low Water Pressure:
- Clogged Water Filter: A heavily saturated refrigerator water filter restricts line flow. Replace your filter every six months.
- Self-Piercing Saddle Valves: Older saddle valves installed on copper pipe lines frequently clog with scale deposits, severely reducing water flow.
- Kinked Supply Lines: Coiled plastic or braided stainless steel tubing pushed tight against the rear wall can bend and restrict flow.
To test line pressure, turn off the shutoff valve, disconnect the supply line from the back of the fridge, and hold the open line inside a bucket. Turn the valve fully on. A weak trickle indicates a plumbing line restriction before the refrigerator.
Re-Level the Refrigerator Cabinet and Ice Bin
Refrigerators must sit level from side to side and tilt slightly backward from front to back. If the cabinet leans forward or tilts heavily to one side, water poured into the ice mold during the fill cycle spills over the low edge before freezing solid.
This creates uneven ice cubes, thin ice bridges, and water pooling in the bottom of the ice storage bucket. You can fix this issue in a few minutes without buying replacement parts:
- Place a Level: Set a carpenter's bubble level across the top front edge of the refrigerator cabinet.
- Remove the Base Grille: Pop off the plastic kick plate at the bottom front of the appliance.
- Adjust Leveling Legs: Use an adjustable wrench or flathead screwdriver to turn the leveling legs. Turn legs clockwise to raise a side and counterclockwise to lower it.
- Set Front-to-Back Pitch: Adjust the front legs so the front of the refrigerator sits approximately 1/4 inch higher than the rear. This slight backward pitch ensures proper door closing and keeps liquid level inside the ice tray mold cups.
Quick Reference: Ice Maker Overflow Causes & Actions
| Symptom | Primary Cause | Recommended Action | Difficulty |
|---|---|---|---|
| Water splashing over rim during fill | Fill level screw set too high | Turn adjustment screw counterclockwise | Easy |
| Water spraying sideways into bin | Frozen or restricted fill tube | Melt ice blockage using a hairdryer | Easy |
| Constant slow trickle into ice tray | Stuck-open water inlet valve | Replace water inlet valve assembly | Moderate |
| Thin cubes and continuous seepage | Low home water pressure (<20 PSI) | Replace water filter or saddle valve | Easy–Moderate |
| Water pooling in one corner of bin | Cabinet tilting out of level | Adjust lower front leveling legs | Easy |
When to Call a Pro
While adjusting level screws, leveling cabinet feet, and clearing ice blockages are straightforward DIY projects, some ice maker issues involve complex electrical diagnostics or internal control board failures. If you replaced the water inlet valve and verified household water pressure, but the unit continues to flood the freezer, you may have an issue with the main control module or internal wiring harness.
Additionally, if you suspect sealed-system cooling problems or electrical panel failures, stop work immediately and consult an experienced technician. When hands-on repairs become complex, True Appliance Repair can match you with a local appliance pro to diagnose and repair your refrigerator safely.
FAQ
Why does my ice maker keep filling with water after the bin is full?
If your ice maker continues producing ice past capacity, the shutoff arm or optical sensor is malfunctioning. Mechanical units rely on a wire arm that must swing down freely; if the arm is disconnected or jammed, the ice maker won't know the bin is full. On modern electronic units, dirty optical sensors fail to detect ice levels, causing the unit to overfill the bin continuously.
Can a clogged water filter cause an ice maker to overflow?
Yes. A clogged water filter severely reduces water pressure reaching the inlet valve. When water pressure drops below the recommended 20 PSI, the inlet valve solenoid may fail to seat shut completely after cycling, allowing water to bleed continuously past the valve seal into the fill tube and ice tray.
How much does it cost to fix an overflowing ice maker?
If the fix is DIY—such as releveling the unit, thawing a fill tube, or turning an adjustment screw—the cost is minimal. Replacing a water inlet valve yourself costs roughly $25 to $75 for the replacement part. If you hire a professional service, expect typical repair costs to range between $120 and $250 depending on your area, model, and necessary replacement components.
How do I manually turn off my ice maker to stop flooding?
For mechanical units, lift the wire shutoff arm up into the locked vertical position until you hear a click. For modern units without a wire arm, locate the toggle switch on the side or bottom of the ice maker assembly and switch it to the "O" (Off) position, or turn off ice production using the front door control panel.