
Finding a puddle of water sitting beneath your refrigerator crisper drawers is a frustrating kitchen surprise. Moisture pooling in the bottom of your fridge can ruin produce, create unpleasant odors, and even leak onto your kitchen flooring if left unchecked. Fortunately, this issue is usually caused by a simple drainage or seal problem that you can resolve yourself in under an hour without specialized tools.
Clear the Clogged Defrost Drain Hole
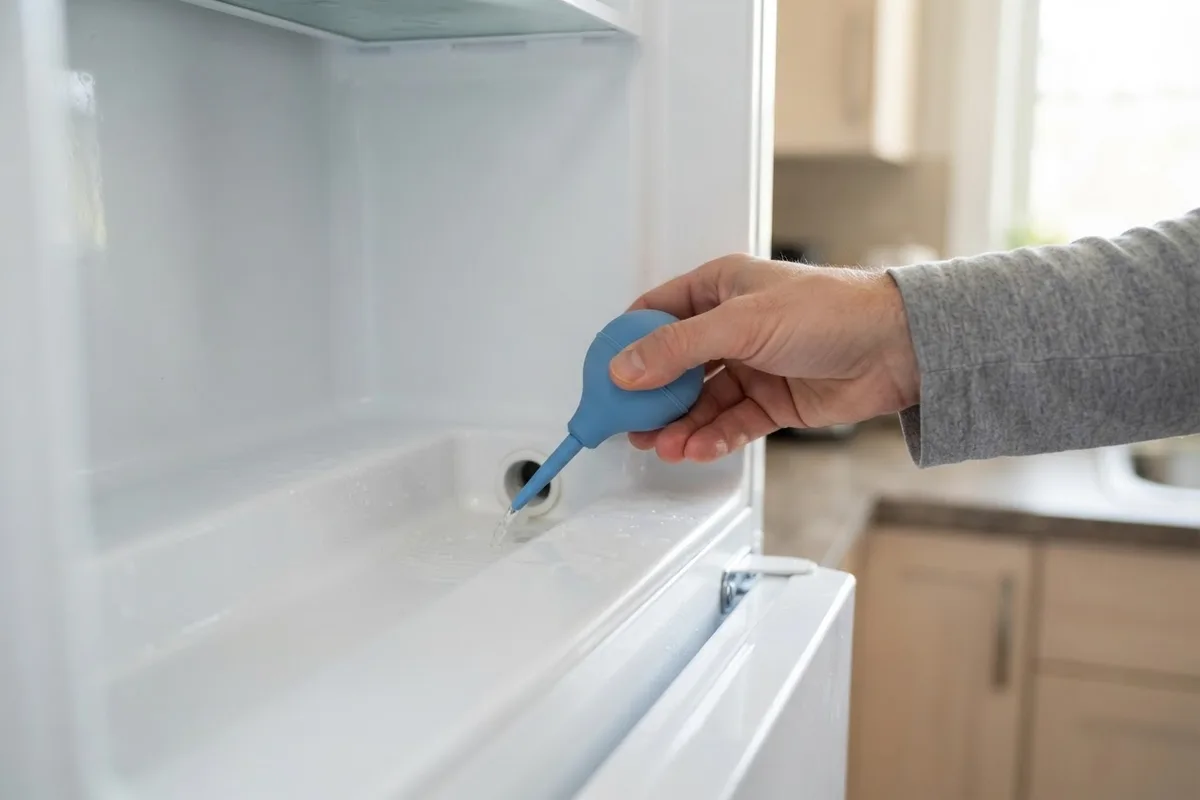
During the normal cooling cycle, your refrigerator automatically melts frost off the evaporator coils. This melted water flows down an internal channel into a small defrost drain hole located along the back interior wall. Over time, food crumbs, ice buildup, or mineral deposits can block this narrow drain opening, forcing runoff water to overflow into the bottom compartment right beneath your vegetable crisper drawers.
- Unplug the refrigerator from the wall outlet or switch off the dedicated circuit breaker before beginning any hands-on maintenance.
- Remove the crisper drawers and lower shelves to access the back interior panel of the fresh food compartment.
- Locate the defrost drain hole along the lower center of the rear wall or behind the plastic panel.
- Use a flexible pipe cleaner or soft plastic tubing to gently clear debris out of the drain opening.
- Flush the drain using a bulb syringe filled with warm water and mild dish soap until you hear water freely dripping into the drain pan below.
Clean or Replace Damaged Door Seals
A worn or dirty rubber door gasket allows warm, humid kitchen air to constantly seep into your cold refrigerator compartment. When this moist external air contacts the cold interior surfaces, heavy condensation forms along the walls and drips downward, gathering underneath your crisper drawers. Over time, a compromised door seal forces the cooling system to work harder, leading to higher energy bills and accelerated component wear. Addressing gasket issues early prevents moisture accumulation and helps avoid costly appliance care mistakes that shorten equipment lifespan.
- Inspect the entire perimeter of the rubber door gasket for visible cracks, tears, mold, or flattened sections.
- Clean the gasket thoroughly using a soft microfiber cloth dipped in warm water and mild dish soap to remove sticky residue.
- Perform the dollar bill test: close the fridge door on a dollar bill and pull. If it slides out with zero resistance, the magnetic seal has lost proper tension.
- Soften stiff rubber using a handheld hairdryer on low heat, gently reshaping the gasket with your fingers to restore a tight seal.
- If the rubber is split or dry-rotted, order a manufacturer-compatible replacement gasket and press it firmly into the door channel.
| Cause of Water Pooling | Common Symptom | Recommended DIY Action |
|---|---|---|
| Clogged Defrost Drain | Water under crisper, sheet ice on freezer floor | Flush drain line with warm water syringe |
| Sticky Duckbill Valve | Repeated water backup every few days | Clean or trim rubber grommet on rear drain tube |
| Damaged Door Gasket | Excessive droplets on interior walls and ceiling | Clean gasket or reshape with low heat |
| Unlevel Fridge Cabinet | Water pooling toward front left or right corner | Adjust front leveling legs to tilt cabinet backward |
| Blocked Air Vents | Localized frost forming behind produce bins | Rearrange food items 2 inches from rear vents |
Flush the Duckbill Drain Valve
Many modern refrigerators feature a rubber check valve—often called a duckbill valve or grommet—attached to the end of the defrost drain tube at the rear of the appliance. This one-way rubber valve allows defrost water to empty into the drain pan while preventing warm air and insects from traveling up into the cabinet. However, the rubber slit frequently sticks shut from dried sediment, sugar, or mineral buildup, trapping water inside the drain line until it backs up into the fresh food cabinet.
- Unplug the appliance and pull it carefully away from the wall to access the rear lower service panel.
- Remove the metal or plastic access cover near the bottom of the cabinet using a nut driver or Phillips screwdriver.
- Locate the rubber drain tube extending above the drain pan near the compressor assembly.
- Squeeze the rubber duckbill grommet at the end of the tube to break open the stuck slit and release trapped debris and water.
- Wash the rubber grommet in warm water and snap it securely back onto the drain tube outlet.
Inspect and Level the Refrigerator Cabinet
Refrigerators rely on gravity to direct defrost water down the interior channel and into the rear drain hole. If your appliance tilts slightly forward or unevenly to one side, defrost meltwater can overflow the internal catch basin before reaching the drain. Proper cabinet pitch ensures that water flows smoothly backward into the drain tube rather than spilling down the interior front wall and pooling under your drawers.
- Place a bubble level flat across the top front edge of the refrigerator cabinet.
- Check that the unit is level from side to side and features a slight backward tilt (approximately 1/4 inch lower in the back).
- Snap off the plastic toe grille located at the front base of the refrigerator.
- Turn the front leveling legs or adjustment screws clockwise using a wrench or screwdriver to raise the front corners slightly.
- Re-check the level to ensure doors self-close smoothly when opened to a 45-degree angle, verifying correct tilt for proper drainage.
Adjust Crisper Humidity Settings and Air Vents
Incorrect airflow or improper humidity slide settings can cause localized frost formation and excessive condensation behind produce bins. When air vents are blocked by oversized food packages or containers pushed against the back wall, cold air cannot circulate evenly. This creates localized cold spots where moisture freezes into thin ice sheets that later melt and collect beneath the drawers. If you notice dampness across other internal components, troubleshooting why your refrigerator is sweating inside can help identify secondary airflow issues.
- Rearrange stored food to ensure at least two inches of space between containers and the rear air vents.
- Slide crisper humidity controls to a medium setting to allow excess moisture vapor to escape efficiently.
- Wipe down the interior floor beneath the drawers with a dry towel to remove existing standing water.
- Verify that cold air flows freely from the upper damper vents down toward the lower fresh food section.
- Check that produce bags or plastic wrap are not pressed directly against cold rear walls, which causes localized condensation build-up.
When to Call a Pro
While most water pooling under crisper drawers stems from simple drain clogs or gasket gaps, certain complex issues require technical expertise. If water continues to collect after thorough drain cleaning, or if you notice heavy ice buildup forming behind the interior freezer back panel, your unit may have an internal defrost heater failure or a damaged drain pan assembly. Typical professional repair costs for defrost components range from $150 to $350, though exact pricing varies by area and model.
Always stop DIY repairs immediately if you encounter electrical shorting, burning smells, or signs of refrigerant leaks near sealed evaporator coils. Refrigerant lines and sealed system components should only be serviced by qualified specialists. When internal electrical diagnostics or complex component replacements are necessary, True Appliance Repair can match you with a local appliance pro to diagnose and repair your refrigerator safely.
FAQ
Why is water pooling under my refrigerator drawers but the freezer is dry?
Water collects beneath crisper drawers because the fresh food compartment defrost drain is clogged or restricted. While the freezer operates at sub-zero temperatures where water freezes instantly, the fresh food section sits just above freezing, causing backed-up defrost water to remain liquid and pool at the lowest interior point beneath your produce bins.
Can a clogged water filter cause water under the crisper drawers?
A clogged water filter itself rarely leaks into the bottom of the fridge, but a damaged water filter housing or cracked water supply line located behind the crisper drawers can leak fresh water into the bottom pan. If the pooled water is completely clean and accumulates even when the fridge isn't in a defrost cycle, inspect your filter housing and ice maker water line connections for drips.
How often should I clean my refrigerator defrost drain?
Flushing your defrost drain once every 12 to 18 months as part of routine household maintenance prevents food debris, dust, and algae from clogging the drain line. Incorporating this quick task alongside coil cleaning keeps your appliance draining smoothly and prevents unexpected interior water leaks.
What should I do if the drain hole keeps freezing over?
If the defrost drain hole refreezes shortly after clearing, the drain heater loop may be failing, or the rubber duckbill valve at the bottom of the tube may be stuck shut. Installing a copper or aluminum drain tube heater probe—which transfers heat from the defrost element down into the drain opening—can permanently prevent ice from re-forming.