
Opening your washing machine to find clothes barely damp or rubbing together in a puddle of suds is frustrating. While modern high-efficiency machines use far less water than older agitator models, an actual water shortage ruins wash performance and strains the drive motor. You can diagnose whether your machine is operating as designed or suffering from a clogged valve, a pinched pressure line, or a faulty sensor using basic household tools.
Always prioritize safety before inspecting internal components. Unplug your washing machine from the wall outlet and turn off both hot and cold water shut-off valves behind the unit before loosening hoses or removing access panels. If any repair requires opening high-voltage electrical enclosures or checking live circuits, stop and contact a qualified technician.
Understand Normal HE Washer Auto-Sensing Levels
Before replacing components, verify whether your machine is behaving abnormally or simply running its programmed cycle. Modern top-load and front-load washers use load-sensing technology to weigh dry laundry and add precise water increments. It is normal for laundry to remain visible above the waterline during regular cycles.
- Check the selected cycle: Normal or Eco cycles intentionally restrict fill volume to meet federal energy standards.
- Review your soil level and fabric settings: Bulky, Bedding, or Heavy Duty cycles prompt the control board to add extra water depth.
- Avoid setting dry clothes in mounds: Distribute items evenly around the wash drum or impeller so sensors correctly gauge total load mass.
- Test with a Deep Fill or Extra Rinse option: If your model includes a Deep Fill button, press it to see if the machine adds the expected extra gallons.
If switching cycles fails to introduce additional water and clothes consistently exit the cycle with dry patches or detergent stains, a mechanical or sensor malfunction is present.
Clear Clogged Water Inlet Valve Screen Filters
Your washer pulls municipal or well water through two supply hoses connected to a dual solenoid inlet valve. Each intake port contains a fine mesh sediment screen. Over time, rust flakes, calcium scale, and pipe sediment collect against these screens, restricting incoming water flow so severely that cycles time out before filling adequately.
- Disconnect the electrical cord and shut off both supply faucets completely.
- Place a small shallow basin or towel beneath the hose connections at the back of the washer.
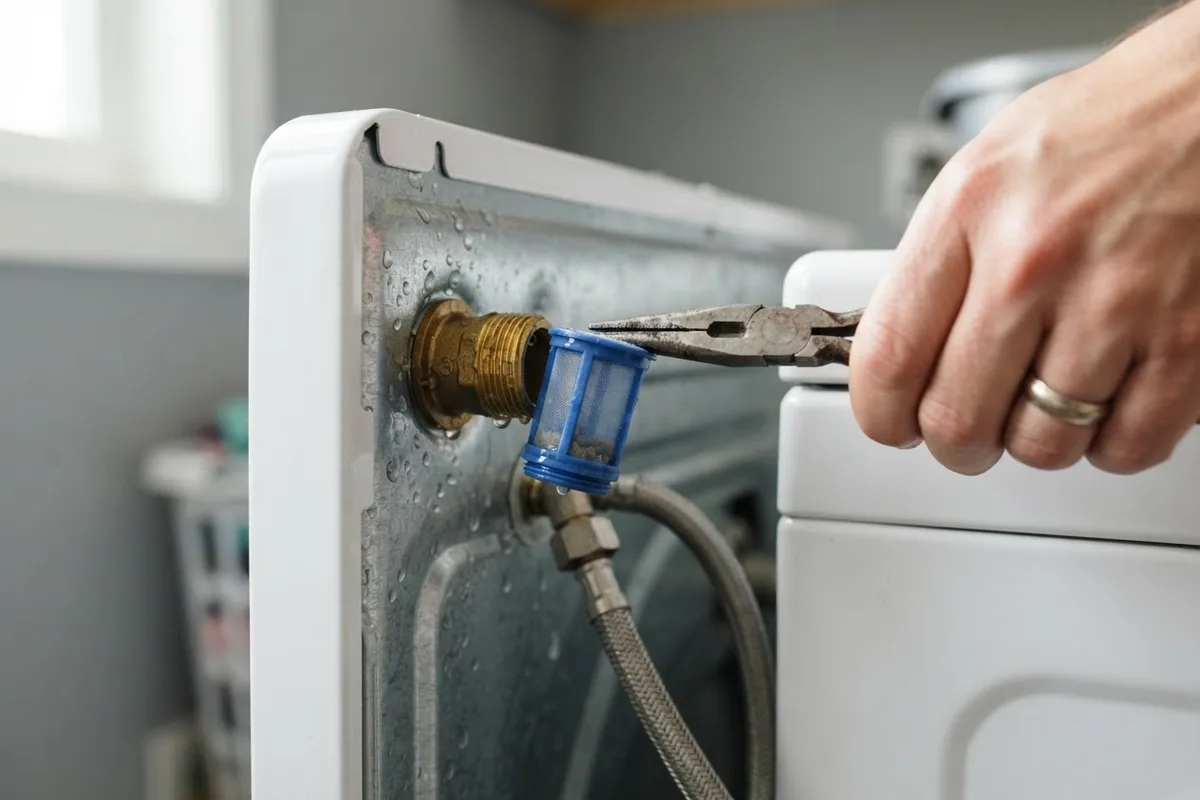
- Unscrew the hot and cold water supply hoses using slip-joint pliers, turning counterclockwise.
- Inspect the small plastic mesh filters nestled inside the threaded valve ports on the machine.
- Pry the screens out gently with needle-nose pliers and rinse them under running tap water, scrubbing built-up mineral grit with an old toothbrush.
- Press the clean screens back into place, reattach hoses firmly, turn the water valves back on, and inspect for drips.
Inspect and Flush the Pressure Switch Air Tube
Washing machines track water depth through an air pressure system. A narrow, flexible vinyl tube connects the bottom of the outer wash tub to an electronic pressure transducer or electromechanical water-level switch located beneath the top console. As water fills the drum, air inside the tube compresses. If lint, dried soap scum, or mineral sludge plugs this tube, the switch misreads water volume and halts filling early.
- Disconnect machine power and pull the washer away from the wall.
- Remove the top console or rear access panel screws using a nut driver to reveal the internal cabinet.
- Locate the thin translucent tube running from the side of the plastic outer tub up to the round switch mounted on the frame.
- Inspect the entire length of the tube for kinks, cracks, burn marks, or trapped condensation.
- Detach the lower end of the tube from the air bell on the tub and blow firmly through the tube toward the switch to clear obstructions.
- Reattach the hose securely, making sure both ends form an airtight friction fit.
Test the Water Level Pressure Switch
If the air tube is clear and intact, the switch itself may have failed. Mechanical pressure switches contain internal contacts that close when air pressure hits a calibrated threshold. Electronic transducers transmit variable frequency signals to the main logic board. A stuck diaphragm or faulty circuit will signal the computer that the tub is full when it holds only an inch of water.
- Unplug the washer and locate the pressure switch inside the console or upper cabinet.
- Disconnect the wire harness from the switch terminals by depressing the locking tab.
- Set a digital multimeter to measure resistance (lowest ohms scale).
- Touch the meter probes to the switch terminals corresponding to the empty state according to your machine's wiring schematic.
- The meter should display near zero ohms of continuity when the tub is empty.
- If the switch reads open (infinite resistance) with no water in the drum, the internal contacts are seized, requiring an exact model replacement.
Replacing a faulty pressure switch typically costs between $25 and $60 for the DIY component, whereas professional diagnostics and replacement run between $130 and $240 depending on your regional labor rates.
| Issue | Primary Symptom | Diagnostic Check | DIY Fix |
|---|---|---|---|
| Clogged Inlet Screens | Slow trickle of water, long fill times | Visual check of inlet valve ports | Soak screens in warm vinegar and brush clean |
| Blocked Air Dome Tube | Premature fill shutoff, intermittent error codes | Detach tube and inspect for soap plug | Blow through tube or flush with warm water |
| Siphoning Drain Hose | Water fills and drains simultaneously | Inspect standpipe insertion depth | Install siphon break; limit hose depth to 4-6 inches |
| Failed Pressure Switch | Washer skips fill or halts with water level error | Multimeter continuity test on switch terminals | Replace pressure switch assembly |
| Miscalibrated Control | Fill levels uneven across identical loads | Observe cycle resets or run calibration code | Execute board reset or factory recalibration |
Check Drain Hose Height to Stop Siphoning
A washer can appear to suffer from low water levels when it is actually losing water as fast as it enters. If your drain hose is inserted too far down the household standpipe, or if the standpipe sits below the machine's internal water line, a natural siphoning action draws water out of the tub during the fill cycle.
- Inspect where the corrugated drain hose enters the wall standpipe or laundry tub.
- Ensure the hose extends no more than four to six inches into the pipe. Pushing the hose all the way down creates an airtight seal that triggers continuous suction.
- Confirm that the top of the standpipe stands at least 34 to 39 inches off the floor (refer to your owner's manual for specific elevation guidelines).
- Secure the drain hose with a zip tie to the standpipe bracket, leaving an open air gap around the hose collar rather than taping it airtight.
Eliminating this siphon effect ensures water stays inside the wash tub until the drain pump actively discharges it.
Run a Recalibration Cycle on the Control Board
Microprocessor-controlled washing machines rely on calibrated software baselines to calculate drum weight and fill levels. Power surges, off-balance loads, or component changes can corrupt these calibration tables, causing the computer to miscalculate how much water is needed to saturate the clothes. Resetting the control module often restores factory-correct water fills.
- Clear all garments and standing water completely out of the wash basket.
- Close the washer lid or door securely.
- Turn the main cycle selector knob to the off position or press the Power button.
- Unplug the power cord from the wall outlet for ten full minutes to clear residual capacitor charge.
- Plug the washer back into the wall outlet.
- Execute the model-specific calibration sequence (for many modern top-loaders, this involves turning the selector dial through a sequence of detents or holding the Cycle Signal and Extra Rinse buttons for three seconds).
Allow the machine to run its full self-diagnostic test without touching buttons or opening the lid until the cycle finishes.
When to Call a Pro
Most causes of a washer water level that is too low—such as dirty sediment screens, kinked hoses, or mispositioned drain lines—are simple weekend projects. However, troubleshooting internal wiring harness faults, testing main computer control boards, or accessing complex tub assemblies carries electrical and water damage risks.
If you have tested the inlet valves and pressure switches and the machine still fails to fill, internal control board relays or drive motor sensors may have suffered electronic failure. If you are ever uncomfortable testing live wire terminals or suspect a deeper electrical malfunction, True Appliance Repair can match you with an independent local appliance pro to diagnose and repair your washer quickly. You can also consult our appliance noise guide or review our new home appliance checklist to spot other early mechanical issues.
FAQ
How high should the water level be in a modern top-load washer?
In high-efficiency top-load washers without a central agitator, water usually fills only a third to halfway up the clothing stack. The items slowly circulate through the concentrated water-detergent solution via the bottom wash plate rather than floating submerged.
Can hard water cause a washer to fill with less water?
Yes. Hard water carries dissolved minerals like calcium and magnesium that accumulate on the micro-fine mesh screens inside the water inlet valve. Over months of use, these mineral scale deposits constrict water flow, causing cycles to time out before the tub reaches its target level.
Why does my washer add water, pause, and then add more?
This is normal operation for auto-sensing washers. The machine adds an initial spray to saturate dry fabrics, pauses to let the fibers absorb the moisture, rotates the basket to calculate the total wet weight, and then adds the remaining water necessary for that specific load volume.
Can too much detergent trick the washer into using less water?
Excess suds from non-HE detergent or overdosing can coat the pressure sensor port with thick foam. The trapped air bubble behind the foam mimics high water pressure, signaling the control board that the drum has filled when it is actually empty or holding very little water.