
When heavy towels and jeans start taking two full cycles to dry, a clogged exhaust duct or coated lint screen is almost always to blame. Learning how to clean a dryer vent from the lint trap all the way to the exterior hood restores strong airflow, cuts your energy bills, and eliminates a major household fire hazard. Grab a vacuum, a screwdriver, and a flexible vent brush to clear out compacted lint in six simple DIY steps.
Safety First: Before moving your dryer or disconnecting any ductwork, always unplug the power cord from the wall outlet. If you own a gas dryer, turn the gas shutoff valve behind the machine to the closed (perpendicular) position and take extreme care never to stretch, kink, or strain the flexible gas supply line. If you smell gas or notice a damaged gas connector, stop immediately and call a professional.
1. Deep Clean the Lint Trap Screen with Dish Soap
Pulling the fuzz off the lint screen before every load isn't enough. Dryer sheets and liquid fabric softeners leave behind an invisible, waxy film that clogs the tiny mesh pores and chokes airflow—one of the sneakier causes when you are troubleshooting why a dryer is not heating or drying properly.
- Pull the lint screen straight out of the dryer slot and peel off any loose surface lint.
- Hold the screen under the kitchen faucet and trickle water onto the mesh; if water pools on top instead of rushing right through, the pores are coated in wax.
- Squirt a few drops of liquid dish soap onto both sides of the screen and scrub gently with a soft nylon brush or old toothbrush.
- Rinse thoroughly with hot water until water flows straight through the mesh without puddling.
- Let the screen air-dry completely on a towel before sliding it back into the dryer—never put a wet lint screen back into the housing.
2. Vacuum Inside the Lint Trap Cavity
Every time you pull the lint screen out, flakes of lint drop down into the narrow plastic chute below it. Over months of laundry, that debris packs tightly around the moisture sensor bars and near the blower wheel housing, trapping damp air inside the drum.
- Shine a flashlight down into the open lint trap slot to spot matted lint balls, stray dryer sheets, or lost bobby pins.
- Attach a long, flat crevice tool (or a flexible dryer lint vacuum attachment) to your vacuum hose.
- Slide the nozzle carefully down into the left, center, and right sides of the cavity to suction out loose fluff.
- If a dense mat of lint is stuck at the bottom, mist the tip of a long bottle brush slightly with water, reach down to twist and hook the lint ball, and pull it gently up to the opening.
- Wipe the two thin metal moisture sensor strips—usually located just inside the drum rim near the lint slot—with a cotton ball dipped in rubbing alcohol to remove fabric softener residue.
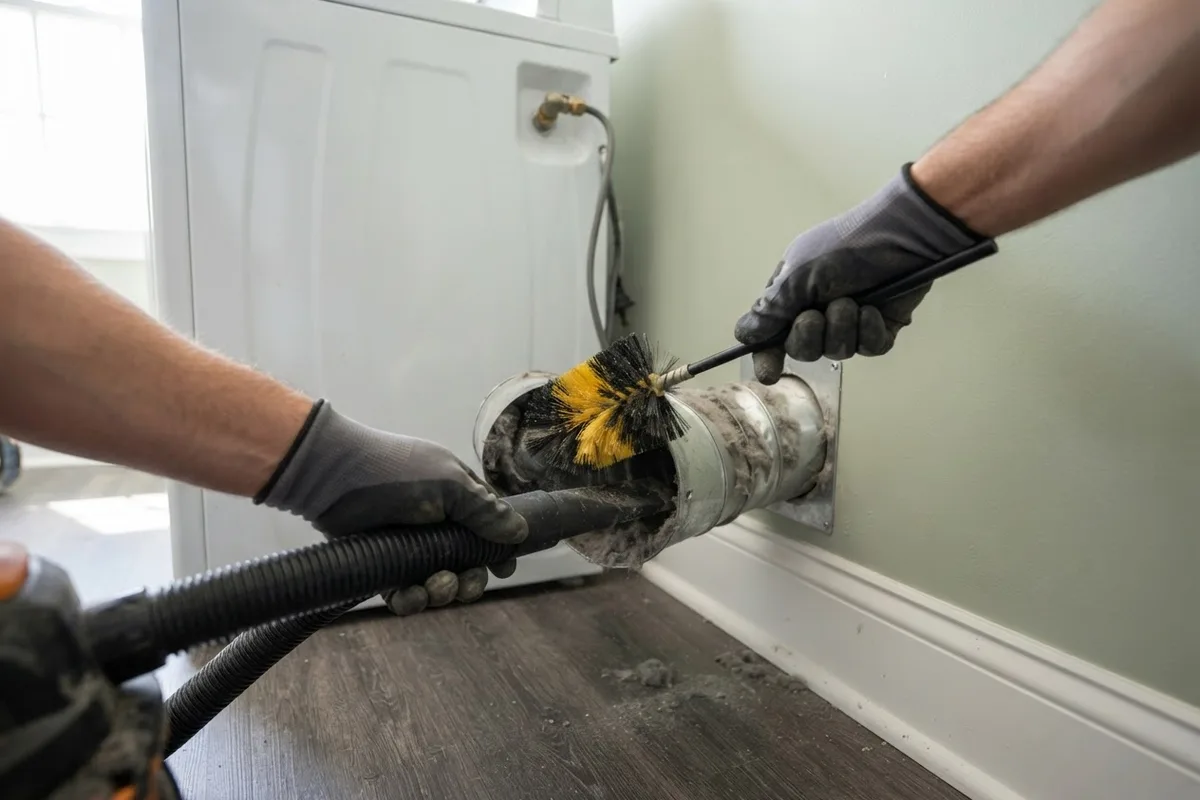
3. Disconnect the Rear Dryer Transition Duct
The four-inch transition hose connecting the back of your dryer to the wall exhaust outlet has to bend in tight quarters, making its low loops a prime collection spot for heavy, damp lint.
- Unplug the dryer (and shut off the gas valve on gas models), then walk the machine forward gently by 18 to 24 inches so you can safely reach behind it.
- Locate the four-inch metal duct clamped to the circular exhaust port at the bottom rear of the dryer cabinet.
- Use a flathead screwdriver or nut driver to loosen the metal worm-drive clamp—or peel back the foil tape—holding the duct to the dryer port and the wall outlet.
- Slide the transition duct carefully off both collars and carry it outside or set it on an old drop cloth.
- Inspect the hose material: if you have a flimsy white vinyl or thin shiny foil accordion hose, replace it immediately with a rigid or semi-rigid aluminum transition duct, which resists crushing and traps far less lint.
4. Brush and Vacuum the Interior Exhaust Duct
With the transition hose removed, you have direct access to both the short exhaust pipe exiting the dryer blower and the main metal ductwork running through your wall or floor to the outside of your home.
- Reach into the four-inch exhaust port on the back of the dryer with your vacuum hose and suction out any lint resting near the blower wheel. Do not jam hard tools into the blower blades, as cracking the plastic wheel will cause loud rattling.
- Thread the first flexible rod of a rotary dryer vent cleaning brush kit onto the four-inch round bristle head.
- Push the brush head into the wall exhaust duct opening and spin it clockwise (either by hand or on a low-speed cordless drill setting) so the threaded rods do not unscrew inside the wall.
- Work the brush forward two feet at a time, adding extension rods as needed, and pull it slowly back out to drag loose lint into a trash bag.
- Vacuum out the mouth of the wall duct thoroughly once the brush comes back clean.
5. Clear the Exterior Dryer Vent Hood and Flaps
Even a spotless interior duct won't vent moist air if the outside hood is crusted shut with wet lint, spiderwebs, or a bird's nest. Checking the outdoor vent takes five minutes and prevents moisture from backing up into the ductwork.
- Walk outside and locate your exterior dryer vent hood—usually mounted near the foundation wall, along the siding, or under a soffit.
- Lift the hinged plastic louvers or metal damper flap by hand to make sure they swing open freely without sticking.
- If a wire mesh bird cage or narrow screen is installed inside the hood, remove the screen; fine mesh catches wet lint like a second lint trap and quickly blocks the entire pipe.
- Feed your vent brush in from the outside for a few feet, rotating clockwise, to clear the final elbow before the hood.
- Wipe down the louvers with a damp rag so they drop completely shut when the dryer is off, keeping cold drafts and mice out of your laundry room.
6. Reconnect with Foil Tape and Test the Airflow
Putting the ductwork back together the right way keeps lint from snagging on fasteners inside the pipe. Much like clearing a kitchen line when a garbage disposal is not draining, smooth internal walls are essential to prevent future blockages.
- Slip the ends of your semi-rigid aluminum transition duct back onto the wall collar and the dryer exhaust port.
- Secure both ends tightly using four-inch metal worm-drive clamps or UL-listed rigid metal foil tape (never use standard cloth duct tape, which dries out and peels off under heat, and never drive sheet-metal screws into a dryer duct, as the protruding screw tips catch lint inside the pipe).
- Push the dryer carefully back toward the wall, leaving 4 to 6 inches of clearance so the transition duct forms a gentle, unkinked curve.
- Plug the dryer back in (or turn the gas valve back on), start a timed air-fluff or heated cycle, and walk outside to confirm a strong, steady blast of warm air is pushing the exterior vent flaps wide open.
Dryer Vent Maintenance & Warning Signs Guide
Use this quick-reference chart to track when each part of your venting system needs attention:
| Vent Component | Warning Sign of Buildup | Recommended Cleaning Frequency | Safe Tools to Use |
|---|---|---|---|
| Mesh Lint Screen | Water pools on mesh; clothes feel damp after one cycle | Scrape every load; wash with dish soap every 3 months | Soft nylon brush, warm water, liquid dish soap |
| Lint Trap Cavity | Visible fuzz below screen; musty smell in drum | Every 3 to 6 months | Vacuum crevice wand, long damp bottle brush |
| Rear Transition Duct | Top of dryer cabinet feels unusually hot to the touch | Once a year | Screwdriver, vacuum, semi-rigid aluminum duct |
| Main Wall Duct & Exterior Hood | 2+ cycles needed per load; outdoor flaps barely open | Once a year (every 6 months for large families or pets) | Flexible rotary vent brush kit, metal foil tape |
When to Call a Pro
Most single-story dryer vents that exit straight through an exterior laundry room wall are easy to clean in under an hour. However, if your dryer vents vertically up through the roof, runs more than 25 feet through a finished ceiling with multiple 90-degree elbows, or if a brush rod becomes disconnected inside the wall, it is safest to skip the ladder work. Likewise, if your vent is completely clear and airflow outside is strong, yet the drum still tumbles cold or shuts off early, an internal thermal fuse, heating element, or cycling thermostat may have failed—similar to how electrical issues require a careful eye when an electric oven is sparking.
When you need help diagnosing a heating failure or servicing hard-to-reach laundry components, True Appliance Repair can match you with a local appliance pro. Visit our washer and dryer repair page or connect with us through our contact page to schedule a visit.
FAQ
How often should you clean your dryer vent?
For an average household running four to six loads of laundry per week, you should disconnect and brush out the full dryer vent duct once a year. If you have a large family, wash heavy fleece and pet bedding frequently, or have a long duct run with several turns, cleaning the vent every six months will keep drying times short and protect your heating element.
Why is water pooling on my lint screen when I wash it?
Dryer sheets and liquid fabric softeners contain fatty waxes that melt in the heat of the dryer and coat the fine nylon mesh of your lint screen. Even when the screen looks completely free of fuzz, that clear film blocks up to half of the airflow until you scrub it off with hot water and grease-cutting dish soap.
Can I use a leaf blower to clean out my dryer vent?
A leaf blower can push loose, dry lint out of a very short, straight metal pipe that has no interior mesh screens, provided you disconnect the dryer first. However, if your ductwork is long, runs through an unheated crawlspace or attic where condensation makes lint sticky, or has loose joints, a leaf blower can pack wet lint into a solid plug or blow a hidden duct seam apart inside your wall. A rotary brush and vacuum is much safer and more thorough.
How much does professional dryer vent or dryer repair cost?
Professional dryer vent cleaning typically ranges from $100 to $225 depending on whether the vent exits near the ground or up on a steep roof, and varies by area. If a clogged vent has already caused the dryer's thermal fuse or heating element to burn out, professional washer and dryer repair generally runs between $140 and $350, varying by area and dryer model.