
When pet hair, kitchen grease, and household dust blanket your refrigerator's condenser coils, the cooling system cannot release heat into the room. That trapped heat forces the compressor to work overtime, warms up the fresh-food shelves, and quietly shortens the life of the most expensive appliance in your kitchen. Learning how to clean refrigerator coils takes about 20 minutes, requires only basic household tools, and is one of the smartest ways to keep your fridge running quietly and efficiently.
Before starting any work beneath or behind your appliance, unplug the refrigerator from the wall outlet (or switch off its dedicated circuit breaker at your main panel) and shut off the ice maker water valve if you plan to roll the cabinet away from the wall.
1. Unplug the Fridge and Gather Your Tools
Condenser coils sit right next to the compressor motor and cooling fan blades, so cutting power first prevents accidental shocks or spinning fan injuries while your hands are underneath the cabinet. Having a few simple cleaning tools within reach makes the job fast and mess-free.
- Open the refrigerator door and turn the thermostat control to the "Off" position if your model has a manual dial.
- Pull the power cord straight out of the wall outlet—never yank the cord itself—or flip the kitchen refrigerator breaker to "Off" if the plug is hidden behind heavy cabinetry.
- Grab a vacuum cleaner with a long hose and narrow crevice attachment.
- Pick up a flexible, long-handled refrigerator coil brush (available at any hardware store for under $10), a flashlight, a microfiber cloth, and a small bucket of warm soapy water.
2. Locate Your Refrigerator Condenser Coils
Depending on the age and style of your refrigerator, the condenser coils will be mounted in one of three places. Shining a flashlight underneath or behind the cabinet will quickly reveal which style you have so you don't waste time dismantling the wrong panel.
- Behind the front toe grille: On most modern French-door, side-by-side, and bottom-freezer models, the coils are tucked in a compact grid underneath the cabinet, accessible right through the front kickplate.
- Behind a lower rear access panel: Many newer units enclose the coils and fan at the bottom back of the fridge behind a thin cardboard or sheet-metal cover held on by quarter-inch hex screws.
- Exposed on the back wall: Older top-freezer and garage refrigerators often have a large black wire grid mounted directly across the exterior back of the cabinet.
- Once you spot the black or copper tubing loops, lay an old towel on the floor in front of the work area to catch falling dust bunnies.
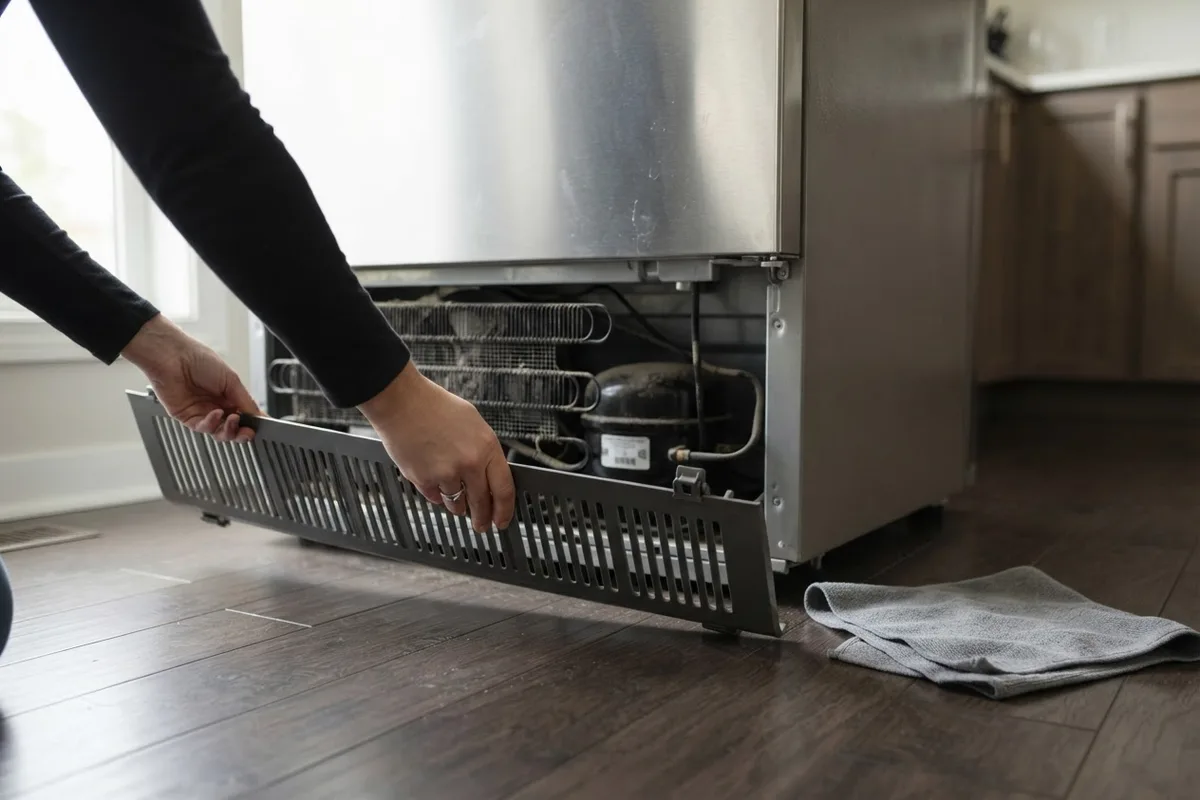
3. Remove the Front Kickplate or Back Panel
Opening up the coil compartment gives your brush and vacuum hose a straight path to the trapped debris. Take care not to force plastic clips, which can get brittle over time.
- For a front toe grille, crouch down and look for two recessed spring clips or Phillips screws along the top or bottom edge of the plastic vent.
- Unscrew the fasteners or press down firmly on the top edge while pulling the grille straight toward you with both hands until it snaps free.
- If your coils are accessed from the back, gently roll the refrigerator straight forward on its wheels—moving slowly so you do not kink a copper or braided water line, which could otherwise cause issues similar to why your refrigerator ice maker is not working.
- Use a nut driver or screwdriver to remove the screws holding the lower rear access panel, and set the panel and screws aside in a small bowl.
4. Brush Loose Pet Hair and Lint From the Coils
Vacuum suction alone won't pull off greasy kitchen dust that has baked onto warm metal tubing. A long, bendable bristle brush reaches deep between the tight rows of fins without bending or puncturing the delicate refrigerant lines.
- Shine your flashlight into the cavity to spot the thickest mats of lint and pet hair.
- Slide the flexible coil brush gently between and around the coils, working from the front toward the back in slow, steady strokes.
- Pull the brush back out and tap the collected fuzz onto your floor towel.
- Bend the wire core of the brush slightly to reach around corners or behind the front support bar, never forcing the brush if it snags on a wire or sensor.
- Keep brushing until you can clearly see the bare metal surface of the tubing and cooling fins.
5. Vacuum the Coils and Condenser Fan Area
Once the stubborn buildup is loosened, vacuuming clears it completely out of the compartment so the cooling fan doesn't blow the dust right back onto the freshly cleaned coils the moment you plug the fridge back in.
- Attach the narrow crevice tool to your vacuum hose and turn the vacuum on.
- Run the nozzle slowly across the front, top, and sides of the condenser coils to suck up every flake of loosened lint.
- Vacuum the floor pan directly underneath the refrigerator as far back as the crevice tool can reach.
- If you removed the rear access panel, carefully vacuum the dust off the condenser fan blades and the round black compressor housing, holding the fan blade steady with one finger so it doesn't spin wildly.
- Wipe down the plastic louvers of the detached toe grille or back cover in the sink with warm dish soap, dry it completely with a towel, and snap or screw it back into place.
6. Check Leveling and Airflow Before Restoring Power
Before pushing everything back against the wall, take two minutes to verify that air can circulate freely around the exterior cabinet. Pairing clean coils with good ventilation is one of the best appliance energy saving tips and DIY maintenance steps you can practice at home.
- Plug the power cord firmly back into the grounded outlet (or flip the breaker back on) and listen for the low, smooth hum of the compressor and condenser fan.
- Roll the refrigerator back into its alcove, leaving at least 1 to 2 inches of breathing room behind the cabinet and 1 inch above the top hinges so rising heat can escape.
- Verify that the water supply line behind the fridge forms a gentle loop without sharp bends or pinches.
- Check that the doors swing shut easily and that interior temperatures return to 37°F in the fridge and 0°F in the freezer—a simple check that also helps prevent issues like why your refrigerator crisper drawer is freezing food.
How Often Should You Clean Refrigerator Coils?
Use this quick schedule to decide how often your home's refrigerator coils need attention, along with typical US professional maintenance costs if you prefer not to move heavy appliances yourself.
| Household Environment | Recommended Cleaning Schedule | Why It Matters | Typical Pro Service Range* |
|---|---|---|---|
| Standard home (no pets) | Every 6 to 12 months | Clears normal household dust and cooking grease | $90 – $160 (tune-up visit) |
| Home with 1–2 shedding pets | Every 3 to 6 months | Pet hair mats quickly across the front intake grille | $90 – $160 |
| Multi-pet home or dusty garage fridge | Every 3 months | Heavy dander and garage sawdust choke airflow fast | $100 – $180 |
| Greasy buildup near stove/range | Every 4 to 6 months | Airborne cooking oil makes dust cling to metal fins | $100 – $180 |
Prices are broad US averages for a standalone maintenance visit and vary by region and built-in versus freestanding refrigerator design.
When to Call a Pro
Cleaning condenser coils is a straightforward DIY task for most freestanding refrigerators, but some situations call for professional tools and training. If you have a heavy built-in or counter-depth refrigerator with top-mounted commercial coils that require special leveling wrenches to pull out, or if you clean the coils thoroughly and the compressor still runs hot, clicks repeatedly, or fails to cool the interior, stop troubleshooting.
A seized condenser fan motor, a failing start relay, or a sealed-system refrigerant issue requires specialized diagnostic gauges. Never attempt to open sealed refrigerant tubing or bypass electrical relays on your own. Instead, book professional refrigerator repair to pinpoint the fault safely. True Appliance Repair can match you with an experienced local appliance pro who can inspect the cooling system and get your kitchen back on track.
FAQ
What happens if you never clean your refrigerator coils?
When condenser coils stay packed with dust and pet hair, the refrigerator cannot shed heat efficiently. The compressor runs nearly non-stop, your monthly electric bill climbs, the interior temperature fluctuates enough to spoil milk and produce faster, and the overheated compressor motor can fail years ahead of its normal lifespan.
Can I spray water or coil cleaner on refrigerator coils?
For standard household refrigerators, dry brushing and vacuuming is the safest and most effective method. Spraying water or foaming cleaners underneath a fridge creates muddy sludge on the floor pan and risks getting moisture inside the condenser fan motor, wiring harness, or start relay.
Where are the coils on a refrigerator if I don't see them on the back?
Almost all modern refrigerators hide the condenser coils underneath the bottom of the cabinet. You can reach them either by unsnapping the slotted plastic toe grille along the bottom front below the doors, or by unscrewing the thin access panel at the bottom rear of the refrigerator.
Why is the outside of my refrigerator still warm after cleaning the coils?
Many modern refrigerators route warm refrigerant tubing through the front door frame (called the mullion) and along the side walls to prevent moisture and condensation from forming around the rubber door seals. Feeling mild warmth along the sides or between the doors right after a cooling cycle is normal, provided the interior stays at 37°F.