
Opening your refrigerator to find snowy ice crystals clinging to shelves, walls, or leftovers is a frustrating discovery. Refrigerator frost buildup not only wastes precious storage space, but it also forces your appliance to work overtime, driving up monthly electric bills and threatening food safety. Fortunately, most frost problems stem from air leaks or minor airflow blockages that you can troubleshoot yourself in an afternoon.
Before taking any hands-on action, prioritize safety. Always unplug your refrigerator from the wall outlet and turn off any connected water lines before removing panels, inspecting electrical components, or cleaning internal mechanisms. Never use sharp metal knives or ice picks to scrape away frost, as puncturing a cooling evaporator coil causes permanent damage.
| Frost Location | Likely Cause | Primary Fix |
|---|---|---|
| Door Frame & Gaskets | Damaged rubber seal or warm air leaks | Clean or replace door gasket |
| Back Wall Near Vents | Blocked airflow or heavy food packing | Rearrange items away from vents |
| Freezer Coils & Floor | Clogged defrost drain tube | Flush drain line with warm water |
| Evaporator Coils (Solid Ice) | Failed defrost heater or thermostat | Test components with a multimeter |
1. Inspect and Clean Worn Door Gaskets
The flexible rubber gasket lining your refrigerator door creates an airtight seal that keeps warm, humid room air outside while trapping cool air inside. When this rubber strip becomes dirty, cracked, or misaligned, warm moisture leaks continuously into the cabinet, condensing into thick frost upon touching the frozen evaporator plates.
Inspect the entire perimeter of the gasket for tears, flattened spots, or food residue. Clean the rubber thoroughly using warm water, mild dish soap, and a soft microfiber cloth to remove sticky spills that prevent a tight closure.
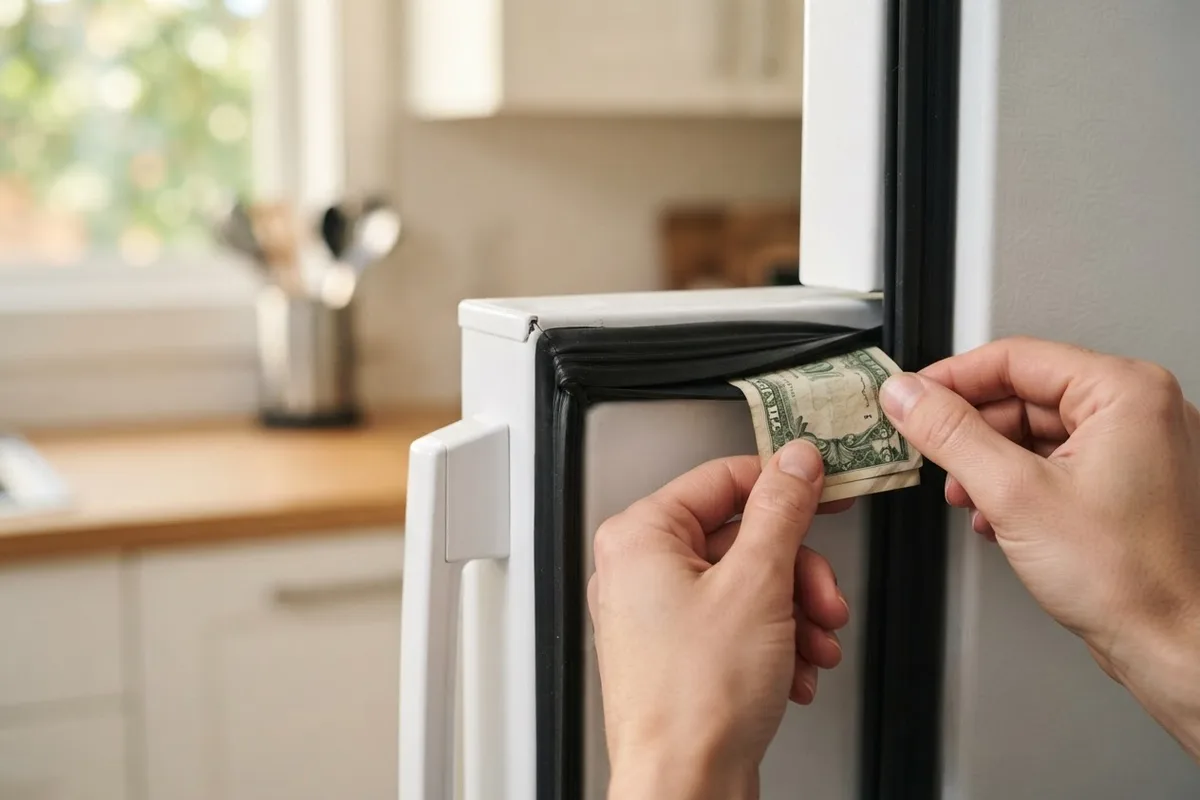
To test your seal strength, try the classic dollar bill test:
- Insert a crisp dollar bill or slip of paper halfway across the door seal.
- Close the refrigerator door completely.
- Pull gently on the bill. If it slides out with zero resistance, your seal is compromised and needs replacement.
If you notice minor warping, you can sometimes soften and reshape the vinyl using a handheld hairdryer on low heat before pressing it back into position. If frost continues forming along the door frame, installing a fresh manufacturer gasket is the best remedy.
2. Unblock Freezer and Refrigerator Air Vents
Modern frost-free refrigerators rely on constant air circulation between the freezer compartment and the fresh food section. Damp air is pulled across freezing coils, chilled, and recirculated through specific air vents. When boxes of frozen pizza or large bags of ice are stacked directly against these vent louvers, air becomes trapped, leading to localized frost accumulation.
Locate the air vent openings along the back and top walls of both compartments. Rearrange stored food so there is at least two inches of open space around every vent. Maintaining a balanced load—keeping the unit roughly three-quarters full without overcrowding—promotes steady air velocity and prevents moisture from settling into ice crystals.
If your unit has been severely frosted over, follow our guide on how to defrost a freezer fast to melt existing ice walls before resetting your food arrangement.
3. Calibrate Temperature and Humidity Controls
Setting your refrigerator temperature too low will not make food last longer; instead, it causes ambient air moisture to freeze instantly on interior surfaces. Conversely, setting temperatures too warm keeps the compressor running constantly, pulling in external moisture every time the door opens.
Check your thermostat dial or digital control panel to ensure correct operational settings:
- Set the fresh food section between 37°F and 40°F (3°C to 4°C).
- Set the freezer compartment between 0°F and 5°F (-18°C to -15°C).
 Place an appliance thermometer inside a glass of water on the center shelf for 24 hours to verify accurate temperatures. Additionally, check your crisper drawer humidity sliders. Excess moisture from unwashed vegetables can evaporate inside the unit, contributing to top-shelf frost. Keep high-humidity settings reserved for leafy greens and low-humidity settings for fruits that off-gas moisture.
4. Clear and Flush a Clogged Defrost Drain
During a standard automatic defrost cycle, ice melted off the evaporator coils drips down a narrow drain hole into a pan beneath the refrigerator, where it evaporates safely. When food crumbs, dust, or mold clog this small drain opening, water backs up into the bottom freezer compartment and freezes into a solid sheet of floor ice.
Unplug the appliance before clearing the drain line:
- Locate the drain hole, typically situated along the back wall at the floor of the freezer or behind the lower panel.
- Clear surface debris using a soft pipe cleaner or nylon brush.
- Mix warm tap water with a teaspoon of baking soda.
- Use a turkey baster to flush the solution down the drain hole until you hear water trickling smoothly into the drain pan below.
If water backs up immediately, an ice plug inside the drain tube may be the culprit. Carefully pour warm water into the hole until the ice plug melts completely. If you also notice puddles pooling underneath your vegetable drawers during this process, review our guide on why your refrigerator is leaking water for additional drainage solutions.
5. Clean Heavy Dust Off Condenser Coils
When dust, pet hair, and lint coat the exterior condenser coils located at the bottom or rear of your refrigerator, the system cannot dissipate heat efficiently. This forces the compressor to run longer cycles to keep temperatures down. Prolonged cooling cycles lower interior evaporator temperatures significantly, causing atmospheric moisture to freeze into thick, stubborn frost.
Unplug your unit and carefully pull it away from the wall:
- Remove the front bottom kick plate or access panel on the rear.
- Vacuum accumulated debris using a brush attachment.
- Use a long, flexible condenser coil brush to scrub between the metal fins gently.
- Vacuum the surrounding floor before reinstalling panels and restoring power.
Cleaning these coils every six to twelve months improves energy efficiency and forms a core part of any comprehensive seasonal appliance maintenance checklist.
6. Test the Defrost Heater and Thermostat
Frost-free refrigerators rely on a automated defrost system consisting of a defrost timer, defrost heater assembly, and a bi-metal defrost thermostat. Every few hours, the timer pauses the compressor and energizes the heating element to melt frost off the internal evaporator coils.
If the defrost heater or bi-metal thermostat fails, frost accumulates unchecked across the evaporator coils until air can no longer pass through. Symptoms include heavy frost lining the back interior wall alongside a freezer that remains cold while the fresh food section warms up.
To safely inspect these components:
- Unplug the refrigerator and disconnect power.
- Remove the freezer back panel to access the evaporator coil assembly.
- Visually inspect the bi-metal thermostat; if it appears swollen, cracked, or bulged, it has failed and requires replacement.
- Use a digital multimeter set to ohms (Ω) to test the defrost heater for electrical continuity. A reading of infinite resistance indicates an open circuit, meaning the heating element is burned out.
When to Call a Pro
While basic door seal care, drain flushes, and coil cleaning are simple DIY tasks, complex electrical troubleshooting or cooling system failures require professional evaluation. If your defrost components test fine but severe frost returns within days, the issue may involve a failing electronic control board or sealed system refrigerant leaks.
Always stop and call a professional if you detect electrical burning odors, notice oily residue around copper cooling lines, or hear abnormal clicking from the compressor assembly. For safety reasons, sealed refrigerant line repairs and high-voltage wiring should only be handled by trained specialists.
Typical repair costs for replacing defrost heaters or control boards range between $150 and $350, depending on your region and appliance model. When self-troubleshooting reaches its limit, True Appliance Repair can match you with a local appliance pro to diagnose and resolve tough cooling problems quickly.
FAQ
Why is frost accumulating on my food packages instead of the walls?
Frost on food containers usually occurs when warm air enters during long door openings, or when warm, uncovered leftovers are placed directly into the freezer. Moisture evaporates from the warm food and freezes instantly on cold package surfaces. Always allow hot food to reach room temperature and seal items tightly before storing.
Can a bad door seal cause my refrigerator to run continuously?
Yes. When a door seal fails, cool air leaks out while warm room moisture flows in continuously. The thermostat responds by signaling the compressor to run non-stop to maintain set temperatures, leading to heavy frost buildup, high energy bills, and accelerated appliance wear. Knowing the signs your refrigerator is dying helps you decide when to repair or replace a struggling unit.
How often should a frost-free refrigerator auto-defrost?
Most modern refrigerators run an automatic defrost cycle once every 8 to 24 hours, lasting roughly 20 to 30 minutes each time. During this period, you may hear mild sizzling or snapping sounds as ice drops onto the warm defrost heater, which is completely normal operation.
Why is frost building up only on the back wall of my fridge?
Frost concentrated exclusively on the back interior wall indicates blocked airflow vents or a failing defrost sensor directly behind that section. Ensure items are not pressed against the rear wall and clean your condenser coils to restore balanced temperature distribution throughout the cabinet.